
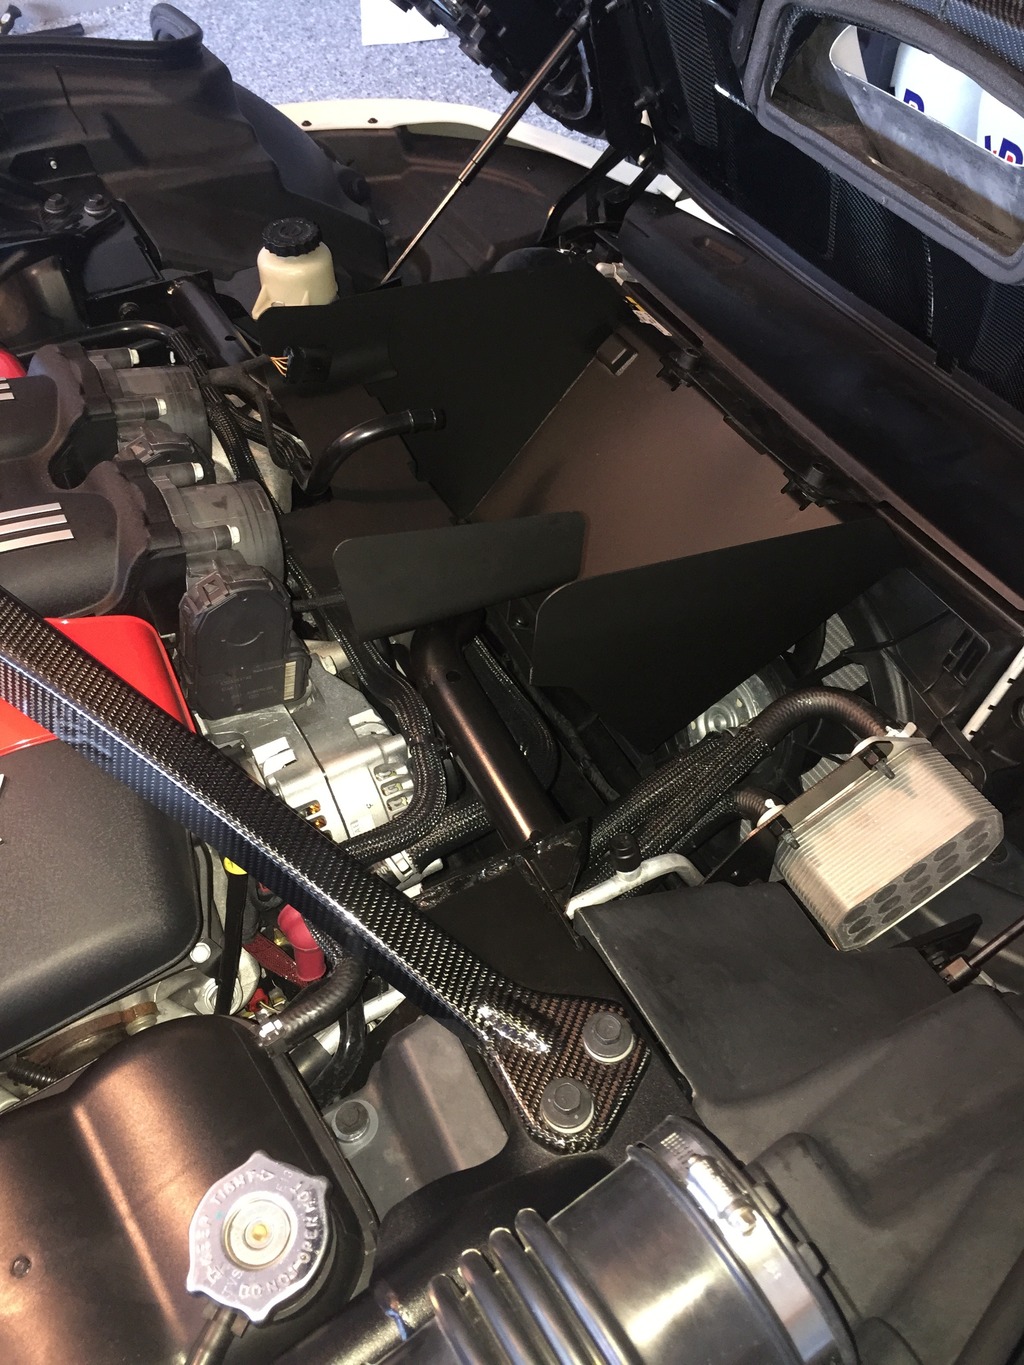
Not sure if it is my computer, however the pic appears too dark for me to see any details on the intake. Was hoping to see it installed as my shield is reportedly on-route.Originally Posted by Rapidrezults

Results 26 to 50 of 194
-
06-23-2015 #26Enthusiast


- Join Date
- Feb 2015
- Location
- GWN
- Posts
- 769
-
06-23-2015 #27Enthusiast
- Join Date
- Nov 2014
- Location
- Bay Area, CA
- Posts
- 1,053
More pics...


-
06-23-2015 #28Enthusiast
- Join Date
- Nov 2013
- Location
- CA
- Posts
- 1,106
Just ordered. Would adding insulation between the shield & air box provide an even lower temp?
Last edited by cashcorn; 06-23-2015 at 08:28 PM.
-
06-23-2015 #29Enthusiast
- Join Date
- Oct 2013
- Location
- Brownsburg, IN
- Posts
- 1,786
Thank you. Try it out and let us know, it would be an interesting experiment. The ceramic coating is double sided and fairly good at keeping the heat away. I suspect some/most of the remaining heat comes from soak over the top of the airbox / shield. Originally Posted by cashcorn
-
06-24-2015 #30Enthusiast
- Join Date
- Feb 2015
- Posts
- 61
I just received email from Doug regarding the Gen V DSE-VP-HS-001 heat shield, stating that (If you are a Gen V (2013+) owner, you will notice the anodized aluminum “DSE” thumb screws will be too short to use for your installation. If you are interested in the exchange, please reply to this email as soon as possible. When the screws are ready I will ship them to you at no cost and include a return label for the shorter screws to be returned in the same package)
But I'm happy to use the OEM screws while they work.
Thanks Doug for your quick respond regarding the screws issue for Gen V
-
06-24-2015 #31Enthusiast
- Join Date
- Nov 2014
- Location
- Bay Area, CA
- Posts
- 1,053
Honestly you can't even see the OEM screws with the way the Gen V hood opens. It would take a rubber neck act to even get a glimpse of them. As far as strength and rigidity goes, that's a different concern but the stockers seem to tighten down pretty good.
-
06-24-2015 #32Enthusiast
- Join Date
- Apr 2014
- Location
- North Texas
- Posts
- 405
Just got mine installed this evening. I had some difficulty reinstalling the center rubber grommet so I sent Doug an email to ask if he had any advice. I expected I'd get a response sometime tomorrow but just minutes after sending the message he replied with some tips! It turned out that I did not have the shield flush with the bracket; once I worked it all the way down it was much easier to install the grommet.
I posted this for two reasons; to give others a heads up about making sure the shield is flush before installing the grommet and to commend DSE on OUTSTANDING customer service.
-
06-25-2015 #33Enthusiast
- Join Date
- Nov 2014
- Location
- Bay Area, CA
- Posts
- 1,053
I had difficulties and then got a bright idea and used some gasket lube on the small end and it went right in. Assuming everything is flush of course. Originally Posted by genVer
-
06-25-2015 #34Enthusiast
- Join Date
- Apr 2015
- Location
- Silver Springs FL
- Posts
- 2,399
Nice
-
06-25-2015 #35Enthusiast
- Join Date
- Dec 2013
- Location
- 40 acres & a mule...
- Posts
- 796
Can't wait to get mine installed...

-
06-25-2015 #36Enthusiast
- Join Date
- Nov 2013
- Location
- CA
- Posts
- 1,106
^^^ I'm right behind you, mines in the mail. lol
-
06-25-2015 #37Enthusiast
- Join Date
- Oct 2014
- Posts
- 585
Just put mine on. Took maybe 30min while monkey around a little bit, super easy install. My IAT's are now averaging 5deg above ambient while moving at damn near any speed. Prior to the shield they would average between 10-14deg above ambient depending on speed. This thing definitely works.
-
06-25-2015 #38Enthusiast
- Join Date
- Oct 2013
- Location
- Brownsburg, IN
- Posts
- 1,786
If anyone who is considering this shield wants to spend their July with lower IATs please PM me, I have about 5 of these left. Have ordered more but they won't be ready until ~ August. Overwhelming response! Thank you!
This is definately a cheap and easy way to maximize power during the hot months at any ambient temperature. It takes minutes for anyone to install. I'm looking to possibly try to justify the IAT / power relationship on a dyno back to back by simply heating the air into the intake (unless someone beats me to it). This mod can be considered a bolt on power adder that anyone can install, could be a huge bang for the buck depending on how the car loses power with increased IAT.
-
06-25-2015 #39Enthusiast

- Join Date
- Oct 2013
- Location
- Montgomery Texas
- Posts
- 6,732
Installing my final version tonight and boxing up the earlier versions and getting them back to Doug. These really turned out great.
Originally Posted by SSGNRDZ_28
-
06-25-2015 #40Enthusiast
- Join Date
- Oct 2013
- Location
- Greenwood Village, CO
- Posts
- 3,797
I have two to install. This weekend is my plan.
-
06-26-2015 #41Enthusiast
- Join Date
- Jun 2014
- Location
- San Diego
- Posts
- 1,252
just installed mine, it's a great piece. i'll post results after a weekend of driving in the SoCal heat.
-
06-26-2015 #42Enthusiast
- Join Date
- Oct 2013
- Location
- Orlando
- Posts
- 2,541
Send me the front knobs, I'll send doug my production ones back Originally Posted by FLATOUT
-
06-27-2015 #43Enthusiast
- Join Date
- Oct 2013
- Location
- Brownsburg, IN
- Posts
- 1,786
Everyone make sure you have your rubber drain / valve piece installed on the bottom of your airbox. Just did some testing and it was 4 degrees hotter running and 10 degrees hotter at heat soak without that plug.
-
06-27-2015 #44Enthusiast
- Join Date
- Oct 2013
- Location
- CT
- Posts
- 2,733
Question: Is there supposed to be a hole a the bottom of the shield for the drain/rubber drain piece to fit through? I ask because I think the plastic drain tube on the bottom of my air box is hitting the shield causing the airbox to sit high and not allowing my hood to close. I was about to cut off the plastic pee-pee thing on the bottom of my airbox. Originally Posted by SSGNRDZ_28
There's no hole in my shield for the drain valve but can drill one easily. Just wondering. Thanks.
Last edited by ViperTony; 06-27-2015 at 12:38 PM.
-
06-27-2015 #45Enthusiast
- Join Date
- Oct 2013
- Location
- Brownsburg, IN
- Posts
- 1,786
There should be more than enough clearance (especially on a GenV because the airbox is spaced up about 0.5".) If the hood isn't closing there's another issue.
Are the front tabs of the shield on top of the radiator and spacer bit? (Note the picture on this thread actually shows incorrect installation because the shield tabs are sandwiched between the radiator flange and spacer)
Is the shield flush on the center cross brace mount where the rubber grommet is?
Should be no need for modifications of car or shield.
Thanks
Doug
Originally Posted by ViperTony
-
06-27-2015 #46Enthusiast
- Join Date
- Oct 2013
- Location
- CT
- Posts
- 2,733
Yes, tabs are on top of radiator and spacer. Shield is flush on the cross brace, rubber grommet fits in nicely. I'll spend a little more time on it today. I'll figure it out. Very nice work and well done on this BTW!!! Originally Posted by SSGNRDZ_28
-
06-27-2015 #47Enthusiast
- Join Date
- Oct 2013
- Location
- CT
- Posts
- 2,733
(after actually reading the directions
 ) I figured it out. I'm good. Took less than 30 minutes.
-
06-27-2015 #48Enthusiast
- Join Date
- Apr 2015
- Location
- Silver Springs FL
- Posts
- 2,399
I definitely want one. Wont be able to buy one for a few months though. Saving up for Suntek.
-
06-27-2015 #49Enthusiast
- Join Date
- Jun 2014
- Location
- San Diego
- Posts
- 1,252
What plug? Will you please post a picture. Originally Posted by SSGNRDZ_28
-
06-27-2015 #50Enthusiast
- Join Date
- Oct 2013
- Location
- CT
- Posts
- 2,733
My airbox didn't have a drain plug. I borrowed one off of my GenII airbox, fits perfectly. Originally Posted by KB Viper

 Reply With Quote
 Posting Permissions
All times are GMT -5. The time now is 02:10 AM.

Powered by vBulletin® Version 4.2.4 Beta 1
Copyright © 2025 vBulletin Solutions, Inc. All rights reserved. vBulletin Skin By: PurevB.com
Copyright © 2025 vBulletin Solutions, Inc. All rights reserved. vBulletin Skin By: PurevB.com
Shoutbox provided by
vBShout (Lite) -
vBulletin Mods & Addons Copyright © 2025 DragonByte Technologies Ltd. Runs best on HiVelocity Hosting.
Copyright © Viper Owners Association - All Rights Reserved
Bookmarks