Subscribing. I've been studying the NINEBALL build since he posted it. Always nice to see more input.
Results 26 to 50 of 76
Thread: Paxton G3 Build
-
01-21-2015 #26Enthusiast


- Join Date
- Oct 2013
- Location
- Tampa / Kuwait
- Posts
- 836
-
01-21-2015 #27Enthusiast


- Join Date
- Mar 2014
- Posts
- 269
Looking good...Paul....I've read before but didn't think much about it when the paxton was being installed but just got mine out of the shop after spinning and breaking both pins in the crank...Serious HP here in Houston covered all time and material to fix it and re drilled and put bigger pins in.....maybe it was a bad set?....Your going to love it!!!!....I'm doing 666 RWHP with 5 lbs of boost and engine work and my face hurts from smiling so much while driving it....Have Fun
-
01-21-2015 #28Enthusiast


- Join Date
- Oct 2013
- Location
- The True North Strong and Free Ontario, Canada
- Posts
- 1,635
-
01-22-2015 #29Enthusiast


- Join Date
- Feb 2014
- Posts
- 404
Thanks steve, i can't wait to get some pics of the ARH headers up, that will be next weeks project once i get caught up with fuel upgrades.
james430, i saw somewhere that gen 2 paxton pins where hollow i think? or maybe they didn't drill deep enough?, happy to hear you love the paxton i really can't wait till summer too see how the car reacts to all the mods.
-
01-22-2015 #30Enthusiast


- Join Date
- Feb 2014
- Posts
- 404
RSI Performance sent me Aero fuel regulator, mounted on firewall unbolted the wiper frame 3 bolts helped alot, next took driver rear inner fender out helped for two reasons, one was running the rsi plug and play harness to the battery and to the fuel hanger, also mounted the relays to the frame, second was running the -6 return and the -8 feed. The rsi fuel hanger upgraded the fuel pumps to AEM’s 320lph E85 compatible fuel pumps.
Last edited by PaulP; 06-05-2020 at 02:33 PM.
-
01-22-2015 #31Enthusiast


- Join Date
- Feb 2014
- Posts
- 404
To tired too fig out why pics are side ways ^^ sorry all cell phone pics too, anyways hers a pic of the fuel hanger and moving the float, also i was going to leave the stock fuel lines in and fuel filter but after running new lines decided to pull them was easy and made for more room for new setup.
-
01-22-2015 #32Enthusiast


- Join Date
- Mar 2014
- Posts
- 269
Didn't want to get to radical with the engine since I planned on putting the SC on....See my signature below,it Dyno at 520 Rwhp with engine work and the YouTube video below shows it doing the 666 rwhp with the Paxton,could bump it up to 8 or 9 lbs boost and get a lot more HP but I'm happy where it is....Need good forged internals before more boostLast edited by James430; 01-22-2015 at 11:46 AM.
-
01-22-2015 #33Enthusiast


- Join Date
- Oct 2013
- Location
- Greenwood Village, CO
- Posts
- 3,797
Here are a few tips I learned (sometimes the hard way) on my 06 Paxton.
1) Get the belt tensioner from Doug Levin, makes the belt tight and easier to remove.
2) Doug also glues the o-ring to the bypass valve because it tends to disappear after a while reducing seal.
3) Add a swinging oil pickup from a Gen 4. Without it you run the risk of oil starvation on hard turns.
4) Get a bigger intercooler than what comes with the kit.
5) Make sure the electronics box is zip tied to something under the dash, the velcro eventually gives up and the darn thing falls right in front of the gas pedal.
6) Keep air fuel to 12:1 or lower. Don't exceed or you may develop holes in the side of the block (don't ask me how I know).
7) I believe Dan Cragin told me that headers would lose power on a supercharged car because the reduced back pressure allows some of the charge to blow out on valve overlap.
8) If you are running the OEM PCM have Dan Cragin or someone tune it for your car. He can adjust fan on temps, fuel mixture, etc.
9) Use the NGK plugs that are a bit colder than stock, Dan used to sell them.
10) Use a different color antifreeze in the intercooler than what the radiator uses. This helps identify which one is leaking if they ever do.
11) Consider building up the bottom end.
12) Those electronic boxes from Paxton can fail and when they do weird stuff happens.
13) Use a vented cap on the intercooler tank that goes to an overflow tank. I made my own from a Paxton cap. When the intercooler fluid warms up enough on the track it can blow by the gasket of the stock cap.
14) If the plastic seal on the front of the blower pulley bolt is missing, Paxton will not honor your warranty. Mine never came with one and I didn't know it was missing until a warranty claim with Paxton.
15) Install a higher flowing intercooler pump than what comes with the kit. Dan Cragin used to sell these.
16) Wire idiot lights to auxiliary fuel pumps so you know when they come on and you know they are working. Lean conditions with a blower are bad news.
17) Install wide band O2s, boost, and fuel pressure gauge. PLX Devices had one that could be programmed to alert for certain conditions. For example mine alerted when the boost was >2.0 and air fuel was >12:1. Saved my ass once.
18) After install of the intercooler pump in front passenger side of fender (where horn is), horn sounds funny. Had to modify horn bracket to fix. Don't remember exactly why but it drove me and my Viper tech crazy for a while.
19) Carry spare belts for the blower, they are hard to find at an auto parts store.
20) Loctite bolts.
Think that's it.Last edited by ViperGeorge; 01-22-2015 at 11:46 PM.
-
01-22-2015 #34Enthusiast


- Join Date
- May 2014
- Posts
- 35
Loctite every bolt!!! I had 2 come out, one hit the fan and took out the radiator.
-
01-23-2015 #35Enthusiast


- Join Date
- Mar 2014
- Posts
- 269
-
01-23-2015 #36Enthusiast


- Join Date
- Oct 2013
- Location
- Greenwood Village, CO
- Posts
- 3,797
LOL, the great thing about this club is you learn from someone else's experiences. It really helps avoid a lot of trial and error. I loved that 06 and it was wicked fast with the Paxton. I only sold it when the Gen 4 ACR became available as aero is king on a road course.
-
01-31-2015 #37Enthusiast


- Join Date
- Feb 2014
- Posts
- 404
Installed the american racing headers, imo the best headers for a Gen 3, great quality and i knew i wanted long tubes 5 into 1, i went 1 3/4 x 3", the install i did over two nights after work, i got new factory gaskets to go with the ARH headers instead of the paper style ones, i also installed the old heat shield bolts it will go back on at the end of install. tools i used 1/4 drive, sockets 3/8's & 1/2'', swivels, extensions, stubby 3/8's wrench is the key here. Found the best price on these threw RSI performance.
Last edited by PaulP; 06-05-2020 at 02:33 PM.
-
02-08-2015 #38Enthusiast


- Join Date
- Feb 2014
- Posts
- 404
Well some more progress, RSI sent me another box of parts, fuel filter fragola -8, 60lb injectors, AEM wideband & boost gauge #30-4900, raptor shift light with dual mode launch and shift light, heres intake ready to go on, has a roe tb from last summer,
Last edited by PaulP; 06-05-2020 at 02:34 PM.
-
02-08-2015 #39Enthusiast


- Join Date
- Nov 2013
- Location
- Poughkeepsie NY
- Posts
- 40
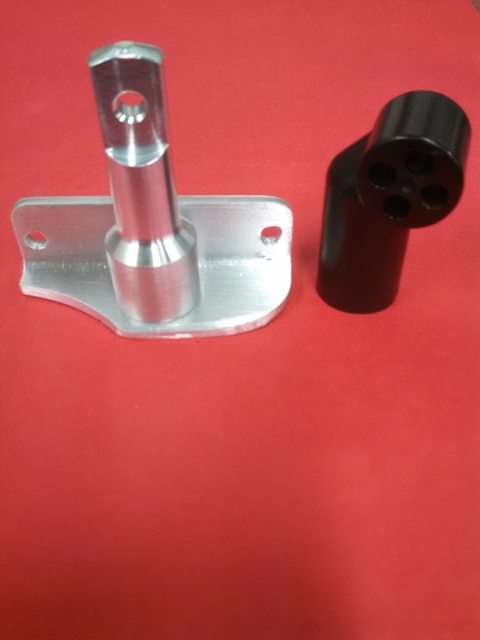
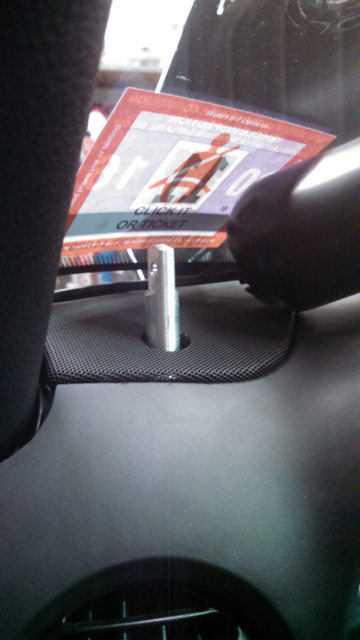
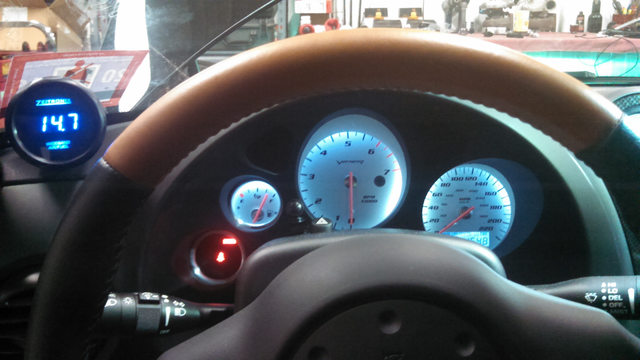
Hey Paul nice collection of parts! Keep them coming. Here are a few pictures of a wideband we did on a customers car that didn't want his tach blocked by the gauge. We machined a stand that mounted inside the drivers tweeter location. Prefect view while driving. The black plastic piece in the first picture is the mount Zeitonix supplied for mounting on the Apillar.
[IMG] [/IMG]


-
02-08-2015 #40Enthusiast


- Join Date
- Feb 2014
- Posts
- 404
Right on Gjon a great part! love seeing custom innovations like that for vipers,
-
02-08-2015 #41Enthusiast


- Join Date
- Feb 2014
- Posts
- 404
New thicker wires insulated, wire sheaths, high voltage screamin demon coil packs, installed.
Going back together , Painted the thermostat housing, before i painted the cross brace, cut off the factory intake tab and filled all holes from the vacuum lines, then painted for a cleaner look.
photo-30.jpgphoto-32.jpgLast edited by PaulP; 02-17-2015 at 02:47 AM.
-
02-18-2015 #42Enthusiast


- Join Date
- Feb 2014
- Posts
- 404
Fired it up last night, RSI custom tune for all my mods, here's a quick video of the custom turbosmart BOV, ARH headers with no cats and belanger mufflers,
Last edited by PaulP; 06-05-2020 at 02:35 PM.
-
02-18-2015 #43Enthusiast


- Join Date
- May 2014
- Posts
- 56
congrats on getting it running. should be a beast
-
02-18-2015 #44Enthusiast


- Join Date
- Nov 2013
- Location
- Houston, TX
- Posts
- 1,677
Love that BOV, sounds amazing.
-
02-19-2015 #45Enthusiast


- Join Date
- Sep 2014
- Location
- Allen TX
- Posts
- 306
jelly
-
02-19-2015 #46Enthusiast


- Join Date
- Oct 2013
- Location
- St Augustine
- Posts
- 831
OOHH Me likey!!!!
-
02-19-2015 #47Enthusiast


- Join Date
- Oct 2013
- Location
- Ontario,MCVO,PA,OH
- Posts
- 2,671
Nice work Paul ! Looks very thorough !

-
02-19-2015 #48Enthusiast


- Join Date
- Sep 2014
- Posts
- 145
That sounds sick, love it!
-
02-20-2015 #49Enthusiast


- Join Date
- Oct 2013
- Location
- Greenwood Village, CO
- Posts
- 3,797
What did you do about your downstream O2 sensors? If you have the Mopar controller, you don't need them. Plug the bung (plugs available at Lowes in hardware section). If you leave them in you will eventually melt the wires which then causes a short and which likely blows the 20amp ASD fuse. Result, car barely runs if at all. One guy, who is on this board somewhere, melted his wires on One Lap and threw something like 23 engine codes. Car didn't run. Everyone I know with American Racing headers has melted their rear O2 wires. I even had mine insulated with 1500 degreen DEI insulation. Didn't matter. Loved the headers but they melt wires. Trust me on this, I know what I'm talking about.
-
02-20-2015 #50Enthusiast


- Join Date
- Feb 2014
- Posts
- 404
My downstream o2's are turned off, i plugged the driver o2, the passenger has my wideband in it. i have the wide band wrapped in heat tape and installed this over it
https://www.deipowersports.com/produ...ng/fire-sleeveLast edited by PaulP; 02-21-2015 at 02:02 PM.


 Reply With Quote

Bookmarks