
Anyone have a spare drivers side door trim bezel. It is the gray piece that fits around the door handle. Must fit a 94. Found one on line but it's for a 96. Compared the two. The 96 is not the same. Thanks.
Results 1 to 25 of 28
Thread: Drivers side door trim bezel
-
10-31-2014 #1Enthusiast


- Join Date
- Sep 2014
- Posts
- 150
Drivers side door trim bezel
-
10-31-2014 #2Enthusiast
- Join Date
- Oct 2013
- Location
- SE PA
- Posts
- 357
This...
bezel.jpg
...or the part that is retained by screws?Last edited by Matt M, Pa; 10-31-2014 at 02:14 PM.
-
10-31-2014 #3Enthusiast
- Join Date
- Oct 2013
- Location
- Up The River..[Columbia River Gorge near Portland OR]
- Posts
- 3,726
Geez, Matt, vpa? A big supporter here?
Don't you listen to the OTHER MATT? MTGTS about vpa?
[PartsRack has that part.....NOS.]
-
10-31-2014 #4Enthusiast
- Join Date
- Oct 2013
- Location
- SE PA
- Posts
- 357
Sorry Jon....I did a quick "image" search....and that's what came up. Updated....
Last edited by Matt M, Pa; 10-31-2014 at 02:15 PM.
-
10-31-2014 #5Enthusiast
- Join Date
- Oct 2013
- Location
- Up The River..[Columbia River Gorge near Portland OR]
- Posts
- 3,726
What a guy....hero status
-
10-31-2014 #6Enthusiast
- Join Date
- Sep 2014
- Posts
- 150
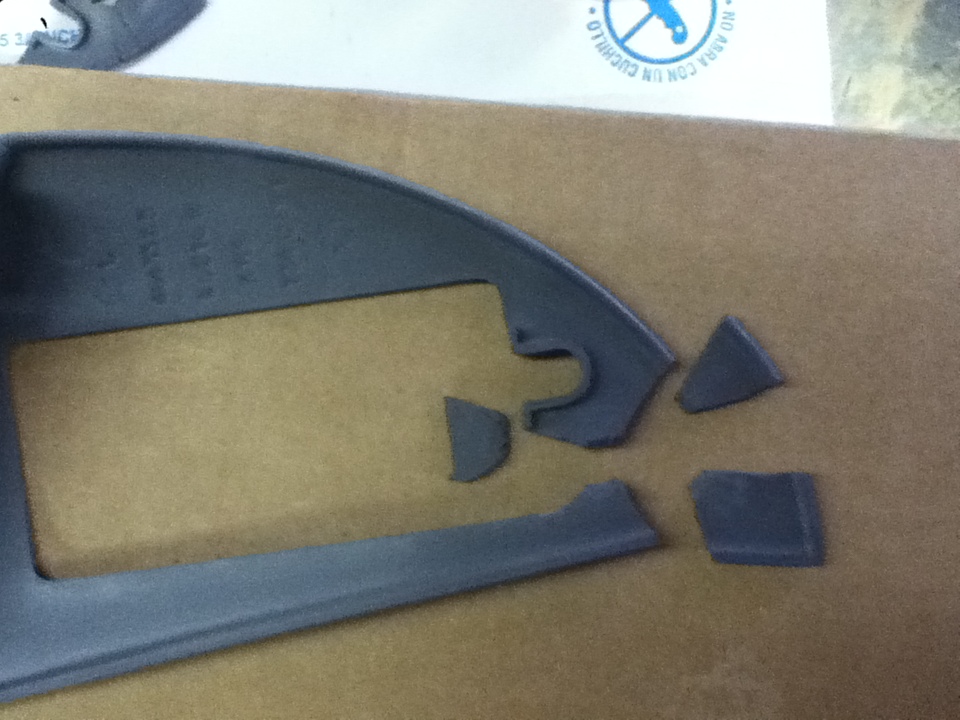
The part I need is the pie shaped gray bezel attached with two screws. I checked the parts rack site and they DO NOT have it for a Gen 1. I found one at VPOA but it is for a 96 to 98. It is not the same as I need for a 94. Looks close to it but it is off a little and I don't think it will match up. Maybe I can find someone with a 3d printer and try to have it made.
-
10-31-2014 #7Enthusiast
- Join Date
- Jun 2014
- Location
- Eastern MA
- Posts
- 427
Don,
Is yours broken beyond repair?
Tim
-
10-31-2014 #8Enthusiast
- Join Date
- Sep 2014
- Posts
- 150
It could possibly be repaired. The round edge is completely missing. I could possibly use PC7 epoxy and try to form it then sand it. I might have to go that route if I can't find a new or used one. My be a winter project for me. Thanks.
-
10-31-2014 #9Enthusiast
- Join Date
- Oct 2013
- Location
- SE PA
- Posts
- 357
I wonder if one of the used Viper parts folks may have one?
-
11-01-2014 #10Enthusiast
- Join Date
- Sep 2014
- Posts
- 150
Going check around and see if I can find one.
-
11-01-2014 #11Enthusiast
- Join Date
- Oct 2013
- Posts
- 472
I have to check. I may have a set, but they will be expensive. If you order from any Mopar parts dealer, they will send you the 96 version that doesn't fit. The correct original number defaults to the 96up piece. The reason is the door panels were changed in 97 for conv, and 96 for coupe due to roll up windows. They both take a different door panel than the 95-96 Rt10.
Last edited by Granger73; 11-01-2014 at 03:49 PM.
-
11-01-2014 #12Enthusiast
- Join Date
- Nov 2013
- Location
- Chandler, AZ
- Posts
- 2,463
Jon does not have the staff needed to list every piece that he has in stock at all times. Email him for your needs. Sometimes he has to go look in that box of stuff in the back corner, LOL. Originally Posted by Don12

-
11-01-2014 #13Enthusiast
- Join Date
- Aug 2014
- Location
- Wappingers Falls, NY
- Posts
- 276
I have one from my old 94 and held it up to my "new" 98. Where does it not fit?
I have left and right gray interior door skins with pie pieces (not the slide-on door handle surround) but would rather sell all together.
-
11-01-2014 #14Enthusiast
- Join Date
- Jun 2014
- Location
- Eastern MA
- Posts
- 427
Don, here is what one of mine was like.
Then I taped the outside.

used legos and acetone. (Thanks to BugmanJeff)
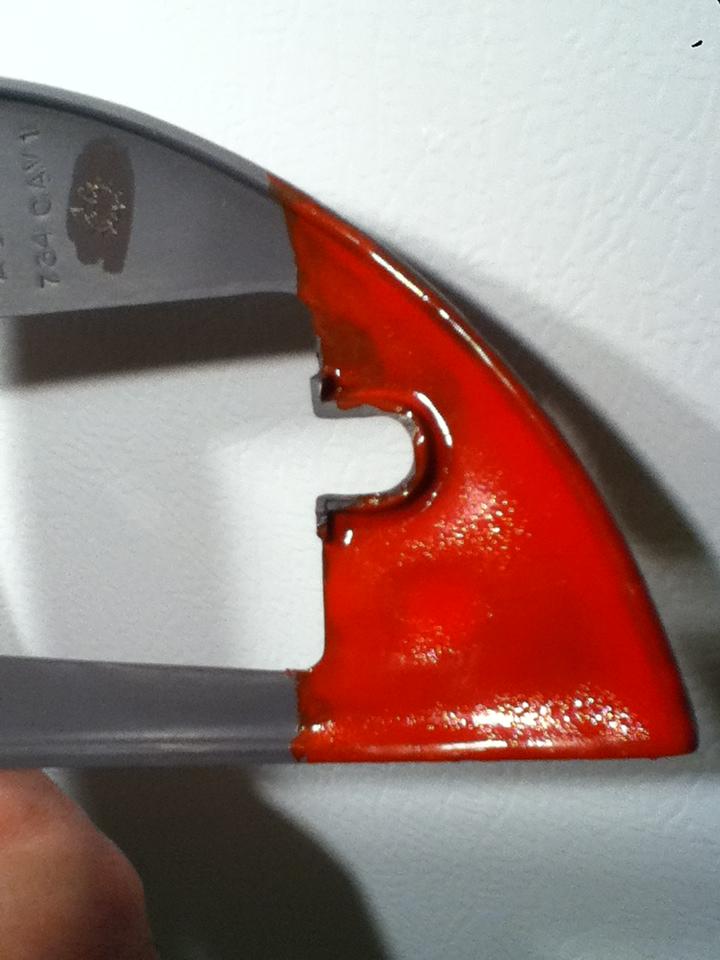
Here's what it'll look like minus paint.
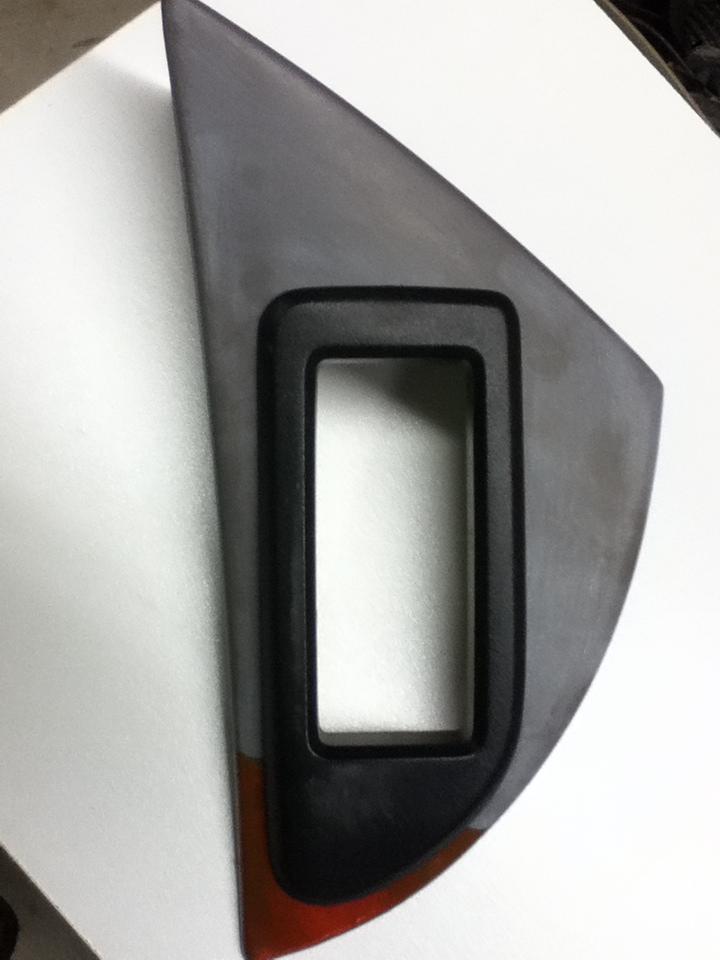
I had to fix both sides. I had previously stripped the stock finish. Also, the last photo you see the red where the tape was, I used a paintbrush on that side. Not sure it needs to be sanded before painting it. At least not for me.Last edited by smhog; 11-01-2014 at 10:09 PM.
-
11-02-2014 #15Enthusiast
- Join Date
- Sep 2014
- Posts
- 150
Looks really good. Unfortunately I don't have the piece that broke off. I will have to mold it somehow. It is the same area as yours. Should'nt be to hard, just time consuming and a hell of a lot of sanding. Do you just take some lego blocks and pour acetone on them and mix until right consistency? Also would like to know what year Viper you have. Thanks for all of your replies to my problems, guys like you is exactly why I love this site. Don
-
11-02-2014 #16Enthusiast
- Join Date
- Nov 2013
- Location
- Chandler, AZ
- Posts
- 2,463
Nice trick. I just looked it up. Of course, you could get some ABS glue at Home Depot if you don't have the ingredients for this. Originally Posted by Don12
-
11-02-2014 #17Enthusiast
- Join Date
- Oct 2013
- Location
- SE PA
- Posts
- 357
Perhaps of little help, but I'm working with a 3Msemi rigid plastic product made for Xenoy...which is what the Gen 1 stanchion close-outs are made of. As you all know, these crack easily. I was fortunate enough to put one of each side away..but wanted to do what I could to prevent the ones on the car from breaking/cracking.
I used the 3M semi rigid product and some screen to reinforce the back sides and bolt holes. In fact, I just did them this AM. I did a sample piece last week and the difference was amazing.
Maybe this product would be helpful on these door bezels?
Downsides? It's expensive and requires an equally expensive adhesion promoter...it also only has 3 minute work time.
-
11-02-2014 #18Enthusiast
- Join Date
- Sep 2014
- Posts
- 150
Thanks for posting the video. Looks simple enough. I think this might actually solve m problem. I will take some clay and make a mold for the end piece. Should work OK. I don't think the acetone would have any effect on the clay. I'll try it and see. Thanks. Don
-
11-02-2014 #19Enthusiast
- Join Date
- Sep 2014
- Posts
- 150
Anyone know the part number of the screws that attach the plate to the door.
-
11-02-2014 #20Enthusiast
- Join Date
- Oct 2013
- Location
- Near PIttsburgh, PA
- Posts
- 353
Just call Jon B.
-
11-02-2014 #21Moderator

- Join Date
- Oct 2013
- Location
- ALL OVER
- Posts
- 3,011
one of y'all needs to do a HOW TO on this.
THE IGNORE FEATURE WORKS, TRY IT...
-
11-02-2014 #22Enthusiast
- Join Date
- Jun 2014
- Location
- Eastern MA
- Posts
- 427
I have a 94 as well, Don. I'm thrilled I can help a fellow member the way others have helped me. Originally Posted by Don12
I read Bugman Jeff's thread on his Banged Up GTS and kinda winged it.
A large glass bowl
Lego knockoffs, no black blocks is why mine piece is red.
Acetone, from one of the chain auto stores.
I started with a 1 to 1 ratio or there abouts. First time I did it I only waited 15 or 20 mins before trying it on a dash part.
Second time was about 30 mins. I notice after I was done the acetone/lego mix was a better consistency to work with and that was approx 90 mins or so. Next time I'll wait at least 90 mins to start.
I had the painters tape laying around and it's worked well so far.
-
11-02-2014 #23Enthusiast
- Join Date
- Jun 2014
- Location
- Eastern MA
- Posts
- 427
3 minute work time?! Wow, that is too quick for me. You really need to bring your A game with that stuff Originally Posted by Matt M, Pa

-
11-02-2014 #24VOA Member
since 2013
Colorado/Montana/Utah/Wyoming
- Join Date
- Oct 2013
- Location
- Fort Collins, CO
- Posts
- 155
You need to get some Plast Aid. I have used it to repair or make parts for my cars. It uses a resin powder and a liquid, mix them into a putty and form into the shape you need.
http://www.plast-aid.comDan St John
2006 Blue Coupe / Silver Stripes.
-
11-02-2014 #25Enthusiast
- Join Date
- Jun 2014
- Location
- Eastern MA
- Posts
- 427
Dan, thanks for the link. Plast Aid seems legit, probably as good as the 3M product mentioned earlier. Originally Posted by Bluecoupe
I have a number of the plastic blocks sitting in a box, really enjoy DIY projects, and like the challenge of doing new things.
Tim

 Reply With Quote


Bookmarks