
Upgrading the lights on the interior of a Gen III/IV cars is very rewarding. Its cheap (<$70 shipped from SuperBrightLEDs), easy, and the results are so nice on something that you see every time you drive the car. When I sought to do the LED interior upgrade the information needed was scarce and I had to piece it together... So to help anyone who wants to do this in the future I figured this would be a great place to combine the information. This isn't meant to be a polished how-to, but instead just an aggregate of information.
The parts needed and the colors I chose:
10 instrument panel general bulbs, white, T1.5 type
3 HVAC bulbs, white, NE05 (5mm)
1 key ring bulb, red, NE04 (4mm)
6 Misc bulbs, white (footwells, the lights in the rear-view mirror, and the license plate at the exterior of the car), white, 194 type, 5 SMD LED
I was able to complete this with basic hand tools (allen wrenches, screw drivers, and pliers) in probably 6 total hours of work time, including the painting I did while everything was apart and goofing around testing the components to make sure the LEDs had the correct polarity. The led's need to be installed correctly, if they don't light up you need to remove them, rotate them 180 degrees, and re-install. It is not too tough of a job but its not for those who aren't confident working on interiors.
Huge politically-correct disclaimer: I did not disconnect the battery but it is irresponsible not to when working on your vehicle, especially electronics! First step should be to disconnect the battery or else you risk damage to the car, yourself, and possibly others.
This is the general procedure I followed:
Change footwell bulbs (this was so easy, not a single thing needs to be removed for access)
Remove the covers on the bulbs on the rear-view mirror (also very easy, they pry out)
You now have access to the rear view mirror bulbs, though they are held in strongly!
Remove ring around shifter
Remove shifter bezel (I actually left mine attached to the ebrake through the boot, was able to work around it)
Remove radio bezel (don't forget the hidden screw at the bottom middle)
Remove HVAC module from radio bezel (easier to test polarity of the LEDs)
You now have access to the HVAC bulbs.
Remove knee panel under steering wheel (two screws and some prying)
Drop the steering column by removing the two nuts that hold on the rearward most section
Remove the two screws holding the two pieces of the collar together (the plastic immediately behind the steering wheel, where the hazards switch is)
Remove the two pieces of the collar carefully
You now have access to the key ring bulb.
Remove (deep breath) the entire dash! This was actually pretty easy: remove the three screws that the knee panel was concealing and then it just pries off. Be careful around the radio/shifter area - you'll see that it is kind of difficult.
Remove the 4 gage cluster
You now have access to the 4 bulbs in the 4 gage cluster
Remove the 3 gage main cluster
You now have access to the 6 bulbs in the 3 gage main cluster
Remove old bulbs and install LEDs
Test all components for polarity of the LEDs. 50% chance on each one and I averaged worse than 50% on first try, go figure!
The re-assembly is exactly reversed from assembly, and almost easier!
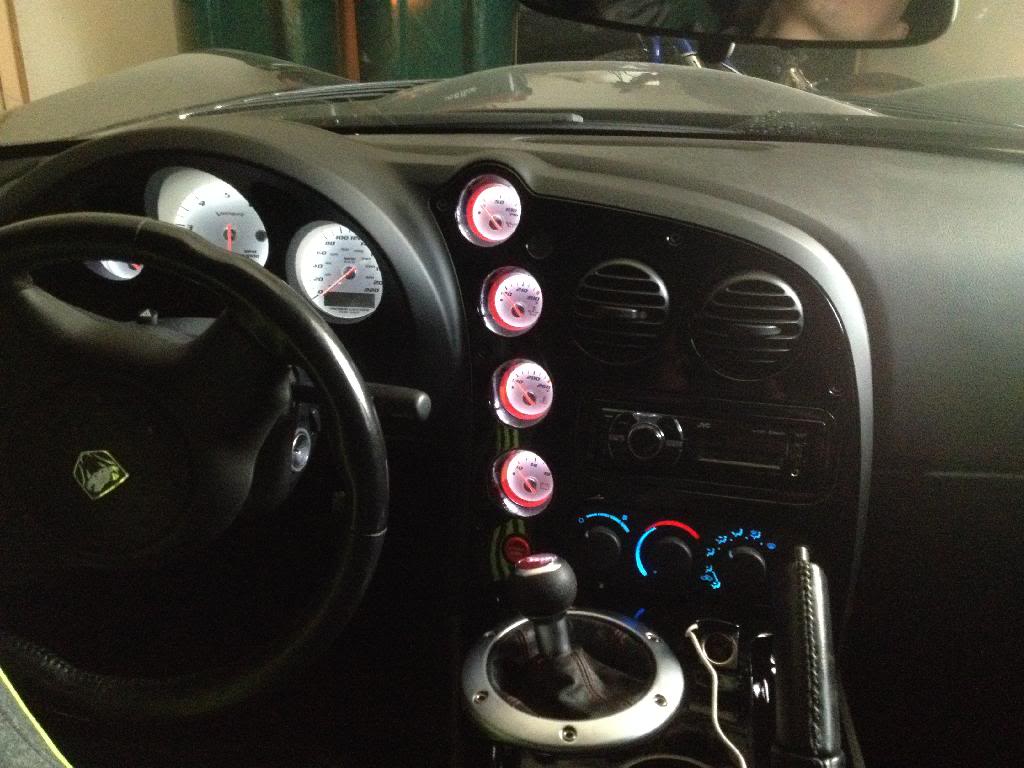
The end result
Notice the HVAC has a little blue to it, even though I used white bulbs. The film that allows light through in the correct places has a blue tint to it.
And here is another shot with the key ring all lit up.
As you might have noticed, I took the time to also paint the 4 gage cluster bezel piece to kind-of mimic the Final Edition 2010 Vipers. I used Rustoleum that was compatible with Plastic. I didn't even scuff these for paint adhesion, since the paint should bond chemically. Just two thick coats.
The interior looks so much nicer now. The yellowish glow of the stock bulbs made it feel dated and not as nice like these LEDs!
Results 1 to 25 of 245
Thread: Gen III/IV Interior LED upgrade
-
04-13-2014 #1Enthusiast


- Join Date
- Nov 2013
- Location
- Sturtevant, Wisconsin
- Posts
- 579
Gen III/IV Interior LED upgrade
Last edited by The_Greg; 03-25-2015 at 02:23 PM.
-
04-13-2014 #2Enthusiast
- Join Date
- Oct 2013
- Posts
- 3,494
One of my favorite upgrades to my car was LEDs inside.


-
04-13-2014 #3Enthusiast
- Join Date
- Oct 2013
- Location
- St Augustine
- Posts
- 831
Nice, that's next on my mod list!!
-
04-13-2014 #4Enthusiast
- Join Date
- Nov 2013
- Location
- Friendswood TX
- Posts
- 412
Very Nice, thanks for posting. It's amazing how much a few things really freshen up the interior. Definitely on the list of mods!
-
04-13-2014 #5Enthusiast
- Join Date
- Oct 2013
- Posts
- 93
I will need to do this!
-
04-13-2014 #6Enthusiast
- Join Date
- Oct 2013
- Posts
- 93
Where did you get your metal center console pieces? Originally Posted by ACRucrazy

-
04-13-2014 #7Enthusiast
- Join Date
- Oct 2013
- Posts
- 3,494
-
04-13-2014 #8Enthusiast
- Join Date
- Oct 2013
- Posts
- 873
IMG_4260.jpgNice write up. Its a very easy install and well worth it in the end.. The blue is our old 06 coupe. Now I need to do the SSG ACR.....
-
04-13-2014 #9Enthusiast
- Join Date
- Nov 2013
- Location
- Sturtevant, Wisconsin
- Posts
- 579
ACRucracy, thanks for the pictures. I didn't have time to vacuum so I didn't take any footwell shots - yours show it off well. And I was on the fence about the MGW shift ring, but after seeing these it looks like I'll be ordering one!
-
04-14-2014 #10Enthusiast
- Join Date
- Nov 2013
- Location
- CT
- Posts
- 818
I like the red guage surround. That is a nice touch. Looks fantastic.
-
04-14-2014 #11Enthusiast
- Join Date
- Nov 2013
- Posts
- 461
great write up where did your bulbs?
-
04-14-2014 #12Enthusiast
- Join Date
- Nov 2013
- Location
- Houston, TX
- Posts
- 1,677
Great write-up, I've been wanting to do my gauge cluster and gauge pod for a while, just been lazy about it. I've already done all the interior ones at its a big improvement.
-
04-14-2014 #13Enthusiast
- Join Date
- Oct 2013
- Posts
- 303
Thanks for all the links, on the brake lights if anyone wants to do a 3flash brakelight you can used these led plug and play. http://www.superbrightleds.com/cat/t...Color,0,3,104:
-
04-14-2014 #14Enthusiast
- Join Date
- Nov 2013
- Location
- State College, PA
- Posts
- 198
Did my SSG in all green bulbs... Well not any of the gauge or dash lights yet. But I'll try and get a picture up soon of it at night. Originally Posted by Torquemonster06
Btw this is an awesome thread... Haven't had the guts to tear apart my interior to figure out how hard it was to replace all the other lights ... Your directions made it easy my friend! I just placed an order for the bulbs I haven't replaced yet
Last edited by DreadLox; 04-15-2014 at 08:15 AM.
-
04-15-2014 #15Enthusiast
- Join Date
- Nov 2013
- Location
- Sturtevant, Wisconsin
- Posts
- 579
Yes, you can change all of the outside blinking bulbs to LED's also, to get that very fast binary blink, instead of the incandescent glowing/pulsing blink. Its about $500 for EVERYTHING that blinks on the outside using V3 LEDs from VLEDs.com, which is a little steep, but they are all plug-and-play components. Information on these can be found on 'other' Viper forums... I would do a write up but not willing to fork over the money just yet. Originally Posted by cubican
Glad to be of help, excited to see the green bulbs! I am thinking about purchasing some red bulbs for the footwells, and leaving the rest white as I currently have them. Originally Posted by DreadLox
-
04-15-2014 #16Enthusiast
- Join Date
- Nov 2013
- Location
- Friendswood TX
- Posts
- 412
^This .. Threads like this make me think I can do this also (almost), still a chicken shit when it comes to pulling her apart. The red around the gauge bezels sure would look good in our red vert, I might need to gather the nerves somehow Originally Posted by DreadLox

Here's a photo I found of a local members SSG dash, looks good.
[IMG] [/IMG]
-
04-15-2014 #17Enthusiast
- Join Date
- Nov 2013
- Location
- State College, PA
- Posts
- 198
YES! Good to see! And that's in the daylight! Bet it looks sick at night, thanks for the pic Originally Posted by Slithr
Now I'm antsy to get the bulbs in, they just shipped.
-
04-15-2014 #18Enthusiast
- Join Date
- Nov 2013
- Location
- Friendswood TX
- Posts
- 412
Well, you know .... while you're in there Originally Posted by DreadLox
I thought this was a cool idea also, just not sure how he pulled it off.
[IMG] [/IMG]
-
04-17-2014 #19Enthusiast
- Join Date
- Nov 2013
- Location
- State College, PA
- Posts
- 198
Ok, question... I tore my dash, gauges, steering wheel, and so on apart and all is ready for when the bulbs arrive (Saturday).
My question is, drum roll.... Did any of the bulbs you all order not work? When I ordered my dome/license plate/etc, two out of all the ones I ordered didn't work. Dummy me, bought just enough this time not thinking -.-, I just want to ask so I can make another order.
(Ok my good camera is not working, so these are from my iPhone)
image.jpg
image.jpg
image.jpg
-
04-17-2014 #20Enthusiast
- Join Date
- Oct 2013
- Posts
- 93
Im sure you did but I have to ask, did you reverse the polarity and (rotate the bulb 180 degrees) for the ones that didn't work? Originally Posted by DreadLox
-
04-17-2014 #21Enthusiast
- Join Date
- Oct 2013
- Location
- Dayton, OH
- Posts
- 4,803
All of the dash bulbs I ordered worked the first time (bought from SuperBrightLEDs), but I've gotten in the habit of ordering one or two extra just in case.
-
04-17-2014 #22Enthusiast
- Join Date
- Oct 2013
- Location
- Houston, TX
- Posts
- 3,005
Dreadlox, did you try installing those non-working bulbs 180 degrees rotated? LED lights only work in one direction. Try flipping them around from how you had them installed.
-
04-17-2014 #23Enthusiast
- Join Date
- Nov 2013
- Location
- Sturtevant, Wisconsin
- Posts
- 579
You tried the bulbs in both orientations? LED's need the electricity 'flowing' in the right direction. If you install the bulbs 180 degrees opposite they will not light up. Try taking them out, rotating them 180 degrees, and putting them back in. None of mine were defective. If you already tried that, then yeah try contacting them for a refund or something! Originally Posted by DreadLox
-
04-17-2014 #24Enthusiast
- Join Date
- Oct 2013
- Location
- Dayton, OH
- Posts
- 4,803
And a couple more shots of what white bulbs in the gauge cluster looks like:


-
04-17-2014 #25Enthusiast
- Join Date
- Jan 2014
- Location
- Phoenix, AZ
- Posts
- 231
That looks great. Nice!


 Reply With Quote


Bookmarks