
Sorry for the tedious post, but after much searching and multiple contradictory posts, can someone just give it to me like I'm 5 and let me know:
For a 2017 Viper ACR:
Transmission Fluid part number and quantity needed for a typical drain and fill
Rear Diff Fluid part number and quantity needed for typical drain/suck and fill
Crush washer part numbers and torque figures if known please
Any tid bits of info you can provide that might be necessary to make the job easier.
Results 1 to 25 of 26
-
03-10-2022 #1Enthusiast


- Join Date
- Dec 2019
- Location
- Seattle WA
- Posts
- 217
2017 ACR Trans and Diff Fluids and Quantities
-
03-10-2022 #2Enthusiast
- Join Date
- May 2019
- Location
- AZ
- Posts
- 90

These were provided to me by Steve-Indy a couples years ago.
Gen V Transmission Fluid: MOPAR ATF+4 for P/S and/or Transmissions...68218057AB
Drain Plug Torque: 20 Ft-Lbs...27 N.m
Fill Plug Torque: 20 Ft-Lbs...27 N.m
Gen V Differential Fluid: "Castrol SAF-XJ/SAE 75W-140 Synthetic Gear and Axle Lubricant" as listed in the Gen V Owners Manual has been renamed "Castrol Syntrax Limited Slip 75W-140".
MOPAR calls this "SAE75W-140 Gear & Axle Lubricant...part number for this fluid is 68197927AA and, YOU can purchase this at your local Chrysler-Jeep-Dodge-Ram dealership, though they may not have it in stock. It comes in ONE quart round bottles...so they will need two bottles, noting that there will be some left over....OR...You can also use 3 of the 500 ml bottles of "Castrol Syntrax Limited Slip 75W-140" differential fluid from Mercedes Benz...noting that these smaller bottles have a built-in nozzle which is handy.
Differential Plug Torque...BOTH: 15 Ft-Lbs...20 N.m
-
03-10-2022 #3Enthusiast
- Join Date
- Oct 2013
- Posts
- 3,749
Thanks, Mike...I emailed an updated version to Dan.
I hope things are well with you guys...bet your weather than ours !!
-
03-10-2022 #4Enthusiast
- Join Date
- Dec 2019
- Location
- Seattle WA
- Posts
- 217
Thanks guys! All set, much appreciated!
-
03-10-2022 #5Enthusiast
- Join Date
- Nov 2014
- Posts
- 2,665
Now make a video so us layman can do these changes!
-
03-10-2022 #6Enthusiast
- Join Date
- Oct 2013
- Posts
- 3,749
Biggest pain in the asp is taking off the shield underneath...followed by cleaning it thoroughly, then retorquing all of the fasteners after the tranny and diff have been serviced.
The small containers of diff fluid from Mercedes make the differential fluid change easier as noted above in the post by GTS-E. For the transmission fluid, I have found it is much easier (and far less messy) to use a pump up pressure pump (stainless steel tank yard sprayer with hoses changes to PVC type)...dump in the 4 quarts of ATF+4, pump up the pressure, open valve and deliver the fluid. I also use a similar pump on diff fluid for our older generations Vipers.
-
03-10-2022 #7Enthusiast
- Join Date
- Oct 2013
- Location
- Dayton, OH
- Posts
- 4,803
Differential
You'll need the following supplies:
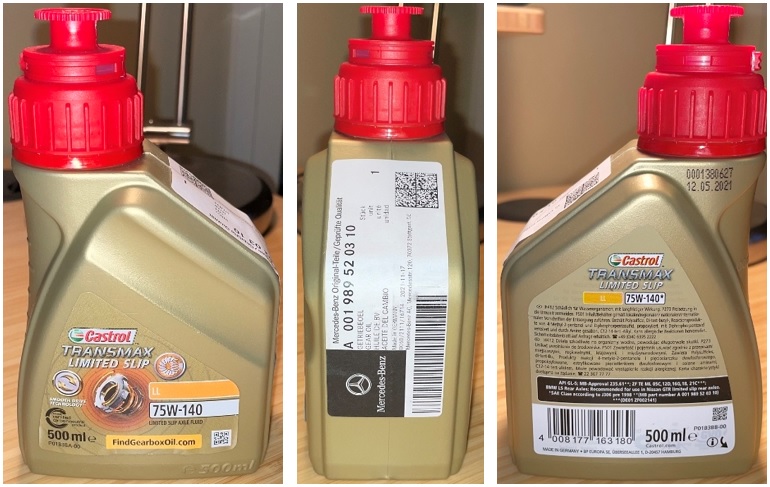
- 1.5-2 Liters of Castrol Syntrax Limited Slip 75w140 (this already has the required friction modifier for the GKN Visco-Lok differential)
- 8mm Allen/hex wrench (drain plug)
- 3/8" square drive (fill plug) - I've seen different drain plug designs used, so if it isn't a square drive, try a 10mm Allen/hex wrench
- T-40 Torx bit (main belly pan fasteners)
- #2 Phillips screwdriver (rear belly pan fasteners)
Amazon used to carry the correct Castrol Syntrax (https://us.amazon.com/Castrol-Syntra.../dp/B07KQFV3K8), but they've been out of stock for a while. You can get the same stuff here in the smaller bottles: https://www.ecstuning.com/b-castrol-.../001989520310/
You'll need 3 of them, since those are 0.5L bottles.
Should look something like this:
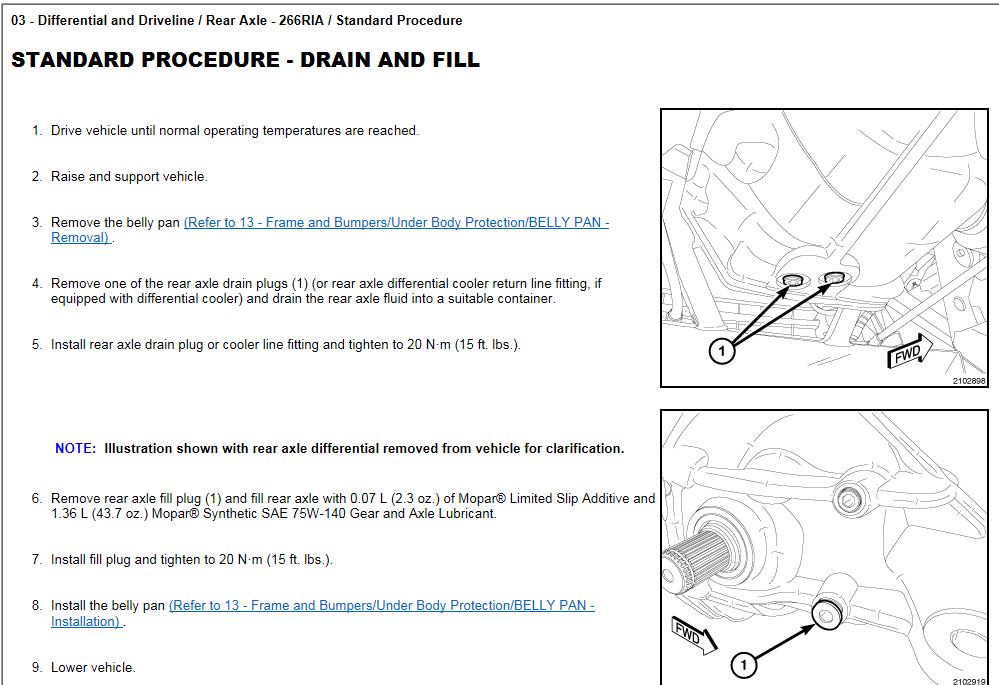
The procedure from the factory manual:
Important: the fluid recommendation in the procedures above only apply if you can't find fluid with the limited slip additive already in the fluid.
Notes:
- Remove the fill plug (3/8" square drive) first - there are two reasons for this:
-- It allows the oil to drain smoothly (i.e. without "glugging") since air will be able to enter from above
-- It prevents you from not being able to drive the car on the off chance you remove the drain plug first and can't remove the fill plug (unlikely, but it can happen)
- There are two drain plugs - the one you want is on the driver's side (see pic below). You can remove both, but it isn't necessary since the driver's side plug is the lowest point in the case.
- There appear to be two fill plugs on the side, but only one is the actual fill plug (the lower one) - the upper "fill plug" is a return port for an oil cooler
- The plugs all use pipe threads - you MUST use thread sealant on these when you reinstall (my recommendation is below)
- Once the fluid has drained and you've reinstalled the drain plug(s) (with thread sealant), you fill the differential until it runs out of the fill plug hole
Fill plug vs. not:

Drain plug (I marked mine on the car so I wouldn't forget):

What I use for thread sealant:
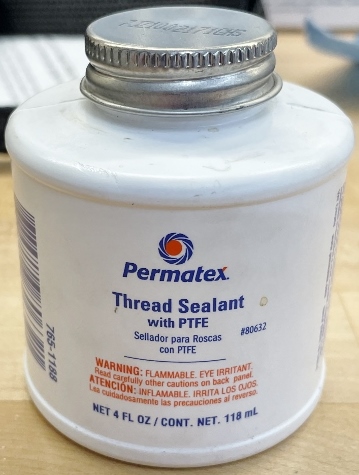
I've also used RTV in the past with success. I do not recommend Teflon tape as chunks can break off and float around in your oil if you aren't careful with how you apply it.
Differential fluid is smelly, so I recommend working in a well-ventilated garage.
-
03-10-2022 #8Enthusiast
- Join Date
- Oct 2013
- Location
- Dayton, OH
- Posts
- 4,803
Transmission
You'll need the following supplies:
- ~4 quarts of ATF+4 - you can also find it in 5L bottles (pictured below), which will leave you with extra. Hint: power steering fluid also uses ATF+4, so you can use the extra for that.
- 3/8" square drive (fill and drain plugs)
- T-40 Torx bit (main belly pan fasteners)
- #2 Phillips screwdriver (rear belly pan fasteners)
- Highly recommended: a fluid pump (my recommendation below)
The fluid:
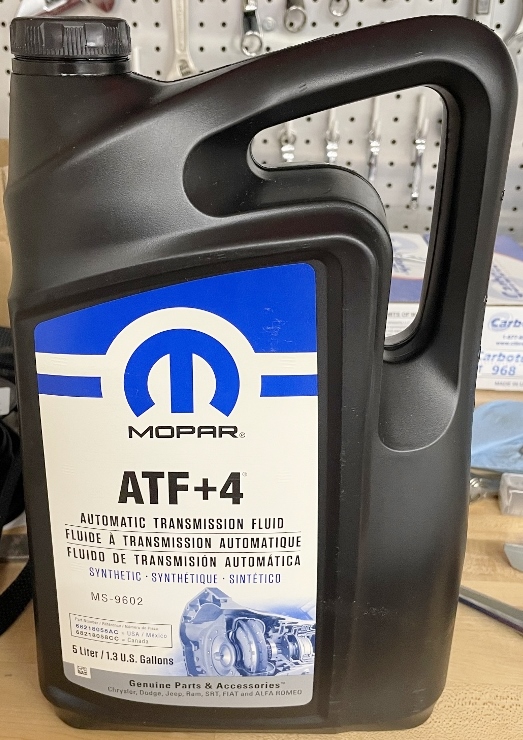
It doesn't have to be the Mopar fluid - any ATF+4 will work in a pinch. That's why standards exist - as long as the fluid meets (or exceeds) the ATF+4 standard, it's all good.
The procedure:

Notes:
- Remove the fill plug (3/8" square drive) first - there are two reasons for this:
-- It allows the oil to drain smoothly (i.e. without "glugging") since air will be able to enter from above
-- It prevents you from not being able to drive the car on the off chance you remove the drain plug first and can't remove the fill plug (unlikely, but it can happen)
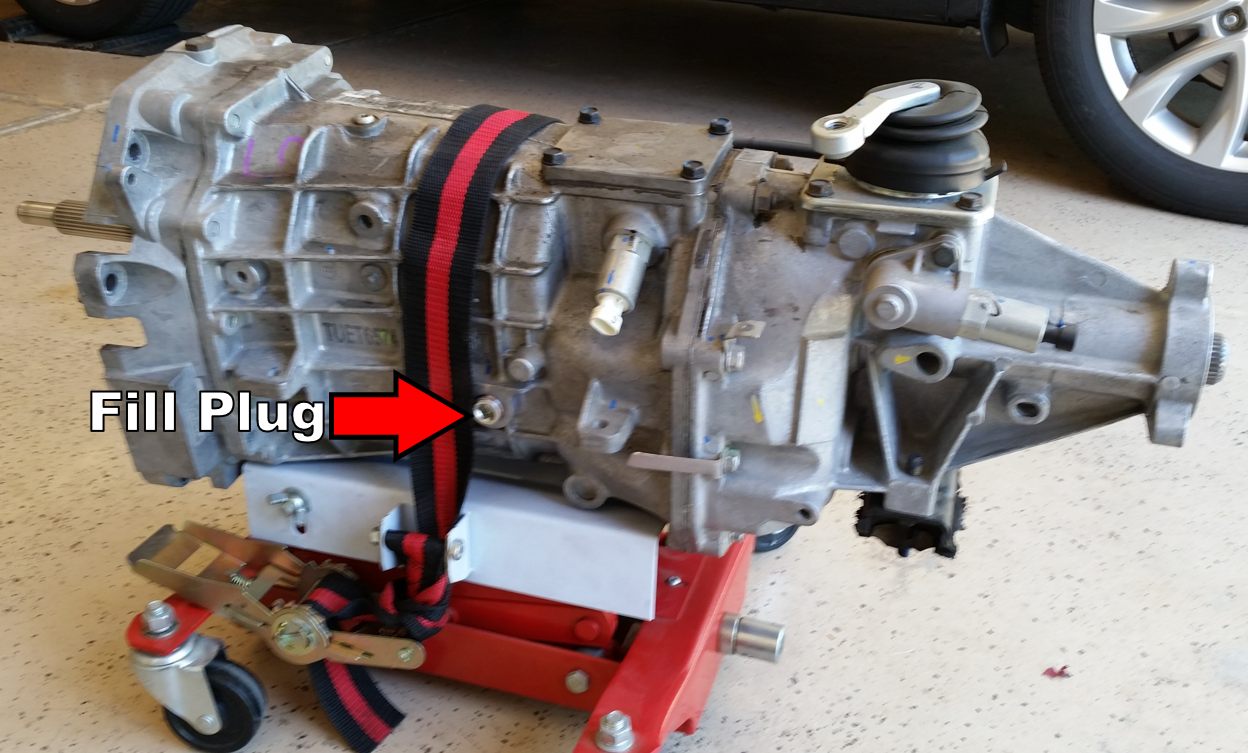
- The fill plug is on the driver's side (pic below)
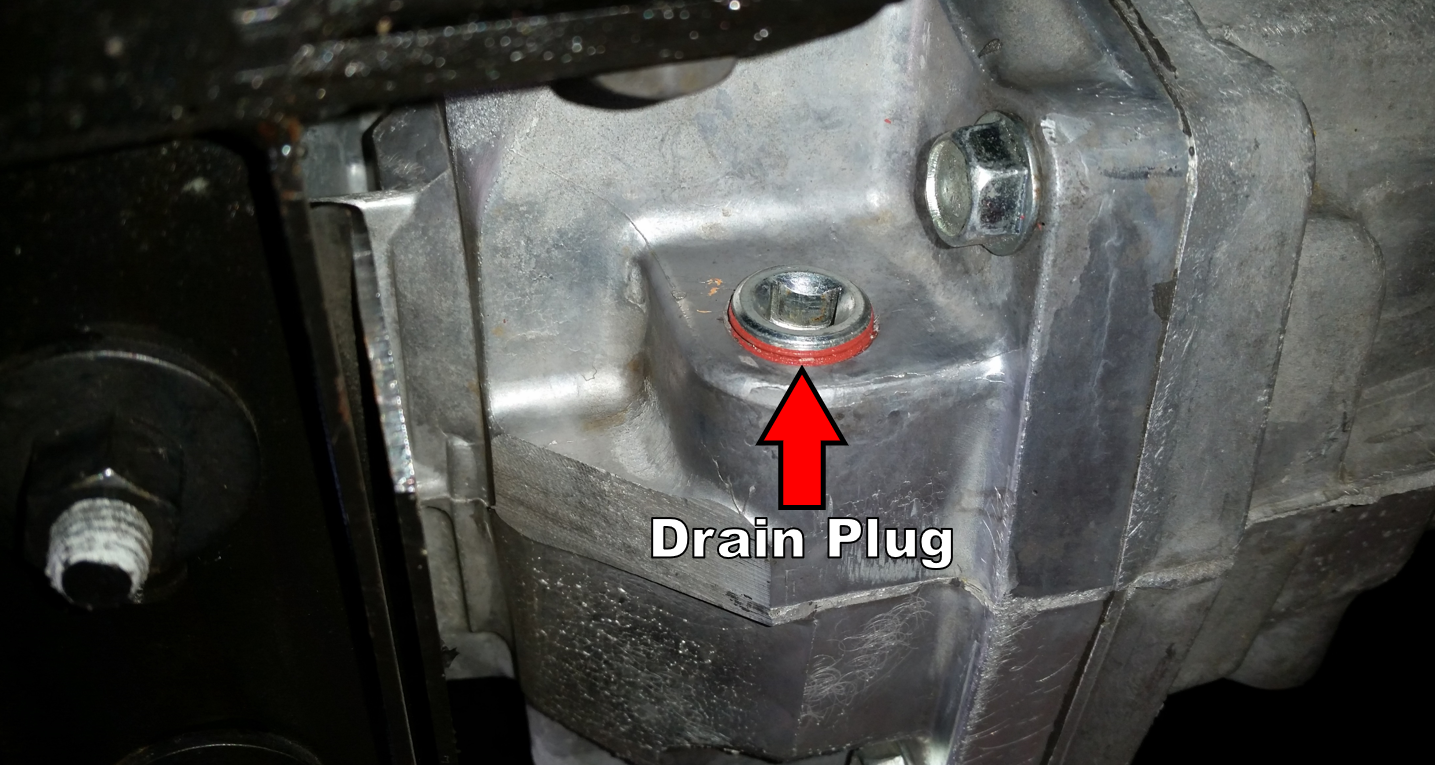
- The drain plug is on the passenger's side toward the back of the transmission (pic below)
- The plugs all use pipe threads - you MUST use thread sealant on these when you reinstall (my recommendation is below)
- The correct fill amount is listed in the procedure above (3,210 mL, or 3.4 qts). Do not fill the transmission until it runs out of the fill plug hole - you will end up with a slight overfill, and that can cause the transmission to puke fluid out of the vent under hard driving. Filling the transmission with the amount listed will put you just below the fill plug hole.
Fill plug location (along with a hint written on the transmission itself):

It's pretty much directly in the center of the transmission on the driver's side:
Drain plug is in the tailshaft housing, but in front of the transmission mount/cross member on the passenger side:
Again, my recommended thread sealant:
As for a fluid pump, there are many different kinds out there ranging from hand pumps all the way to the garden sprayer type mentioned by Steve-Indy above. I prefer the latter, specifically this one:

https://www.amazon.com/Motive-Produc.../dp/B0119DI58A
Yeah, it's expensive, but the quarter turn ball valve is worth its weight in gold if you need to shut off the fluid flow quickly, and the Shrader valve allows you to easily pressurize the container with a compressor, which keeps you from aerating the fluid with the hand pump.
Full disclosure: I have two. One for transmission fluid, and one for differential fluid.
Why? They are a pain to clean, so I found it easier just to keep each one dedicated to one specific type of fluid.
-
03-11-2022 #9Enthusiast
- Join Date
- Nov 2014
- Posts
- 2,665
Wow that is great Steve. Thanks!
-
03-11-2022 #10Enthusiast
- Join Date
- Dec 2013
- Location
- AZ
- Posts
- 154
These are cool for the intermediate jobs:
Mityvac 6852 and much easier to clean than the big floor standing evacuators
https://www.skf.com/mityvac/products...ipment/mva6852
-
03-11-2022 #11Enthusiast
- Join Date
- Jan 2018
- Location
- Spring TX
- Posts
- 322
I’d also watch out slapping a torque wrench on those plugs. Use a good permatex thread sealant and choke up on the wrench nice and hand tight. 20lbs on threads with oil all over them can easily over torque. Just my 2 cents and people will argue it, but I’ve never had a drop leak in 20 years.
-
03-11-2022 #12Enthusiast
- Join Date
- Oct 2013
- Location
- Dayton, OH
- Posts
- 4,803
Agreed…I never use a torque wrench on those plugs. Originally Posted by chris_lee

Pipe threads are tapered, so the more you drive them in, the more stress they will put on the case. You’ll likely never crack either case using the torque specs specified above, but you also won’t be doing yourself any favors in the future when you need to get back in there.
-
03-11-2022 #13Enthusiast
- Join Date
- Oct 2013
- Posts
- 3,749
Thanks for a great couple of posts, Steve. We ALL benefit from reading same !!
-
03-12-2022 #14Enthusiast
- Join Date
- Oct 2013
- Location
- Brownsburg, IN
- Posts
- 1,786
I have met both Steves in person but was too nervous to get their autographs. Quality content!
-
03-12-2022 #15Enthusiast
- Join Date
- Nov 2014
- Posts
- 2,665
I like to do what I can on mine the most daunting part of these fluid changes looks like removing the belly pan. Then putting it back.
-
03-12-2022 #16Enthusiast
- Join Date
- Oct 2013
- Location
- Dayton, OH
- Posts
- 4,803
To me, the two most difficult parts are, in order of difficulty (my opinion): Originally Posted by ViperJon
1. Getting the car up in the air
2. Getting the belly pan off
If you have a lift, #1 should be pretty straightforward. I also secretly hate you - 9' ceilings and my garage's shallow depth really limit the useful options for me.
For those that don't have a lift, I'll show the exact procedures and tools I use to get my car up in the air below.
For an ACR (the Extreme certainly...not sure about the non-Extreme), getting the belly pan off is going to be more difficult due to all of the extra aero under the car in the back. I'll show some pics I dredged up from the internet that might help.
-
03-12-2022 #17Enthusiast
- Join Date
- Oct 2013
- Location
- Dayton, OH
- Posts
- 4,803
Belly Pan Removal
Here are at least a couple of pics that show what you're up against with the ACR aero when it comes to removing the belly pan.
Note: these are not pictures of my car. I took these from a recent BaT listing. What a beautiful car.
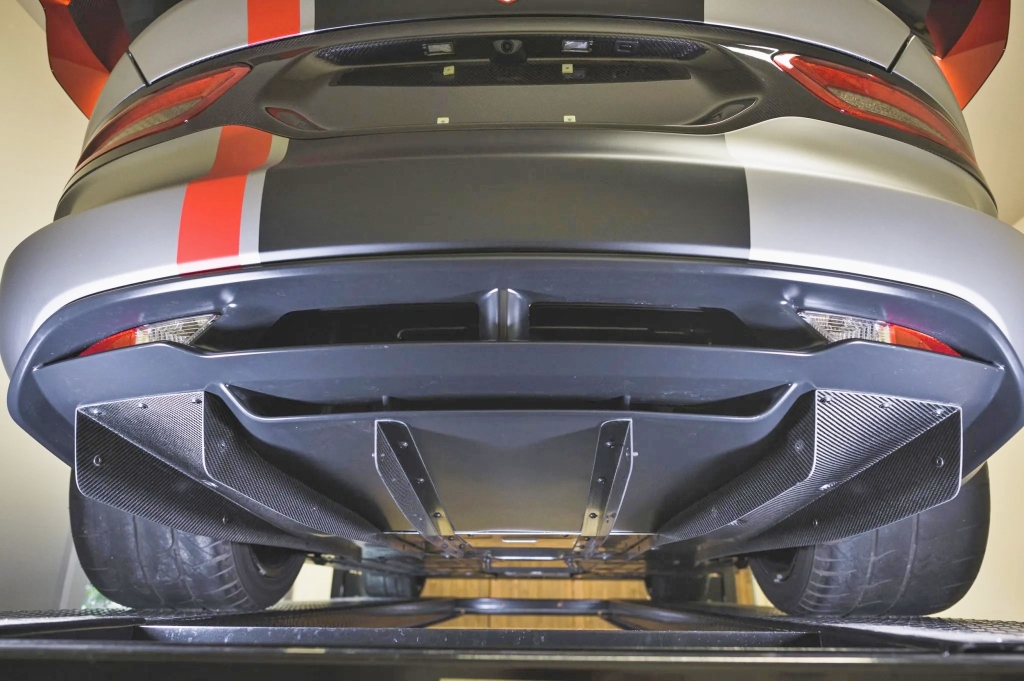

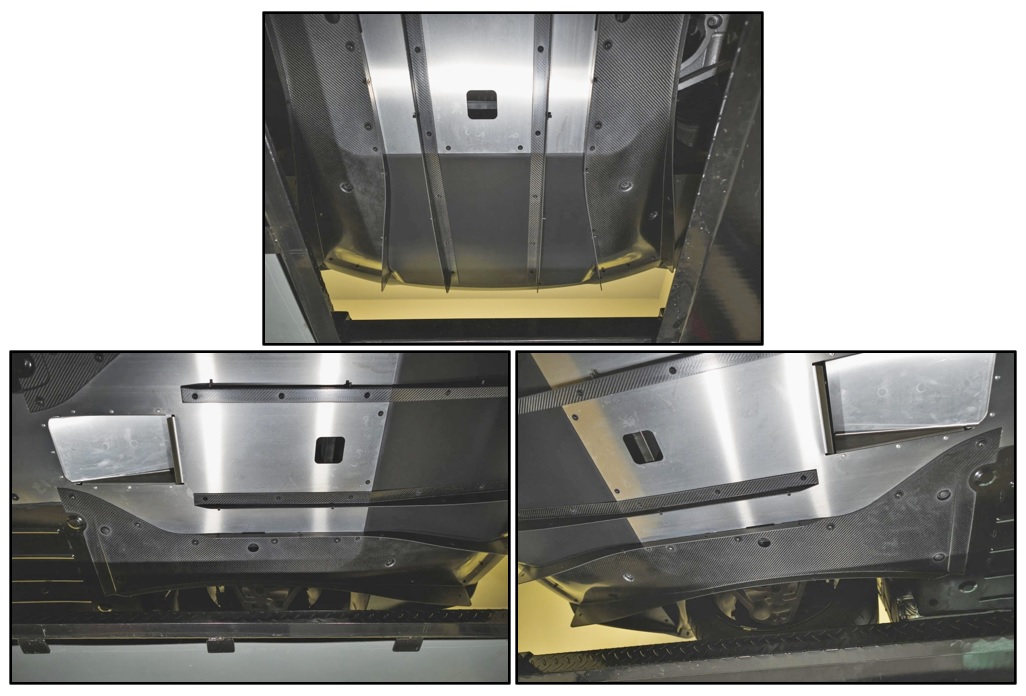
Bottom line: you're going to be doing a lot more wrenching to get all of that stuff off, and it looks like pretty much all of it has to come off due to how it is attached.
My only recommendations would be to:
1. Don't be afraid to remove things to make your life easier...I'd never recommend prying on things when you can just as easily remove them. Yeah, it'll take more time, but nothing under there looks cheap to replace if you end up breaking it.
2. Have a bunch of plastic baggies/containers on hand to keep the fasteners sorted by sub-assembly. That way they are easy to get back in the right spot, and it'll also help you keep track of them. Jesus that's a lot of fasteners.
3. When you can actually get to the belly pan, basically you remove the bolts in the center of the pan last. The pan will flex as you start removing fasteners, and you don't want it hanging by either just the front or just the rear fasteners. If you are doing it on your back on jack stands, you can use your legs/feet/knees + your free hand to help manage the pan as you get the last fastener out. Be prepared to get rocks/pebbles/road grit in your eyes as well...a good pair of safety glasses goes a long way here.
4. I always loosen the fasteners first by hand - after that, I use a drill/impact driver to get them the rest of the way out. This helps prevent fastener cam-outs...the last thing you want is a stripped screw/bolt head that will add hours to an otherwise simple job.
-
03-12-2022 #18Enthusiast
- Join Date
- Dec 2019
- Location
- Seattle WA
- Posts
- 217
I'm going to have both of them sign my engine! Thanks again guys! Originally Posted by SSGNRDZ_28
-
03-12-2022 #19Enthusiast
- Join Date
- Oct 2013
- Location
- Dayton, OH
- Posts
- 4,803
Getting The Car Up In The Air With A Jack And Jack Stands
If you have a lift, disregard what you see below.
For those of us with more archaic tools at our disposal, this post is for you.
So how in the hell do you get this damn car up in the air so you can actually get some work done on it? There are many ways to skin this cat - this is mine. The tools I list here are what I recommend. Most of them are not cheap, but when it comes to safety equipment (and a jack and jack stands are some of the most important), cheap shit doesn't cut it in my garage.
Jack: AC Hydraulics DK13HLQ
Jack Stands: Esco 10498 and 10499 (you'll see the reason for the different sizes in the next post)
Other: Race Ramps Flatstoppers
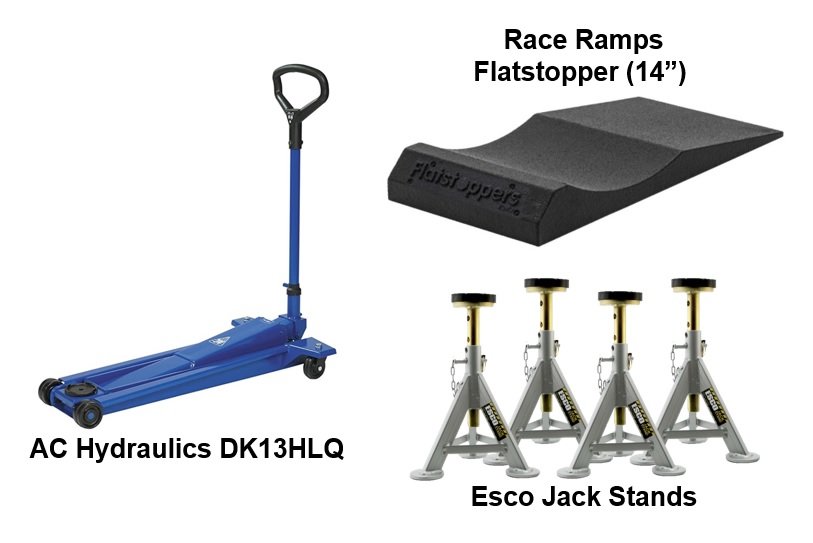
I listed two different Esco jack stands above because I use both - 4 of the 10498s, and 2 of the 10499s. Basically, the 10499s are the baby stands - this is a game where 1-2 inches matters, so the ~2" shorter height does help for one very specific part of my method (again, this will be explained in my next post).
Two pics showing the differences:


There's a rear jack point accessible through the belly pan, shown below:
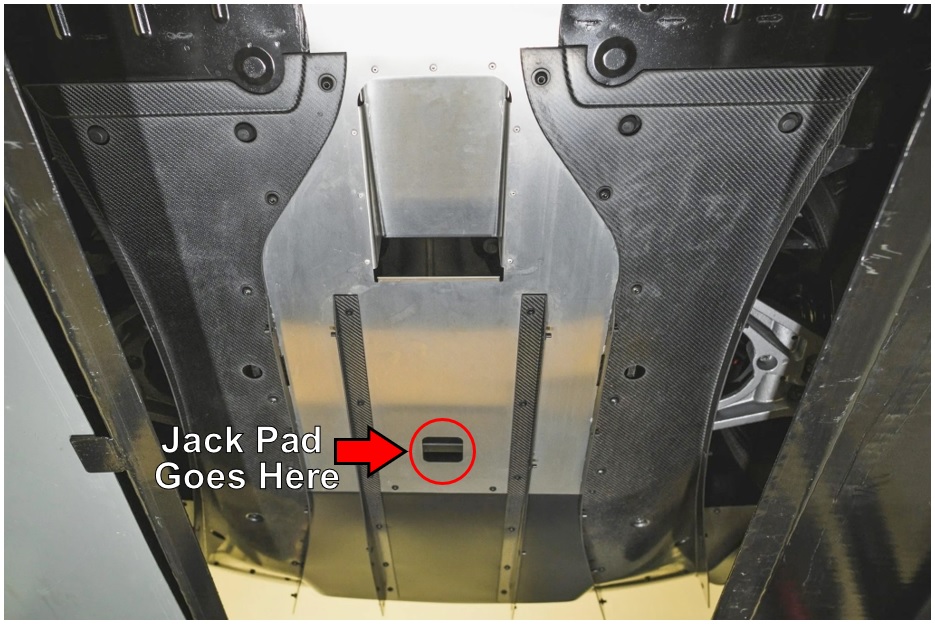
The frame looks a little flimsy there, but it is plenty beefy enough to handle half the weight of the car.
There are a few different ways to get a jack on it. Some folks use a hockey puck. I fashioned one out of what was originally a Protech 1006 side lift jack pad - it looks a bit ghetto (the cuts were made with a hack saw), but it did work.
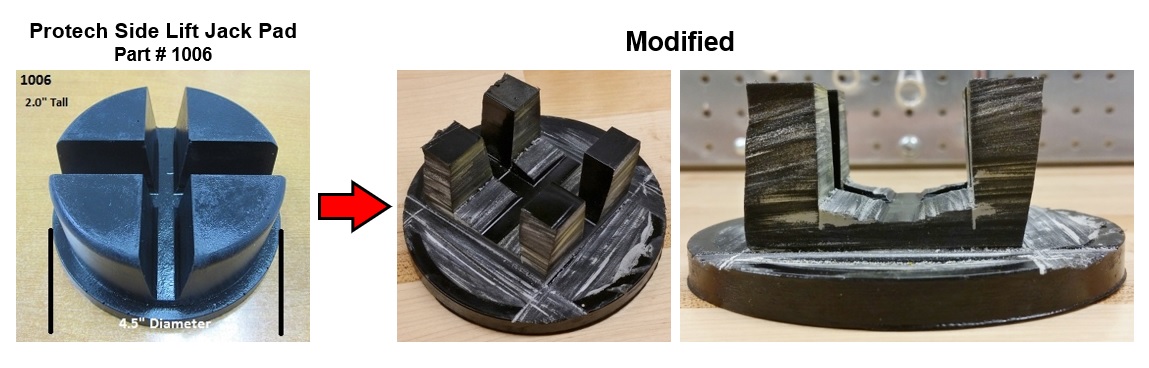
Ew.
That was before Doug Shelby developed a more elegant solution, which has been on my car for a while now:

Highly recommended.
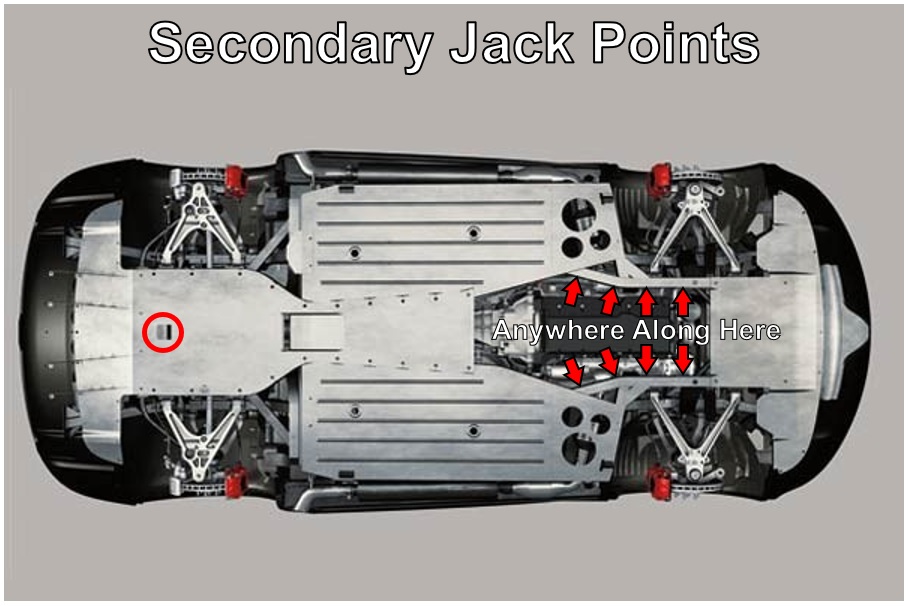
Here are the main jack points you can use - they are made from pieces of angle welded to the frame, and are easily seen when you look under the car:

And secondary points that you can use when the need arises:
If you are going to use the rear jack point in the center of the car, you will need to get it up in the air at least 11-13 inches depending on what jack stands you are using. That doesn't sound like a lot, but with a lowered car, you will end up driving the bottom of the front bumper into the ground unless the front is raised some. That's why I use the Flatstoppers.
I used to be able to just drive the car onto them, but ever since I switched to lower profile 295/30-18 front tires (and lowered the car so it didn't look goofy), I can no longer do that without breaking off the little flaps that sit in front of the tires up there. Because of that, I have to jack the car up from each side to be able to slide the Flatstoppers under the tires. My car is actually low enough that I have to jack the car from the side using the rear jack points because the front points sit too low to get even my jack under there.
Steps 1-2: Get the Flatstoppers under the front tires to get the nose up a bit - if you can drive the car on, that's the easiest.
Step 3: Jack the car up by the center rear jack point so you can get jack stands under the rear main jack points. Once the stands are under there, you can lower the car down onto the stands, which has the added benefit of bringing the nose of the car up in the air just a bit.
Step 4: Jack the car up by one of the front main jack points so you can get jack stands on the exposed part of the frame close to the engine. The frame is stiff enough that the car will be pretty level side-to-side even though you are grabbing it on a corner.
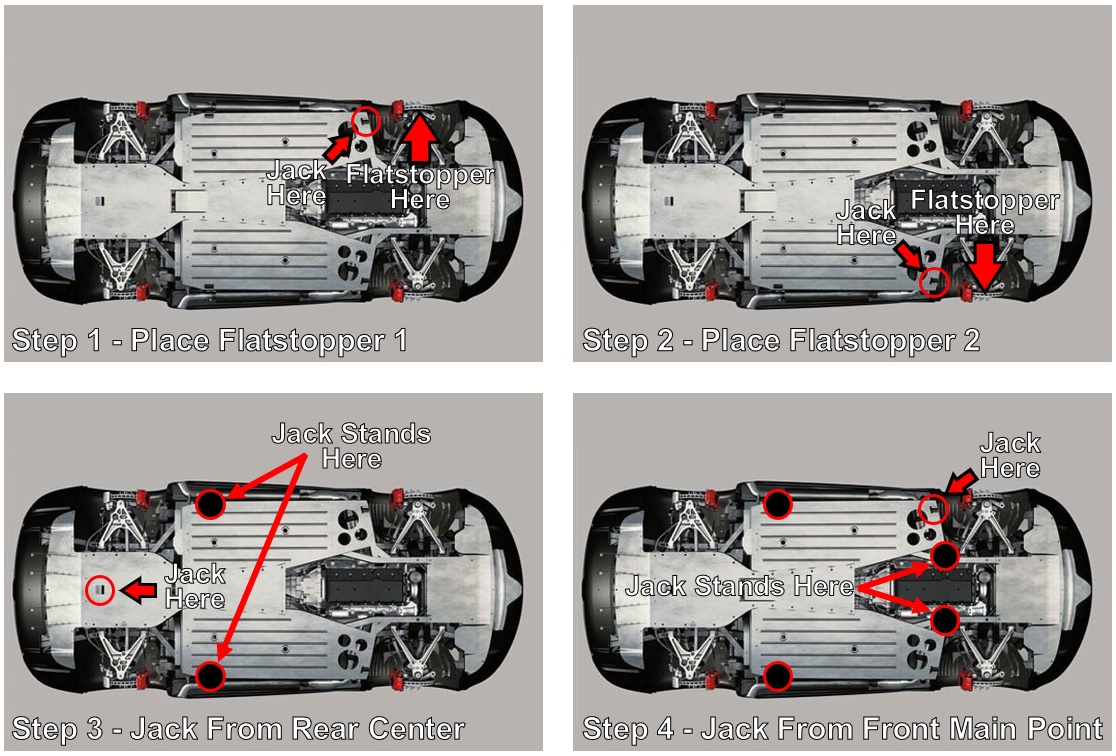
For Step 4, the front stands can go here:

Lots of meat where the front of the frame is reinforced to place a jack stand or two.
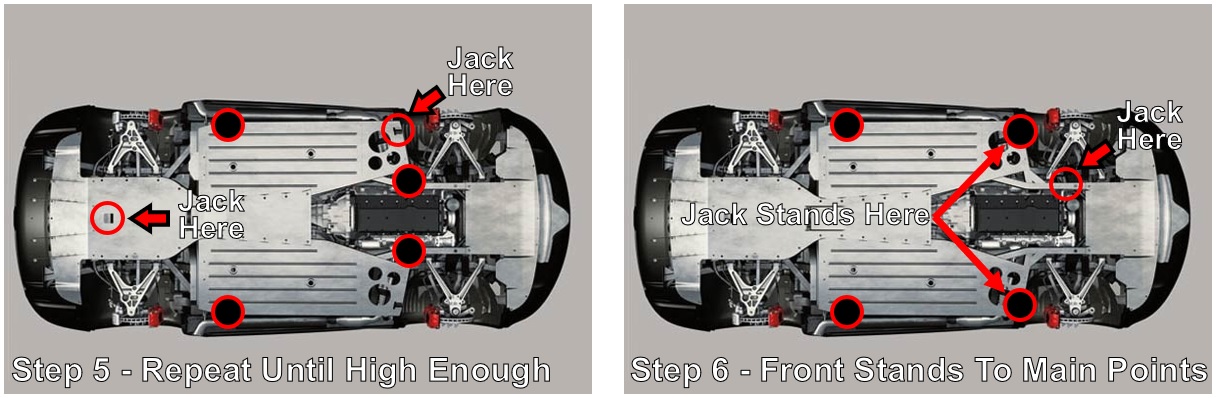
Step 5: Repeat Steps 3-4 until you get the car as high as you want it. I only move the jack stands up one notch at a time - the last thing you want to do is get greedy and have the car slip off the stands.
It'll look something like this:
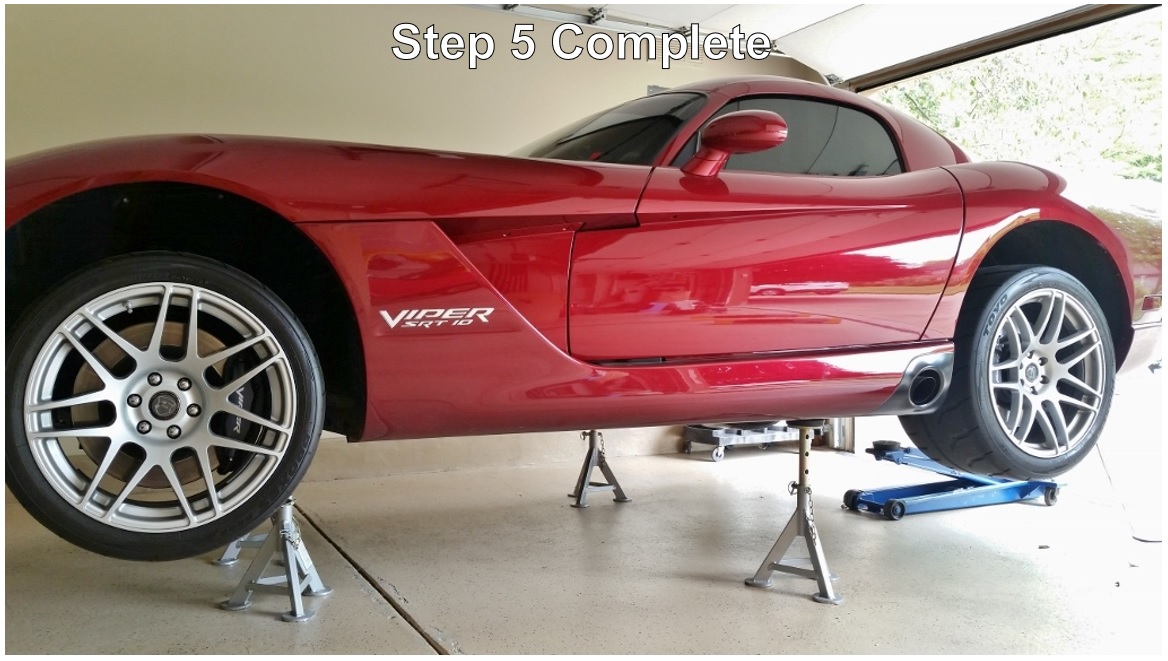
That's high enough to be able to pull the transmission in case you were wondering (you probably weren't though).
Step 6: Move the jack stands outboard to the front main jack points by jacking the car from the frame around the engine. This step is optional, but it helps to get the stands out of the way when trying to do things like changing the engine oil.
Now might be a good time for a beer - getting the car up in the air always stresses me out, and you are about to see why.
-
03-12-2022 #20Enthusiast
- Join Date
- Oct 2013
- Location
- Dayton, OH
- Posts
- 4,803
A Cautionary Tale
So there I was last October.
Long story: last May I installed a McLeod RST (in place of the Nth Moto triple carbon) to get more weight into the clutch assembly to help get my heavy ass car off the line at the drag strip. It had the intended effect, but failed after 12 passes. It wasn't the clutch's fault - I was warned that it might happen, but I decided to take the risk anyway. I was still pretty pissed when it did fail though, and in order to save what was left of the drag racing season up here (which ends at the end of October), I decided to throw the Nth Moto clutch back in.
So up the car had to go on to jack stands.
I got the Flatstoppers under the front tires (Steps 1-2 above), and it was time to jack the car up from the rear so I could get the jack stands under the rear main jack points (Step 3 above).
At this point, I only had the 4 Esco 10498 jack stands (13.2" minimum height). I had done this many, many times before, but it makes me nervous every single time I do it. For whatever reason, likely being in a hurry, I must not have gotten the jack completely under the DSE rear jack pad, and the car ended up slipping off the jack before I could get the car high enough to get jack stands under it.
Fuck. That was the start of a no good, very bad day.
The belly pan was supporting the weight of the vehicle, and I can assure you, it wasn't designed to do that. And to be clear, this had nothing to do with Doug's rear jack pad...this was completely my fault.
Here's the carnage:
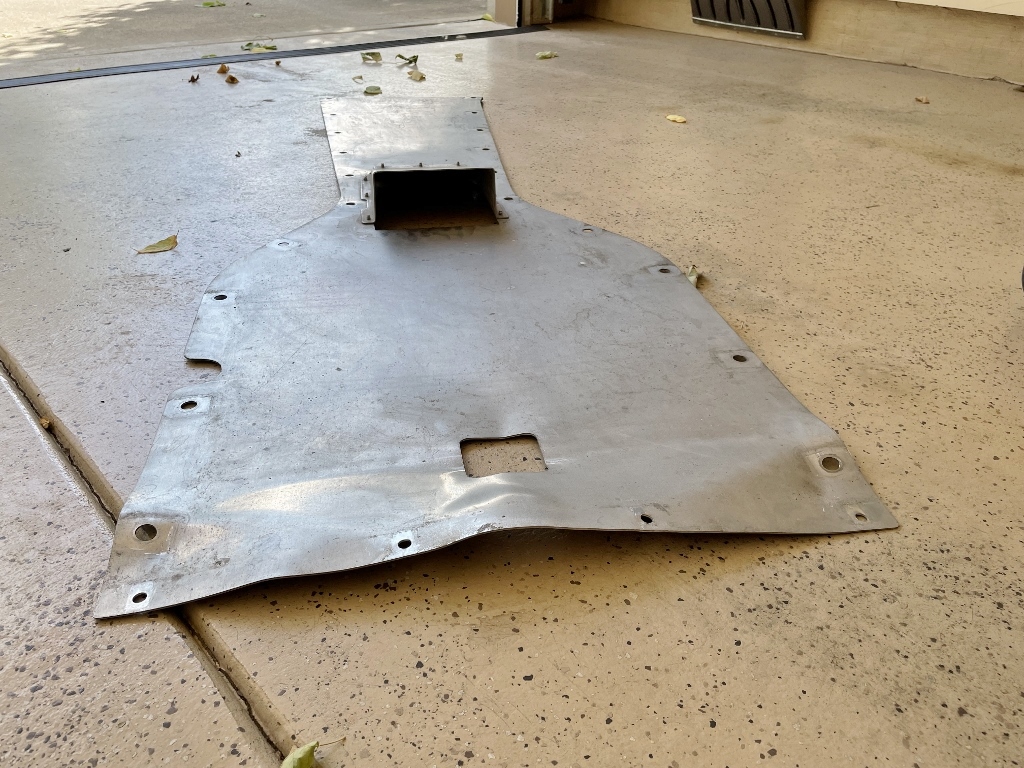
Yeah...that'll buff right out.
Thankfully (and surprisingly), the belly pan was the only damage the car sustained. None of the fasteners bent or broke, and the rear carbon fiber piece under the rear bumper is super flexible, so it bounced right back as soon as I released it from the belly pan fasteners that hold the two parts together. I was shocked at the lack of damage, but it was a huge wake up call for me - I've never had anything like that happen, EVER, and I've been turning wrenches for ~20 years or so. One small lapse in judgment is all it took. I got off lucky.
With the help of a friend's hydraulic press, I was able to get the belly pan bent back into a reasonable shape, but it'll never be the same after that one.
So that's why I now own two of the smaller Esco 10499s - they go under the rear jack points first. The 2" shorter height really does make that part of the process much safer. Once those are under there, I get the front sitting on the larger 10498s, and then move back to the rear to put the remaining two Esco 10498s under the rear jack points to level the car out.
This is also why Doug Shelby has met me in person (mentioned above) - I purchased his carbon fiber belly pan to replace my bent to shit aluminum piece, and I decided to drive a couple of hours to meet him to save on shipping such a large part. He's good people (as is Steve-Indy, also mentioned above) - the Viper community should be thankful he's taken a personal interest in developing parts for this platform. His attention to detail is second to none.
Why am I sharing this? It's taken me this long to make peace with my stupidity, and I don't want it to happen to anyone else. Even something as simple as jacking a car up can be disastrous if you aren't careful. I don't even want to think of what might have happened if my head had been under there when it dropped.
Learn from my mistakes. Take your time, and everything will be just fine.
-
03-13-2022 #21Enthusiast
- Join Date
- Nov 2014
- Posts
- 2,665
Thanks Steve. I made the mistake of investing in the taller Esco stands (expensive!) before I had my QuickJack and discovered they were virtually useless for use on the Viper, just too damn tall and had to get the car up so high in the rear the angle scared me. I used the hockey puck on rear cross member as well but never felt safe doing it. So I bought another floor jack and that helped using two but after a while with that clumsy method just bought the Quickjack and problem solved. I still slide the stands under anyway as a double redundant safety step but they are not really needed.
Removing all the ACR-E aero bolts and then the belly pan bolts.....yikes. Also seems like the belly pan is going to be awkward to handle without some extra hands. I'll save this for a summer day and a buddy. I have a big garage so that's not an issue but getting all those bolts back torqued properly....ouch.Last edited by ViperJon; 03-13-2022 at 06:17 AM.
-
03-13-2022 #22Enthusiast
- Join Date
- Dec 2013
- Location
- CANADA
- Posts
- 599
The DSE rear jack pad is a fantastic piece. Must have in my opinion. Even still, lining up the jack can be a little challenging with the limited visibility due to the diffuser strakes.
Shorter jack stands are your friend when getting the Viper in the air.
-
05-14-2022 #23Enthusiast
- Join Date
- Nov 2016
- Posts
- 786
+10Kabillion on the QuickJack! Originally Posted by ViperJon

Recently bought the QuickJack (5000TL) thru Costco and its already paid for itself. The 5000TL fits all of my cars and is there whenever I feel like gettin' busy in the garage.
Its been liberating not having to schedule time at GearHeads garage to use their lifts.
Thought I'd miss using the their full height lifts but the QuickJack provides more than enough room under the car to do ANYTHING.
Once the car is up on the QuickJack, can raise and lower the car in seconds with the push of a button.
N' dropping and re-installing the belly pan is no big whoop with the QuickJack and a creeper. Is a breeze.
IMHO, the QuickJack is far safer than any set of jack stands.
SteveM, don't hesitate to make the switch. With all the work you do on your car, you won't regret it.
I won't hesitate to drop the transmission now if/when needed.
Here's the Porsche up on the QuickJack next to the Viper on Jackstands.
garageSmall.png
-
05-14-2022 #24Enthusiast
- Join Date
- Jul 2015
- Posts
- 1,689
Mopar diff fluid is now in a new mopar labehlled bottle.. part number is still the same: 68197927AA
-
05-17-2022 #25Enthusiast
- Join Date
- Oct 2013
- Location
- Greenwood Village, CO
- Posts
- 3,797
Is this the same fluid for a Gen 4? Originally Posted by SRT_BluByU

 Reply With Quote
Bookmarks