
I just completed the window regulator Viper Store reinforcement kit installation over the weekend. Ran into a few speed bumps but overall it wasn't too difficult. I couldn't find a comprehensive guide anywhere, so I decided to try and write a basic one. With that said, I HIGHLY recommend you order a DSE Window Boss kit prior to this because you can knock two birds out with one stone. And it will be much easier to install the window boss kit since you'll need to remove the windows. Links to order the products are below. FYI, I wouldn't bother ordering the "special tool" for the regulator reinforcement kit. I didn't need to use it all.
Keep in mind you should only use the reinforcement kit if you're looking to reinforce a regulator that has no issues or has a simple crack/break as shown below. If it is a complicated break, you will need to replace the regulator.
Attachment 47627
https://www.theviperstore.com/Viper5...Mechanical.htm
https://www.dougshelbyengineering.co...indow-boss-kit
Things you'll need:
1. Products in links above.
2. 9mm and 10mm socket and 10mm open wrench.
3. T20 and T25 torx.
4. #2 Philips head screwdriver.
5. Trim removal tool.
6. Flathead screwdriver
7. 2 additional #10-32 x 1/2" screws from the hardware store. I bought a 4 pack for 2 regulators.
Attachment 47628
Step 1. Remove the door panel. I followed the instructions listed here http://billswebspace.com/viper.html#...SpeakerUpgrade. It's simple, use a small trim tool to pop off the two trim covers one located by the door hand hole and the other located behind the door handle. Once the trim covers are removed, it will reveal 2 T25 torx screws that need to be removed. If you have a 2015+ there is another one located behind the airbag cover on the top rear of the door. Next, you will pull at the edges of the door panel to pop the inner push pins out of their hole. I found it easiest to start from the top rear of the panel. Next, go around and unplug all the wiring harnesses. I didn't bother removing the door handle cable as it allowed enough length for me to move the panel around without hurting the cable (I just placed a box underneath it).
Step 2. Once you have the panel removed and all wire harnesses disconnected, start by removing the speaker. You'll need to do this to access the clip for the window. It is held in place by 3 9mm super long screws. So be prepared to crank for a while with your socket wrench. Once the speaker is loose, disconnect the wiring harness connected to it and place the speaker in a safe spot.
Attachment 47624
Step 3. The next step will be removing the window. Start by reconnecting the wire harness for the window switch to the door panel. You will need to adjust the height of the window to be able to access the bolts to the rear shuttle through the holes pictured below. Once you have the window in the correct position, you can disconnect the wire harness again and place the door panel in a space spot so you can work. You will want to remove the inner window seal at the top of the door by gently prying up with your fingers. Next, remove the 2 bolts in the rear shuttle with a 10mm socket (I like to keep 1 bolt barely in for the next step). Then find the front shuttle (white plastic thing) through the speaker hole. You should see a metal spring clip in the shuttle. You will need to pop it off by using a flat head screwdriver. Be careful not to damage the plastic. You should be able to press in on the glass and pop the tab out of the front shuttle; thus, freeing the glass from the front shuttle. Remove the rear bolt if you kept one in place and make sure to hold onto the glass or it may fall into the door and get damaged. You should now be able to remove the glass from the top of the door carefully.
Attachment 47625
Step 4. Next you can remove the 6 10mm nuts holding the regulator in place. Locations in the picture below. Next disconnect the wire harness to the regulator motor. You may have to release the white push pin holding the harness in place to disconnect it.
Attachment 47626
Step 5. Now the regulator should be free. To remove it from the door will take some finesse. Start by moving the entire regulator assembly as far forward as you can. This should give you enough room to be able to pop the rear track out of the opening and from there you should be able to snake the rest of it out.
Results 1 to 10 of 10
-
04-26-2021 #1Enthusiast


- Join Date
- Apr 2019
- Posts
- 346
Window Regulator Replacement Reinforcement How To
-
04-26-2021 #2Enthusiast
- Join Date
- Apr 2019
- Posts
- 346
Step 6. Install the reinforcement kit as instructed T20 torx will be needed. Here is where you'll need to use the #10-32 x 1/2" hardware you purchased as the 2 short screws provided in the kit are too short. The end product should look like the picture below. Remember to wrap the regulator to the reinforcement piece as tightly as possible. I went over with at least 3 layers of electrical tape for added rigidity.
PXL_20210425_175905068.jpg
Step 7. Reinstall everything in reverse order. Remember to install your DSE Window Boss Kit prior to putting the glass back in.
Final step. Check the windows are operating normally. I had an issue where the driver's side would not go up, only down. I ended up needing to disconnect the battery and reconnecting. Apparently this is an issue with leaving the door open for too long?
Any questions, feel free to ask. Best of luck.Last edited by BSLSK; 04-26-2021 at 01:33 PM.
-
04-26-2021 #3Enthusiast
- Join Date
- Feb 2015
- Location
- Northern England
- Posts
- 365
Glad the install went well, thanks for the great write up and pictures.
I guess your search was only on the Gen V part of the forum, as it's been covered in detail on the Gen 3/4 section.
https://driveviper.com/forums/thread...Install-GEN-IV
Admin :- Can these be 2 threads be linked together somehow for future reference?
-
04-26-2021 #4Enthusiast
- Join Date
- Jun 2020
- Location
- London, Ontario
- Posts
- 18
Thanks BLKSNK, we appreciate the write up. Can you check on attachment 47629? When I click it shows "Invalid Attachment specified....", rather than than the picture.
Sonicbloo, this is write-up much more detailed than the gen 3/4 write up. It's also specific to Gen 5s, so this hasn't been covered and a search for "regulator" will find them both.
-
04-26-2021 #5Enthusiast
- Join Date
- Apr 2019
- Posts
- 346
Thank you! I knew the Gen 5 regulator was the same as previous gens but wasn't sure if the process was the same or not. This left questions in the air and I think other owners/members had the same questions as I did. Originally Posted by sonicbloo

Check now, it should be fixed and updated. Hope it helps! Originally Posted by Turla
-
07-10-2021 #6Enthusiast
- Join Date
- Aug 2019
- Location
- Medford, NJ
- Posts
- 295
I'm doing this now and would like to add a few tips. When trying to remove the regulator, it is much easier to remove the door flag first. Two bolts just below the flag, one nut that is identical to the nuts that hold the regulator in. Next, the weatherstrip on the inside comes off easily by popping 3 Christmas tree plugs on the rear of the door, then slide it back and up. You can then see screws holding the outer weatherstrip in place. Remove 4 screws nearest the flag that are easily accessible to loosen the weatherstrip. Pull that weatherstrip up a bit and wiggle the flag out. This allows the regulator to slip further forward in the door more and it will come out (and go in) easier.
Secondly, don't do what I did. When you loosen the nuts that hold the regulator, use open end wrench and a 3mm hex to hold the regulator alignment. When I removed mine, it backed out the threaded rod instead of the nut, pushed it waaay out of alignment, and when I first put the window up the tabs on the rear shuttle caught the upstop and bent the new regulator up. I bent it back, but after reinstalling again, it catches and bends and gets all jammed up. Sending original to be rebuilt at powerwindowrepair.com that came highly recommended.
Lastly, it's much easier to move the window around if you remove the window switch assembly from the door panel. Couple screws on inside of door panel (look for cutouts in the fabric insulation for the hidden ones). Then about a dozen identical torx screws around the lower portion of door panel, bend the speaker grill tabs and it will separate. Then you have just the switch dangling from the door instead of the entire panel propped up trying to adjust.Last edited by Hootie; 08-05-2021 at 02:59 PM.
-
07-14-2021 #7Enthusiast
- Join Date
- Apr 2019
- Posts
- 346
Good points Hootie. I removed the flag for the first door and then left it for the second.
I tried looking for clips under the switch assembly but couldn't find any so I didn't even bother with it. Nice knowing it's held in by screws now! Definitely going to be an easier job for the next guy.
-
08-05-2021 #8Enthusiast
- Join Date
- Aug 2019
- Location
- Medford, NJ
- Posts
- 295
Adding another tip to save someone a headache. After the new regulator is in, if the computer clears the calibration for the up/down stop points, the window WILL NOT GO UP if the door is open. I spent a lot of time disassembling the window switch, door control module and tracing wires looking for the problem.
To make it easier to move the regulator to get the glass in, you can manually close the latch on the door to trick computer into thinking it's closed. Then you can move it up/down at will. Just remember to not close the door until you 'open' it again by using the exterior handle so the latch doesn't smash into the catch on the door jamb. Also, do not raise it all the way and close the door without being certain the glass will not hit the roof.
Seems this is a safety feature where it will not allow the window to raise with door ajar if it doesn't know the upper limit. After doing the calibration the window will go up/down with the door open or closed.
-
08-05-2021 #9Enthusiast
- Join Date
- Aug 2019
- Location
- Medford, NJ
- Posts
- 295
Another tip. To remove the window switch so you can operate the window without the entire door panel hanging in front:
1) Throw service manual in trash. Instructions are useless.
2) Remove these 13 torx screws (red) from the back side of the door panel. Bend the two speaker grill tabs vertical (blue).
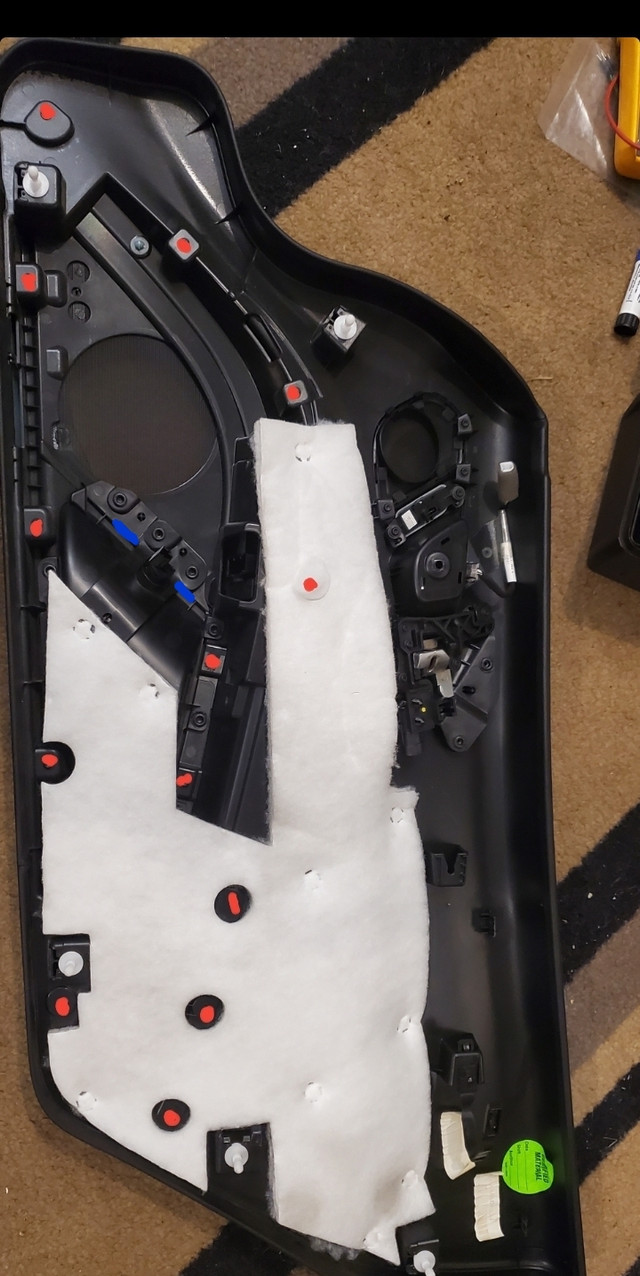
3) Separate the lower door panel into halves. On the smaller half, remove two more torx screws. Switch will come out. All of the 15 total screws are the same so you don't have to worry about mixing them up.

Putting it back together is just the reverse. Good luck!
-
03-29-2022 #10Enthusiast
- Join Date
- Oct 2013
- Posts
- 502
Thank you for this write up and everyone else's contributions. Knowing this is an issue, I decided to try and be proactive with adding the reinforcement this spring. I can't understand how anyone could get the regulator out without also removing the door flag - there would have been no chance for me. But got it out and back in with the kit on to hopefully safeguard my future.

 Reply With Quote
Bookmarks