
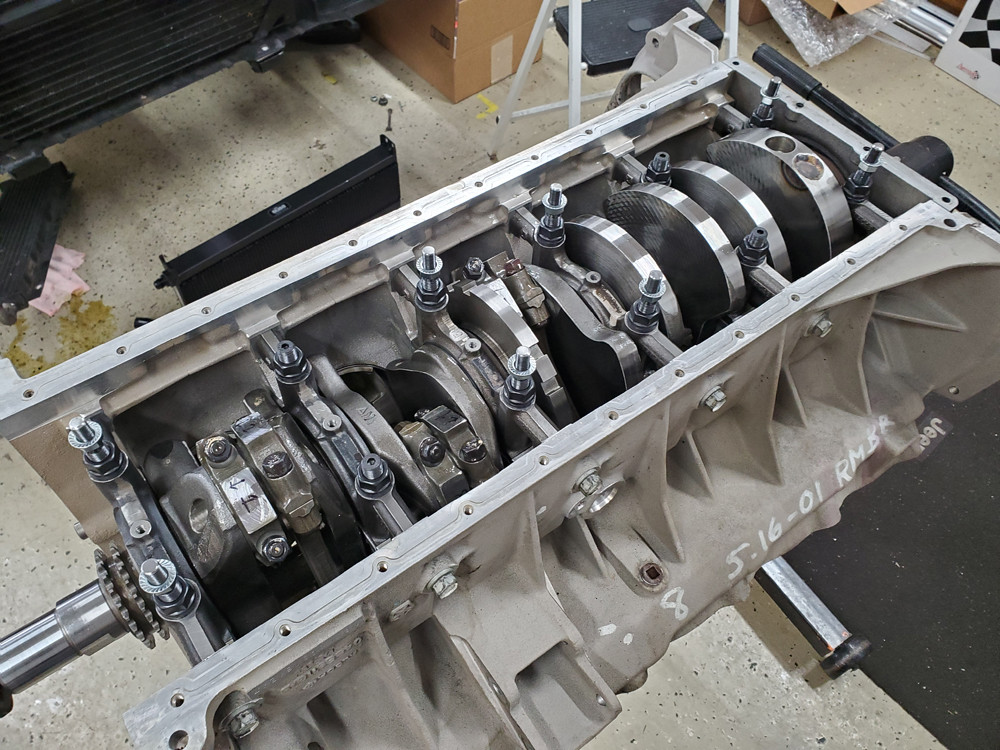
So I got my block and crank back from Prefix just before our stay at home order went into effect.
The work performed by Prefix was adding oil relief channels to the upper mains to help improve oil flow to the bearings. I believe this was done to later generations from the factory. On top of that they line honed the mains, line honed the cam bores, and hot tanked and cleaned the block afterwards. As far as the crank was concerned, since I caught everything so early, there was no real damage so a simple crank polish was all it needed. I purchased main bearings and coated rod bearings from them at the same time. As of typing this, I have yet to actually assemble anything because I have been busy prepping the rest of the car, soon though. You can see the extra little channels in the second block picture. From the factory there would only be a single hole in the center.
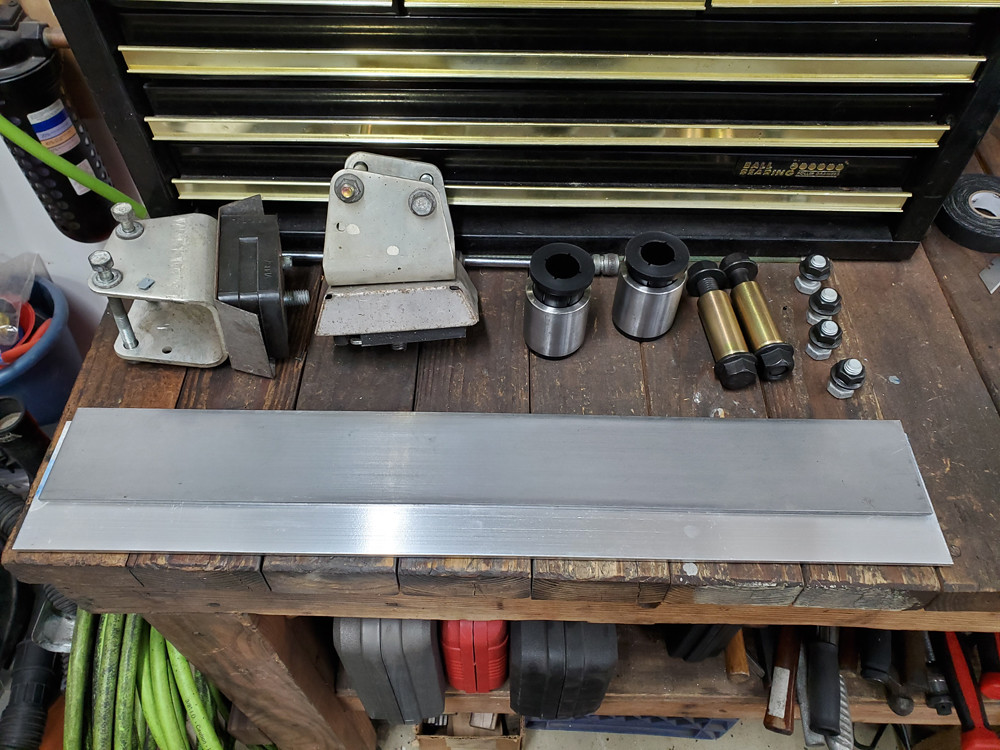
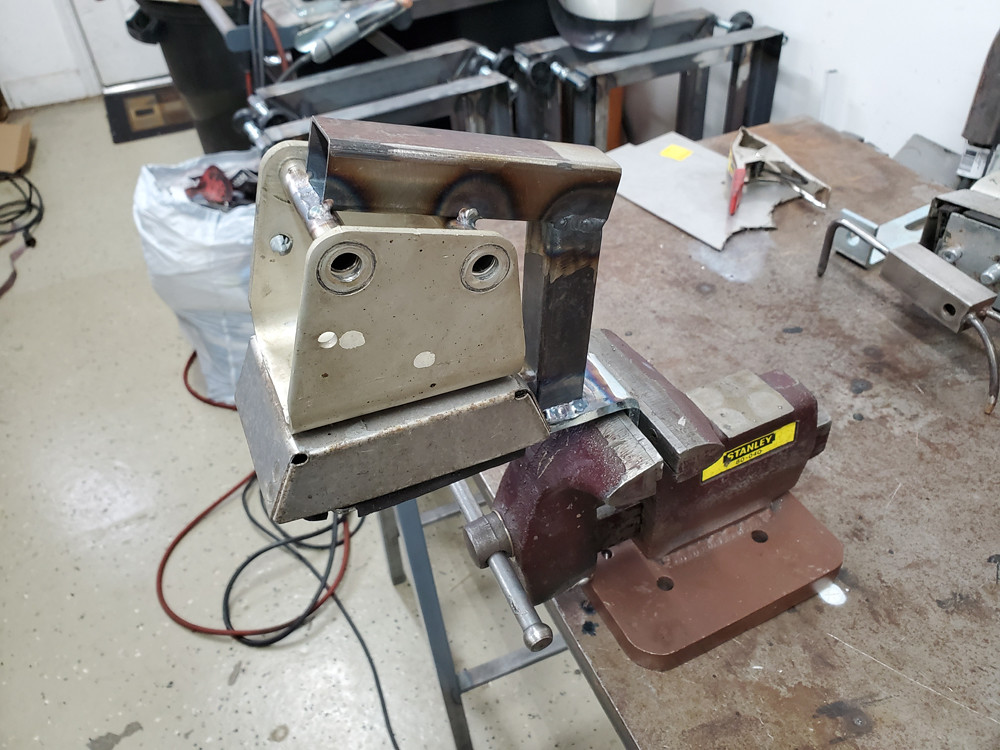
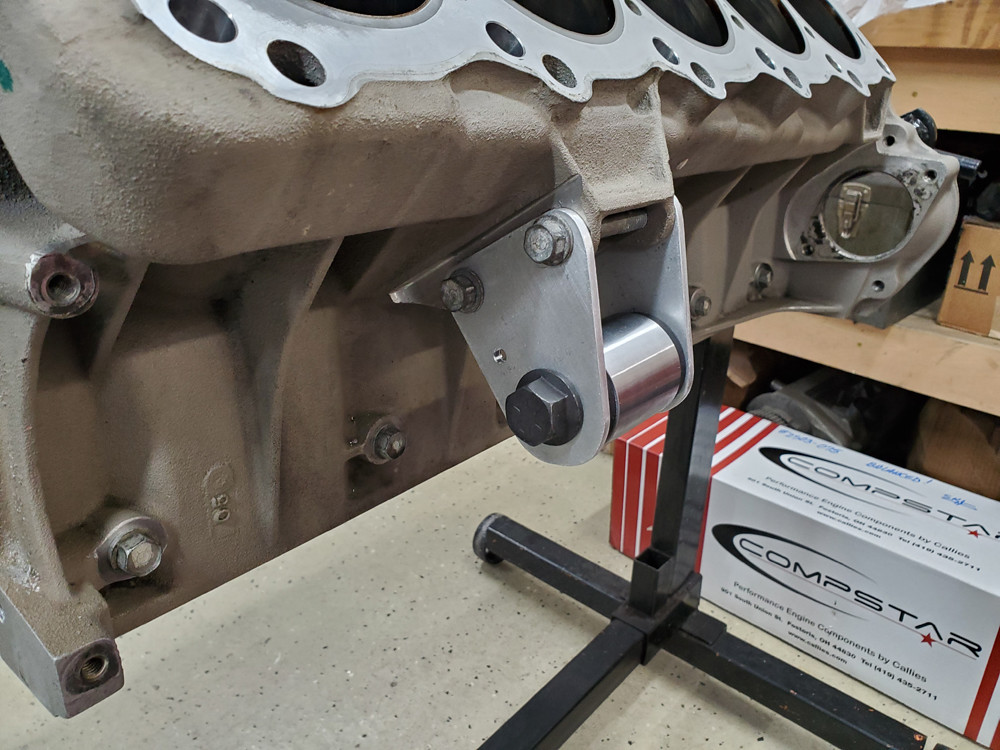
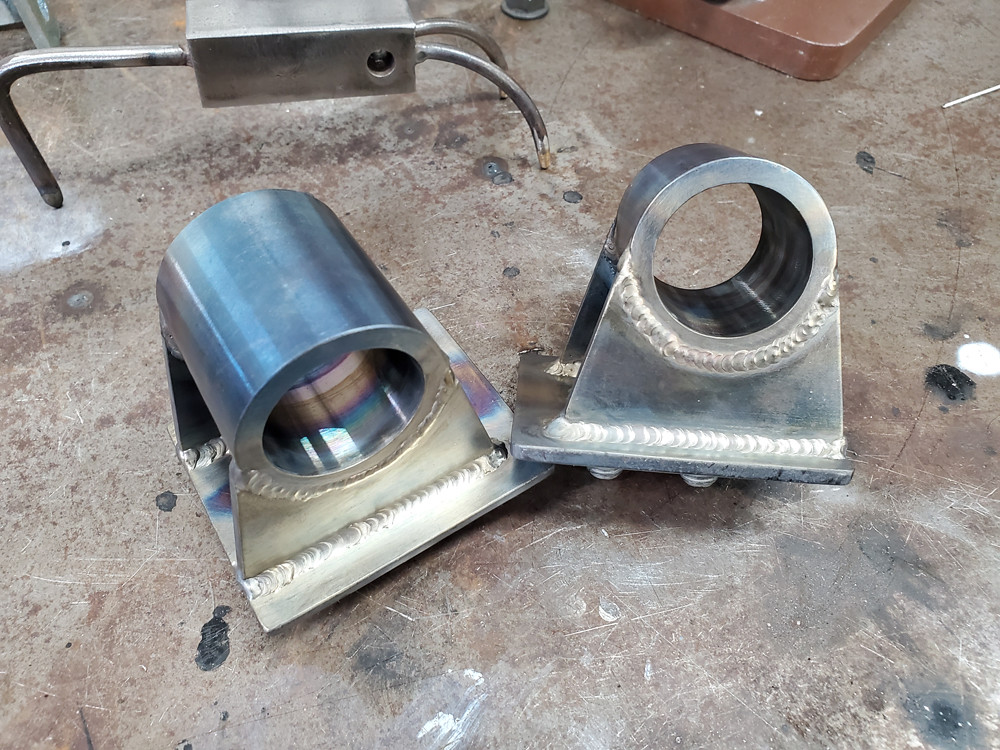
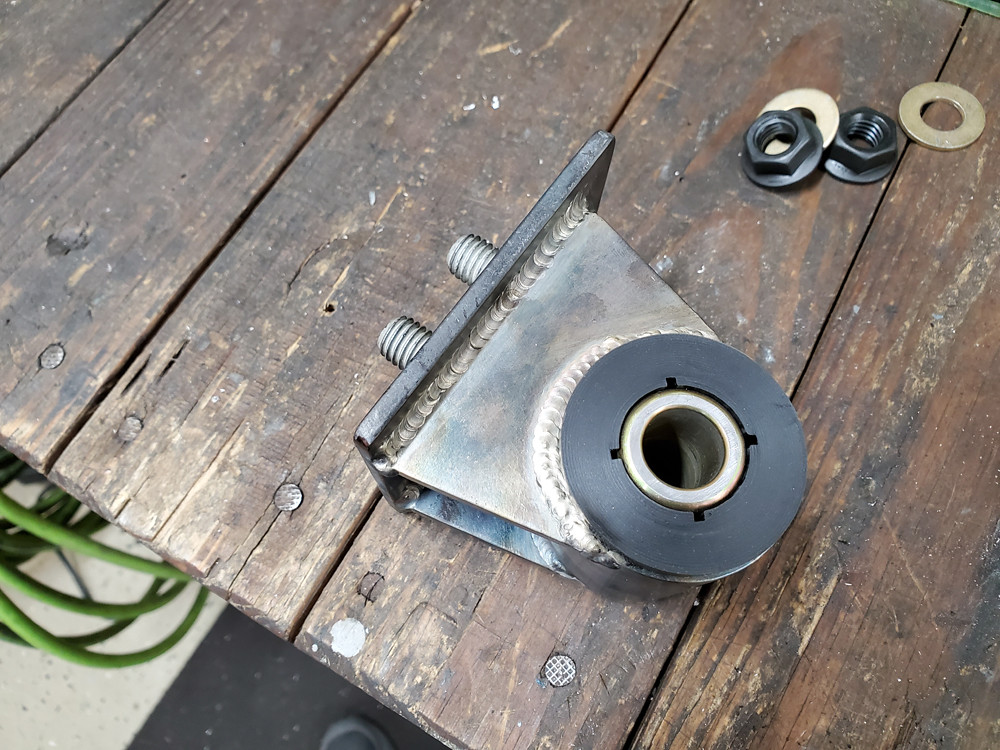
Since I had the engine back I could address one of my other problems that was the broken engine mounts. I decided to go with the tried and true round bushing style used by probably every custom off-roading truck, hot rod, sand rail, etc. Google Custom Polyurethane mounts and you will find thousands of examples on every forum imaginable. I almost bought a set of aftermarket poly Cherokee XJ mounts because they almost looked to be the right size and are super cheap and are of virtually the same design. But instead I decided to make my own. I bought the outer sleeve, bushings, and inner sleeve as a kit for $17 a set and the rest of the parts are just basic steel and aluminum flat stock from Mcmaster-Carr. A simple jig was made to locate everything to tack weld it up. Pretty simple to make and didn't cost remotely what VPUSA charges, and best of all if the polyurethane fails, you can get new bushings for around $10 and change the durometer too if they seem too stiff. Still need to make some basic heat shields. I figure if these break, you might as well write off the whole car, because I have been in a serious accident. Haha
Results 51 to 75 of 80
Thread: Prepping my GTS for the Track
-
04-14-2020 #51Enthusiast


- Join Date
- Jul 2017
- Location
- Michigan
- Posts
- 71
-
04-15-2020 #52Enthusiast
- Join Date
- Dec 2018
- Location
- The Front Range
- Posts
- 137
Shame that you encountered engine issues so soon into your build, but damn, great work on everything here. Super impressive. I know my car also has the Woodhouse mounts for engine and trans....will give a closer look when I do my fluid flush for the season.
-
04-15-2020 #53Enthusiast
- Join Date
- Oct 2013
- Location
- South of London, Surrey
- Posts
- 7,577
Loving those Engine mounts, Man you got skills

What sort of welder did you use for that work? Tig?
-
04-15-2020 #54Enthusiast
- Join Date
- Feb 2020
- Location
- Indianapolis
- Posts
- 166
Well this is epic. Keep it coming!
-
04-15-2020 #55Enthusiast
- Join Date
- Jan 2014
- Location
- So Cal
- Posts
- 1,117
Sweet work my friend, I’m digging your vise welded to a plate. AND unlike all the idiot fabricators on TV, your not welding with a tank top! Great job!
-
04-15-2020 #56Enthusiast
- Join Date
- Jul 2017
- Location
- Michigan
- Posts
- 71
Thanks! Everything is TIG welded. I use a HTP welder that you can see in the background of some of the pictures Originally Posted by Fatboy 18

That little vise is one of my better ideas. I broke the base a couple years ago and then welded and screwed that 1" thick piece on for weight and stability. It is bare metal on the bottom so it grounds through the metal table and you can just spin it and move it as needed all over to weld stuff that is clamped in it. I loaned it to a friend for a little bit and didn't realize how useful it was until it was gone. And yes never understood welding and grinding in short sleeves or shorts. Maybe worse are people who wear sandals while working in the garage. Too many metal shavings and heavy objects that could land on my feet. Originally Posted by Camfab
-
04-17-2020 #57Enthusiast
- Join Date
- Jul 2016
- Posts
- 766
In fear of looking like an idiot. How are you making sure your rear tires are facing straight? I've been doing my own alignment on my cars for a couple years now but I just can't seem to get my Viper to feel right. No major tire wear yet but it just feels loose and squirrely. Totally lacking in confidence around corners. I have the longacre alignment kit with the toe plates. I also bought some slip plates that I use now too. I don't remember the exact specs but here is what I can recall:
- Front Toe - negative about 1/16 of an inch
- Front Camber - Negative 1%
- Front Caster - aprox 6% +
- Rear Toe - negative maybe 1/16 or an inch at the very most. I tried to get this dialed in to 0
- Rear Camber - Negative 1%
I don't have a way to test for rear caster though with my tools. What I did was to make the adjustment's the same left and right to keep the caster the same though. But I normally use the string method to make sure the front and rear tires are point dead straight. I have forgestar F14's so I took the standard difference in the wheel track (1 inch difference between front and rear) added in the backspacing difference of the wheels and then divided by 2. I then set my strings to that. Is that the best way to make sure the rear wheels are pointed straight?
Sorry to ask here but it looks like some good conversation about you doing your alignment as well as GTSDean.
P.S. - GTSDean. I'm semi local and would love to meet another Viper owner. Once the Covid concerns die down I'd love to drive out to your area to learn some things if you'd be willing to show me. I'd pay for your time as well as I don't want to be a mooch. I just don't trust shops to work on this car so am trying to be as self sufficient as possible.
-
04-17-2020 #58Enthusiast
- Join Date
- Oct 2013
- Location
- New Braunfels, TX
- Posts
- 1,836
98Red - I'd be happy to visit with you and maybe help get your ride squared away.
A quick couple of thoughts on unsettled behavior: Unequal caster across the rear will really hurt your confidence because it won't feel the same going left or right in turns under throttle steer. It's nearly impossible to measure correctly without the right tools. Mr. Acoustics really used some smarts coming up with his setup. Bump steer will also make the car nervous and unpredictable because the wheels will toe in and out thru travel causing wild tire slip angles. If you are still running rubber suspension bushings, not having them torqued to spec while properly ballasted will cause damper performance to suffer.Last edited by GTS Dean; 04-17-2020 at 05:49 PM.
-
04-17-2020 #59Enthusiast
- Join Date
- Oct 2013
- Location
- New Braunfels, TX
- Posts
- 1,836
duplicate post deleted.
-
04-17-2020 #60Enthusiast
- Join Date
- Jul 2017
- Location
- Michigan
- Posts
- 71
First what do you mean by negative toe? Generally toe is either in or out not negative or positive, with IN meaning the front of the tires are closer together than the rear of the tires and OUT being the opposite. I just want to make sure we are using the same lingo. Rear toe should generally always be IN a slight amount, if you are setting them for dead straight (0 toe) I would recommend toe in before anything else and see what that gets you. The front toe is dealers choice on how you want turn in to feel. Also having the rear castor actually set equal can make a difference if you are driving in a performance environment. Originally Posted by 98RedGTS
When I lay out strings I always center them by referencing the center of the hub. So the wheels have no center caps and I measure out from the spindle center getting equal distances Left to Right. This should get them parallel with the center line of the car.
Hopefully this helps.
26840087.jpg
-
04-18-2020 #61Enthusiast
- Join Date
- Jul 2016
- Posts
- 766
Greatly appreciated. Once some of the Covid restriction are lifted around here I'll PM you to find a good time for me to drive out there to meet up. I'd love some help, but also to talk to someone that knows these cars better. My car was a garage queen when I bought it and I'm gradually trying to get it in good reliable shape. It does have the rubber bushings in the controls arms. I have been thinking of changing to Poly though. I may do that during this lock down. Originally Posted by GTS Dean
-
04-18-2020 #62Enthusiast
- Join Date
- Jul 2016
- Posts
- 766
For toe, I was using negative as toe in. That's a good idea with removing the center caps when using the string method. I may have to give it a go. I don't race my car but am just trying to get it set-up to be a nice driver on the highway and around town. As it sits today, the car feels so loose that I'm getting passed by sedans on overpasses as I'm having to slow down to 50-55 when going around the corners. I take those same corners in my wife's Durango RT at 65 without even thinking about it. I'm pretty sure it's because of the alignment as my corvette was the same until I finally got it dialed in. I just can't get the Viper dialed in for the life of me, even after at least a dozen attempts. Originally Posted by Mr. Acoustics
-
04-18-2020 #63Enthusiast
- Join Date
- Jul 2017
- Location
- Michigan
- Posts
- 71
I am sure Dean will be able to help you out. Start with Toe and Caster and take steps from there and you should end up with a car that you can trust and enjoy for more spirited driving. Originally Posted by 98RedGTS
-
04-18-2020 #64Enthusiast
- Join Date
- Jul 2017
- Location
- Michigan
- Posts
- 71
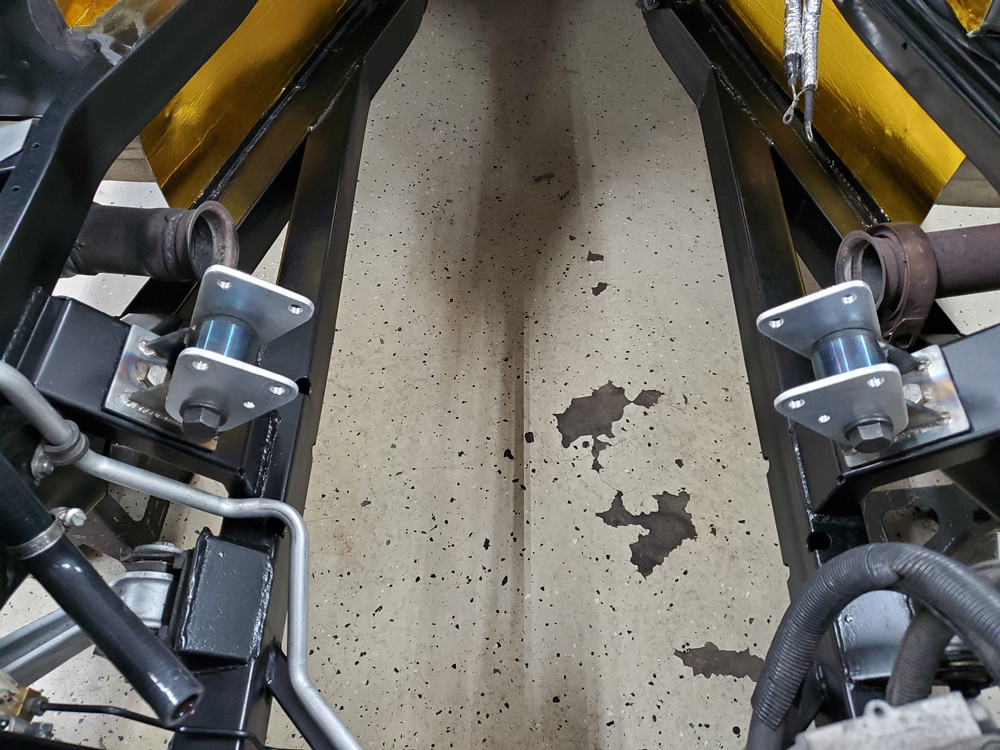
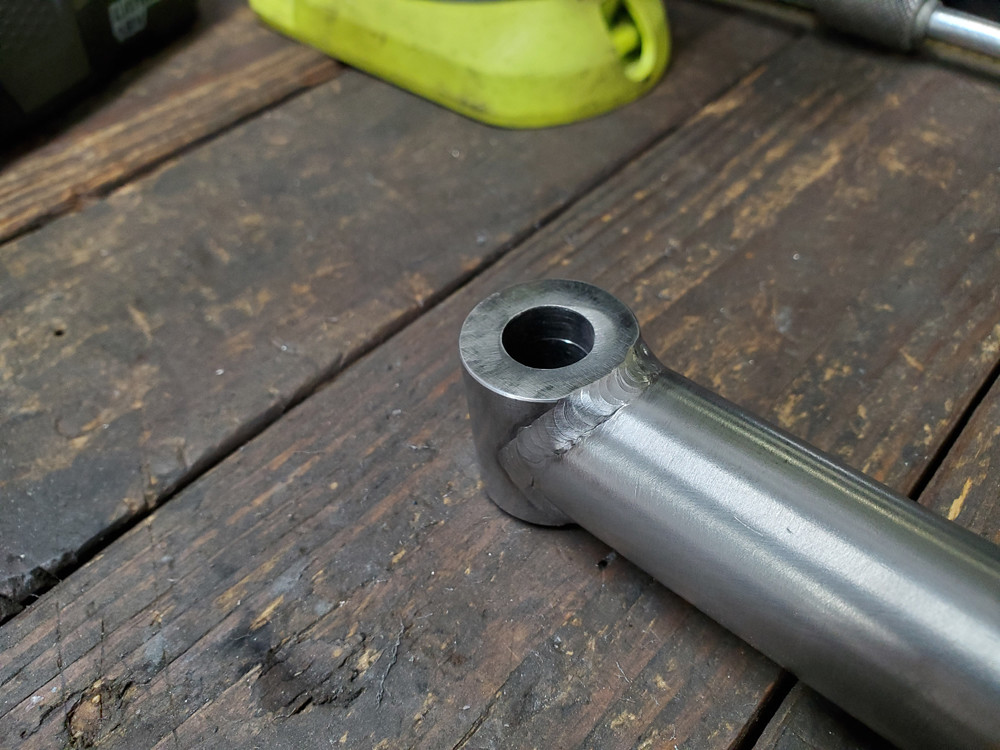
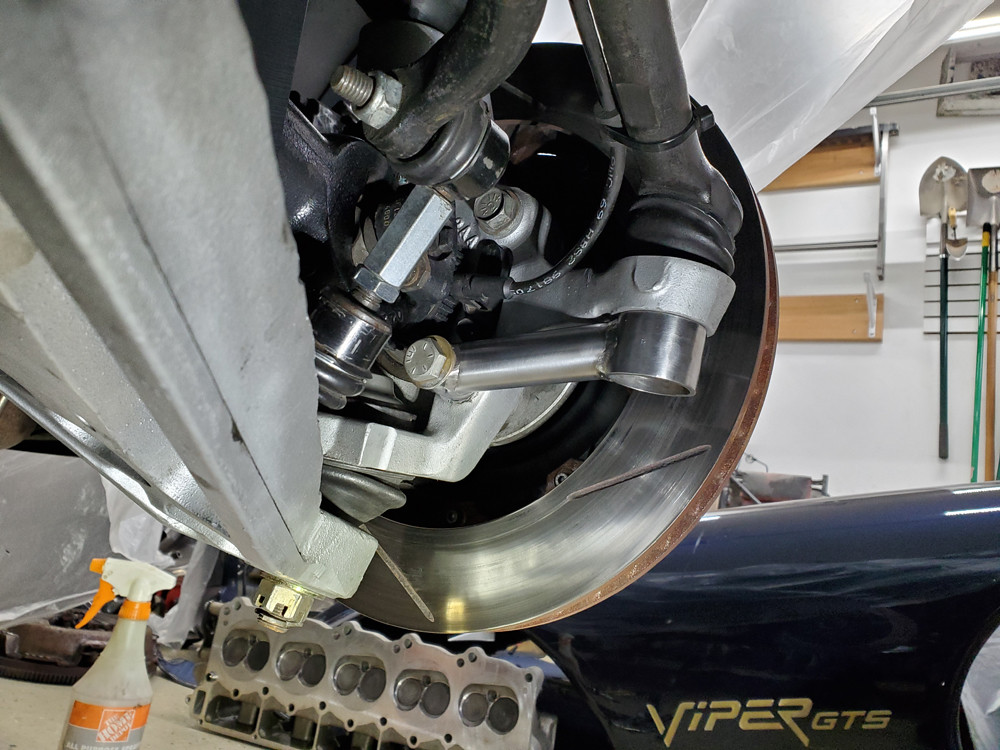
So made more progress and all the above suspension talk above is a great segue to the most recent part I made.
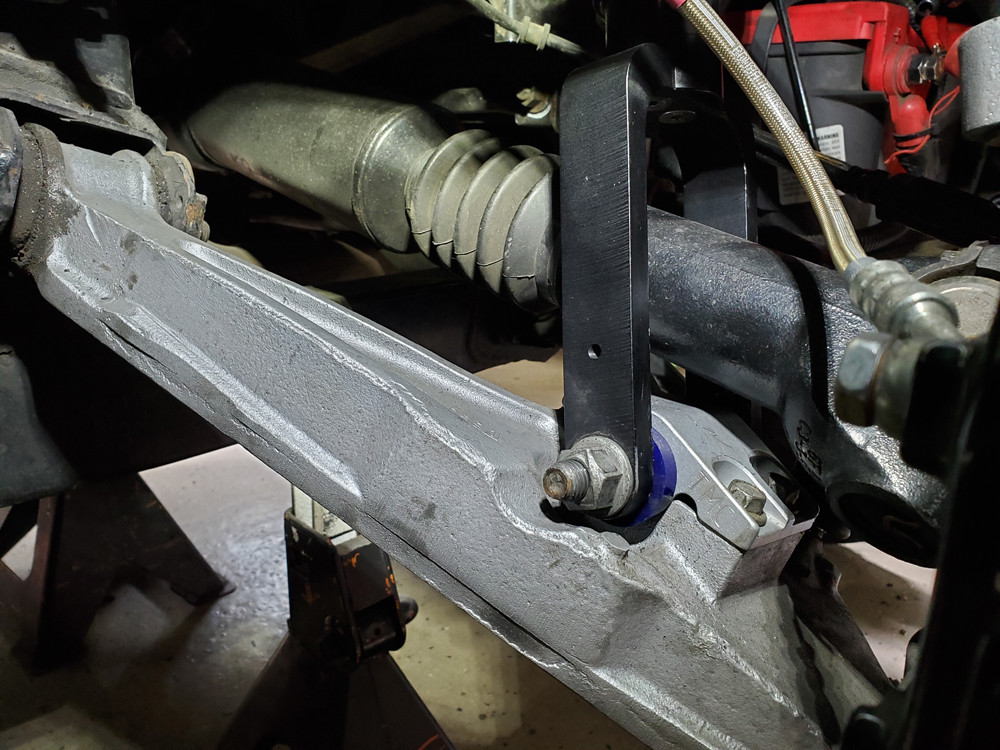
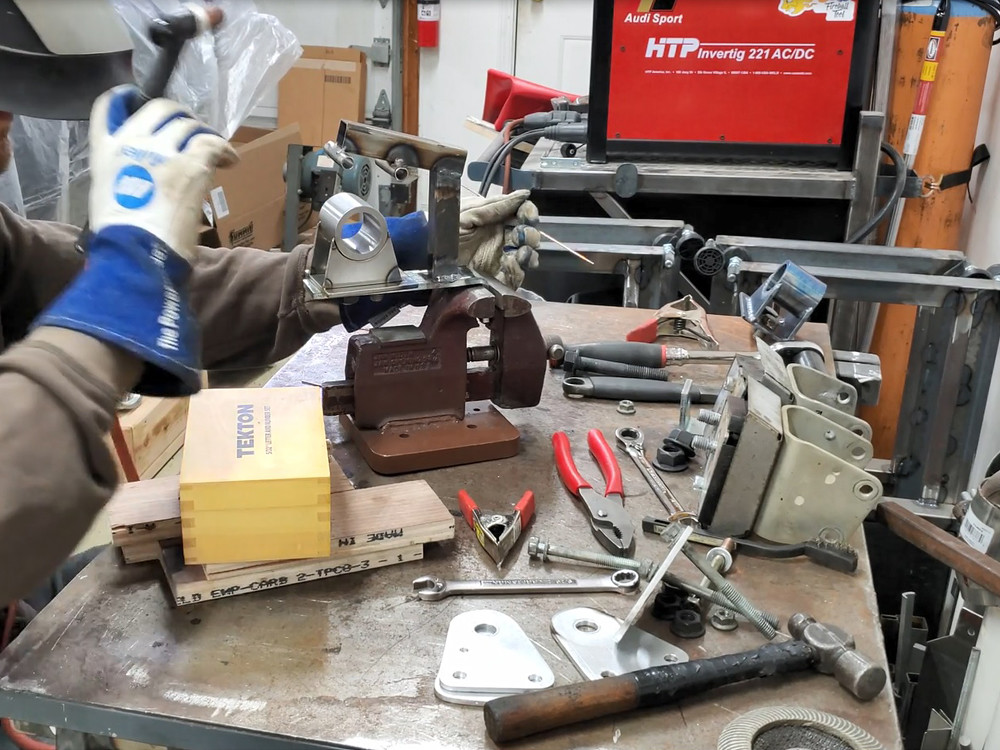
Gen 2s when tracked hard are known for having some interesting Toe changes at the rear of the car due to flex around the tie rod mounting points. I tackled the inner tie rod flex point on the frame a couple years ago by welding in a brace (there is also a bolt on piece for sale to do similar) but I never addressed the out spindle side. The aluminum arm the tie rod bolts to has been reported to have a decent amount of flex when being pushed in hard driving situations which leads to a dynamic toe situation. There are a couple different basic bolt on options made from plate steel, but I saw a beefier version featured on Motoiq and decided to build one like it.
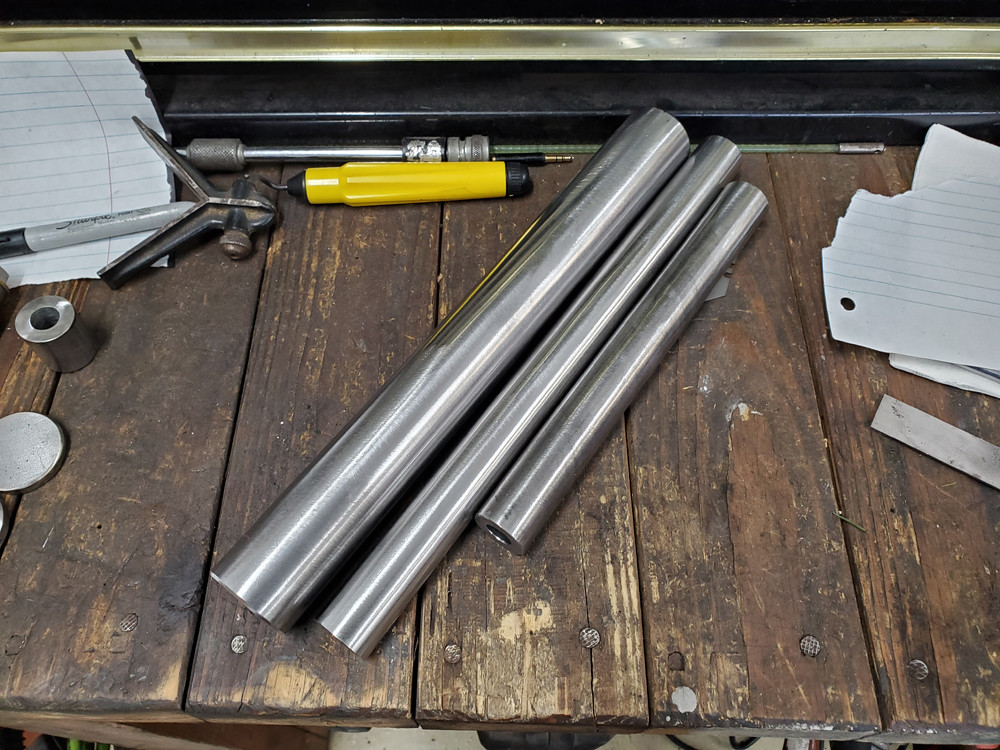
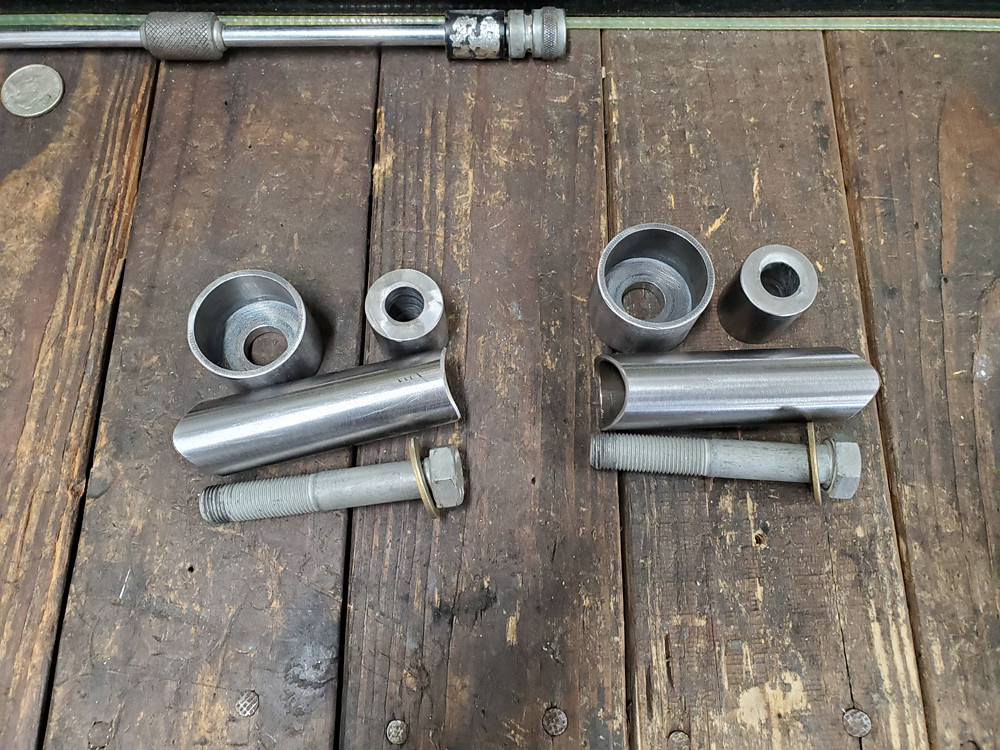
Construction is 4130 Chromoly tubing. Just bought 3 pieces of the size I needed from McMaster, which is probably enough to build another set if I wanted. I cut everything down to size, squared up the mounting faces, and coped the connector piece to have a nice tight fit up which is important for welding. Everything fit perfectly after welding and treating with no slop. Can't wait to see how the car feels on the track when I get everything else back together and the tracks are allowed to open back up. For now I wait on the big brown truck to keep bringing me parts so a can finish the engine and some other parts of the car.
The fabrication and pre welding mockup:

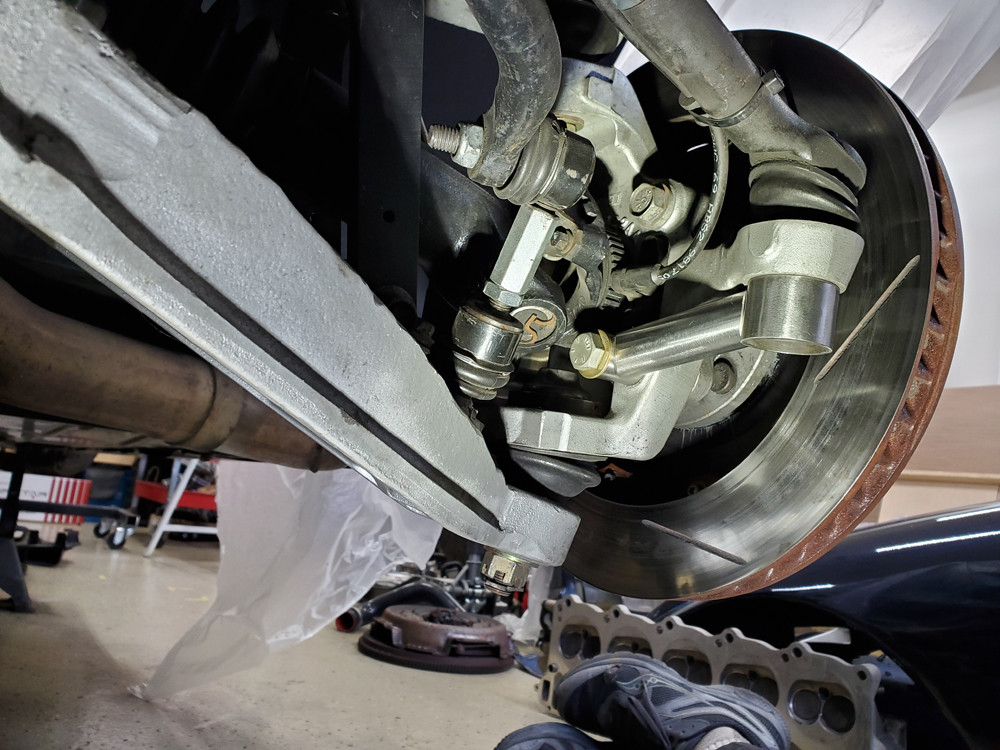
Welded up and bolted to the car. They will come back off and get coated before their final installation.

-
04-19-2020 #65Enthusiast
- Join Date
- Oct 2013
- Location
- South of London, Surrey
- Posts
- 7,577
Great thread
You clearly enjoy fabricating and welding 
Are you going to put any kind of heat shielding around the rubber boots?
-
04-19-2020 #66Enthusiast
- Join Date
- Oct 2013
- Location
- New Braunfels, TX
- Posts
- 1,836
The OEM upper/lower boots are very high quality, interchange with many Chrysler vehicles and are very inexpensive.
-
05-04-2020 #67Enthusiast
- Join Date
- Feb 2014
- Posts
- 297
I don't post in here often, but love this thread! Did you get a chance to run with the cooling ducts/deflectors? Very curious to see if these work decently on track.
-
05-04-2020 #68Enthusiast
- Join Date
- Nov 2016
- Location
- Ohio
- Posts
- 556
Way to go dude. Still counting on seeing this car at the track sometime.
-
05-21-2020 #69Enthusiast
- Join Date
- Jan 2014
- Posts
- 235
Great thread!
-
05-22-2020 #70Enthusiast
- Join Date
- Nov 2013
- Location
- Blair, Nebraska
- Posts
- 3,804
Wow, impressive work and informative thread! 98GTS do accept GTS Dean's offer to help you as he does not have years prepping his car and alignment, he has Decades!!!
-
05-22-2020 #71Enthusiast
- Join Date
- Jul 2016
- Posts
- 766
Oh, trust me, I'll be bugging him soon enough. Would also be nice meeting another Gen1/2 owner. I'm making sure my car is as fresh as possible before trying to align it again and then head out his way for inspection :-) I'm replacing all the control arm bushings with the energy suspension poly kit (stock rubber is really dry rotted already), Inner and outer tie rod ends for the front (outer only for rear) and bought new ball joints for just in case any are bad when I go to removing the control arms. Car has 16K miles on it so I assume they are good but figured I'd rather have them incase they were needed. If not, then I can keep for later use, no biggie. If one is bad I will be sure to replace all corresponding ones. Found MOPAR lowers but couldn't locate MOPAR uppers so got the MOOG ones. Thought about HOWE but I'm not a street racer or a track person. I just like to cruise and the HOWE seems like overkill for what I do with the car. Worst case, I can always swap them in if I have to down the road. Originally Posted by Bill Pemberton
-
08-23-2020 #72Enthusiast
- Join Date
- Jul 2017
- Location
- Michigan
- Posts
- 71
Ok it has been a while so I figured I should update this thread. I will start off saying the car runs and drives and has for over a month now, but I have been busy so I haven't gotten through my pictures until now.
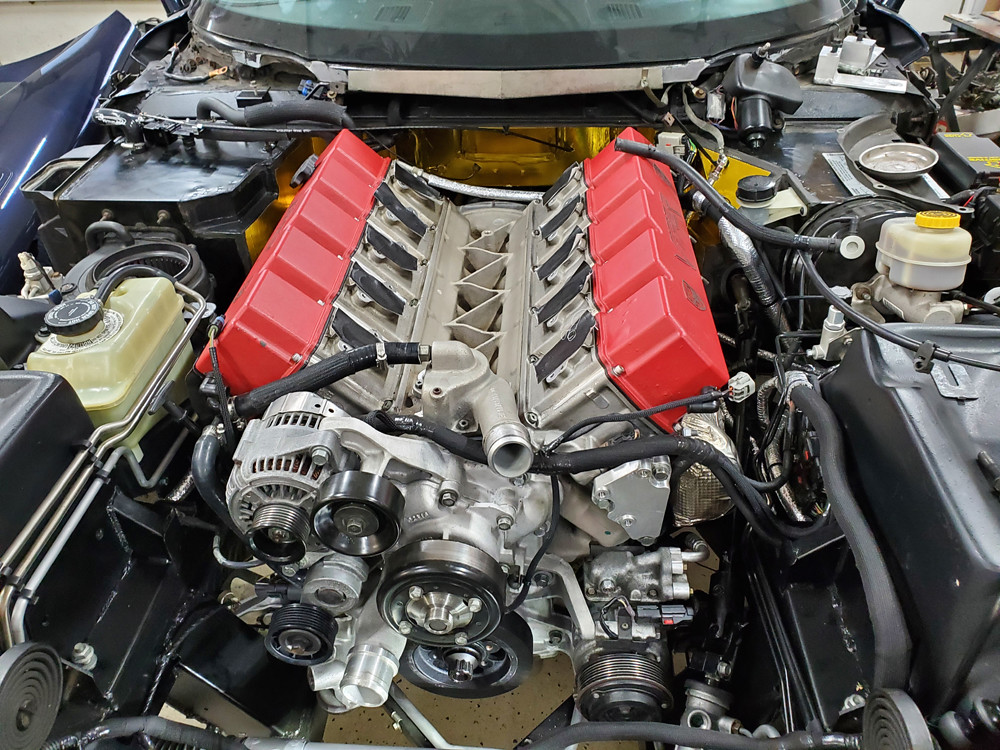
Where did we leave off, ah yes engine reassembly. So all new bearings, ARP bolts, etc. I went with the most oversized main bearings I could get and the motor still assembled a little tighter clearence wise than I prefer, but it should be fine. The build is basically a stock rebuild. I did go with a thinner cometic head gasket to get a small compression bump. I sandblasted and painted the exhaust manifolds so it would look a little cleaner when you open the hood. I installed a Fidanza Lightweight Flywheel and a stock Luk Clutch since they are plenty strong for mostly stock power. I of course redid the wiring wrap on the engine side harness to match everything else in the engine bay. The OCD is strong sometimes.

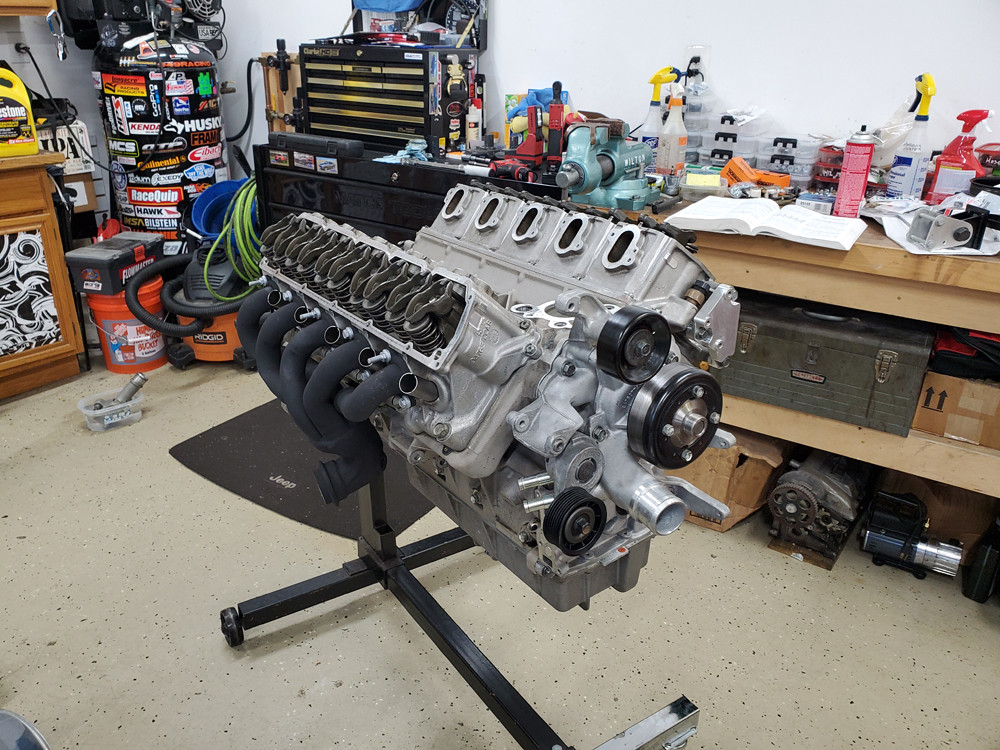
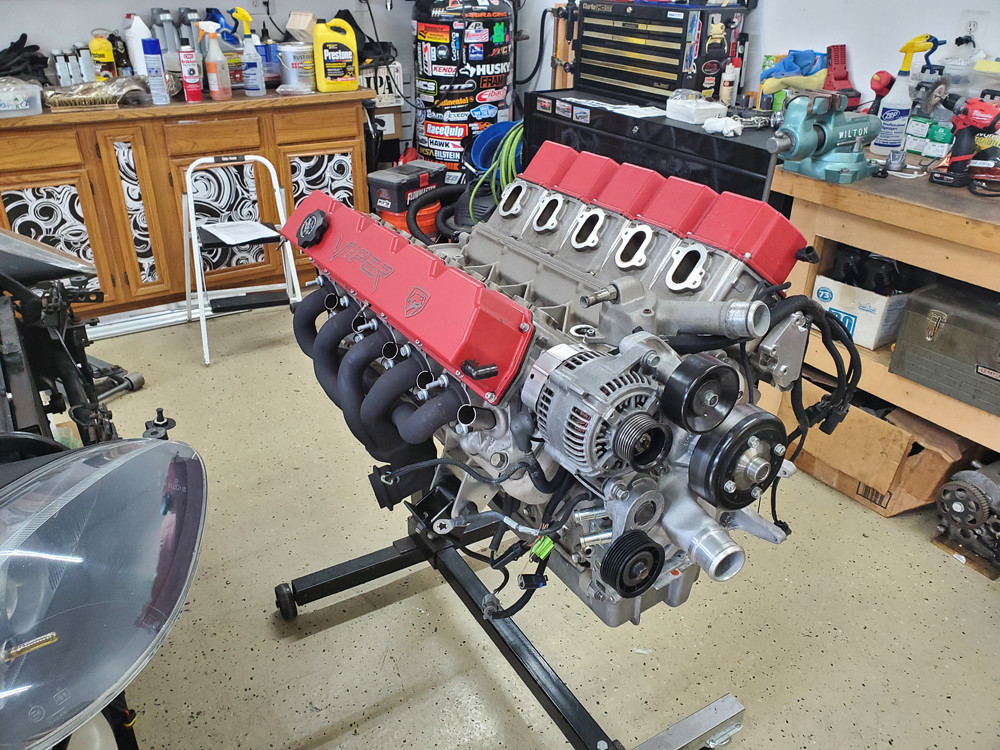

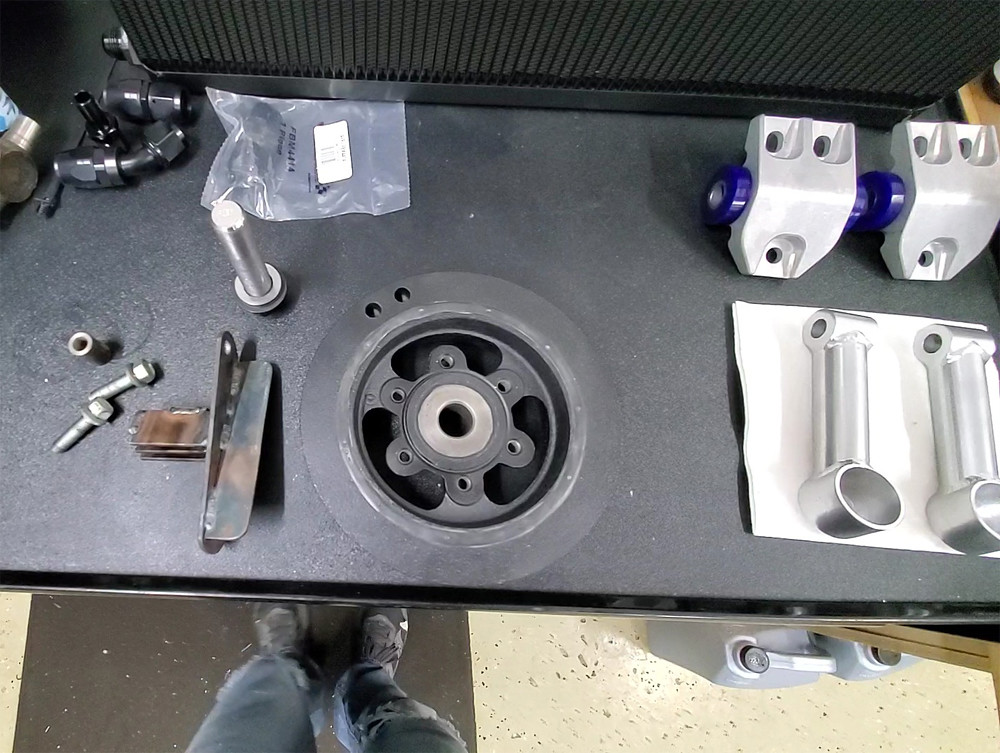
Luckily I have not encountered any harmonic damper problems that sometimes plague this engine. I properly pulled the damper on dry and used a new ARP crank bolt and red loctite. I built a crank holding tool that bolts in the hole where the starter goes and engages the flywheel. It made torquing down the damper bolt super easy and accurate and holds the whole rotating assembly in place if I need to tighten or loosen anything else. It is on the left of this picture and you can see it in place in the previous picture in the starter hole.
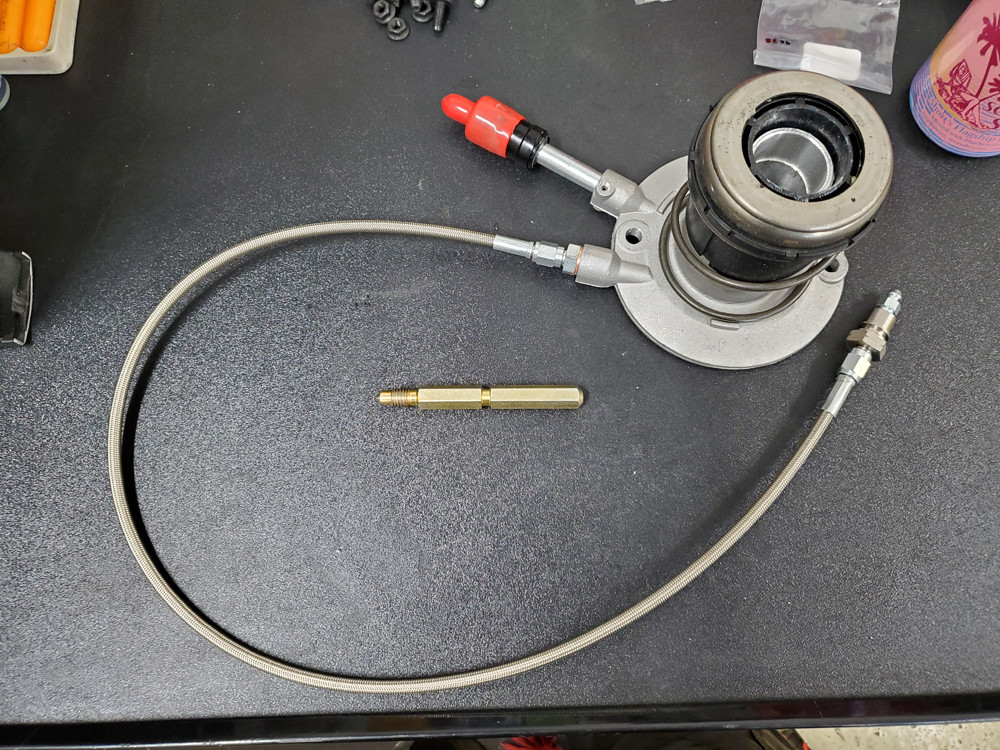
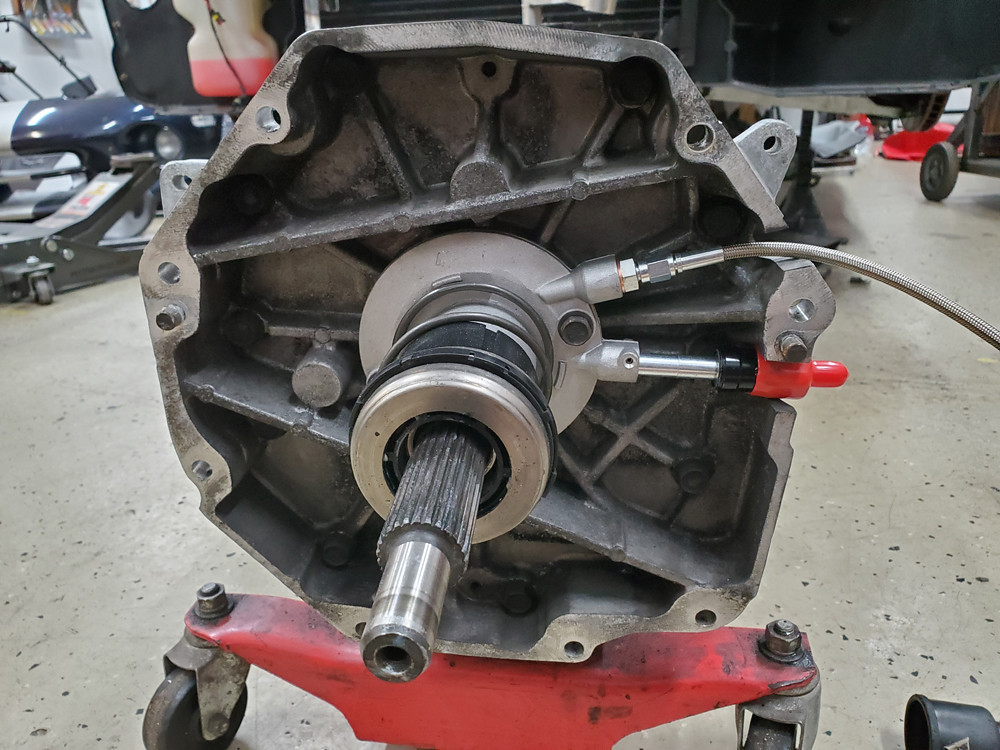
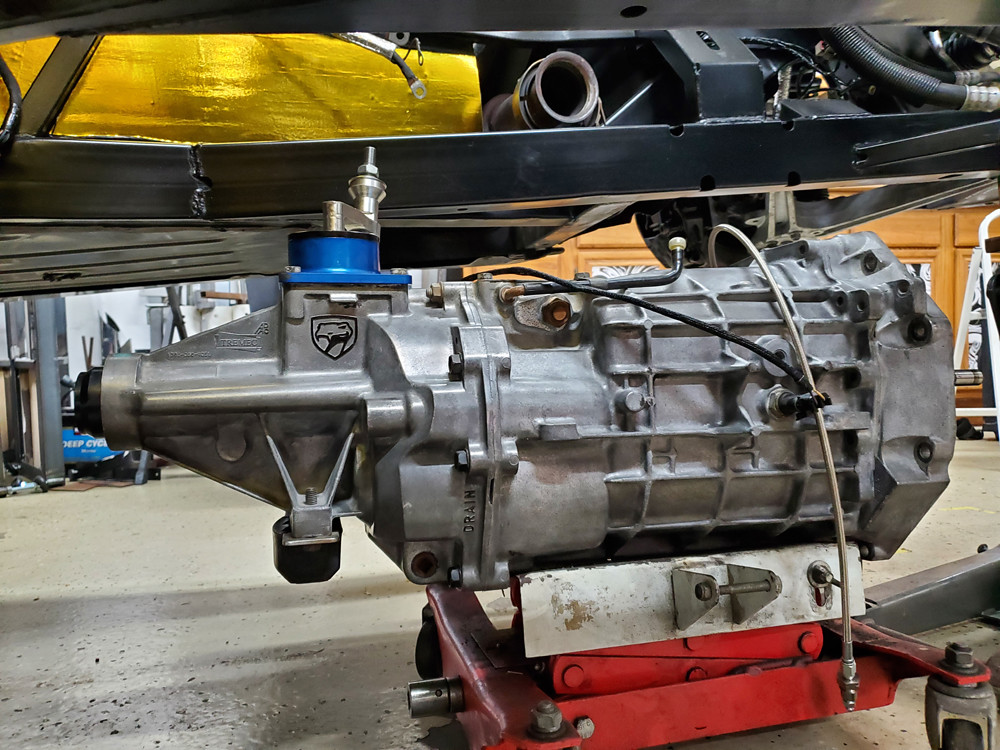
Since the trans was out I put in a new slave cylinder. I also made up my own remote bleeder line. I had seen some other topics on the subject and it was pretty easy to assembly. The one criticism I have of the other topics was they used a 48in long piece of high pressure line. I think that is way too long, 30in is perfect in my opinion (24in also works, you just shortcut a little to still end up by the reservoir). You can run it along the feed side and straight up so it ends right next to the clutch fluid reservoir. I am not sure what you would do with a 48in line besides loop it a bunch and that would look janky. Also because I was bored, I broke out the paint pen and accented the sneaky pete logo on the trans even though you will never see it when installed in the car.

I will try and post some more pictures in the coming days to get fully caught up with the current state of the car and give my thoughts on how everything went and how the car drives, but that is enough for tonight.
-
08-24-2020 #73Enthusiast
- Join Date
- Oct 2013
- Location
- New Braunfels, TX
- Posts
- 1,836
Hopefully you'll get some track time in before the end of the season! Mine's taken a back seat to some race engines lately. Only waiting on heads to be finished.
-
08-26-2020 #74Enthusiast
- Join Date
- Jul 2017
- Location
- Michigan
- Posts
- 71
Luckily some of the local tracks added some extra late fall days to the schedule to make up for cancelled events at the beginning of summer. So hopefully I will be able to get out there at some point and get my track fix. Originally Posted by GTS Dean
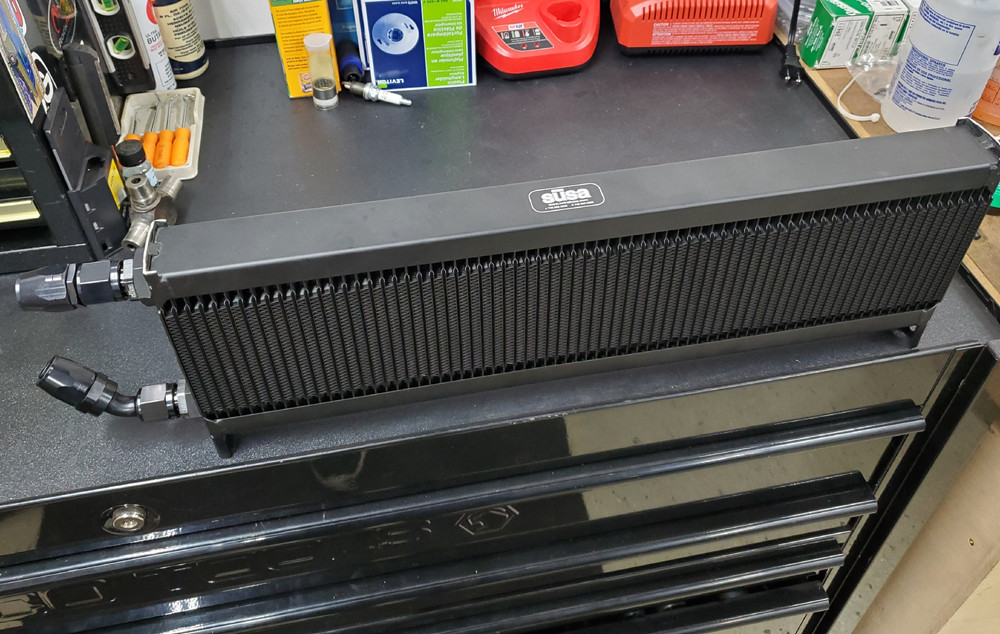
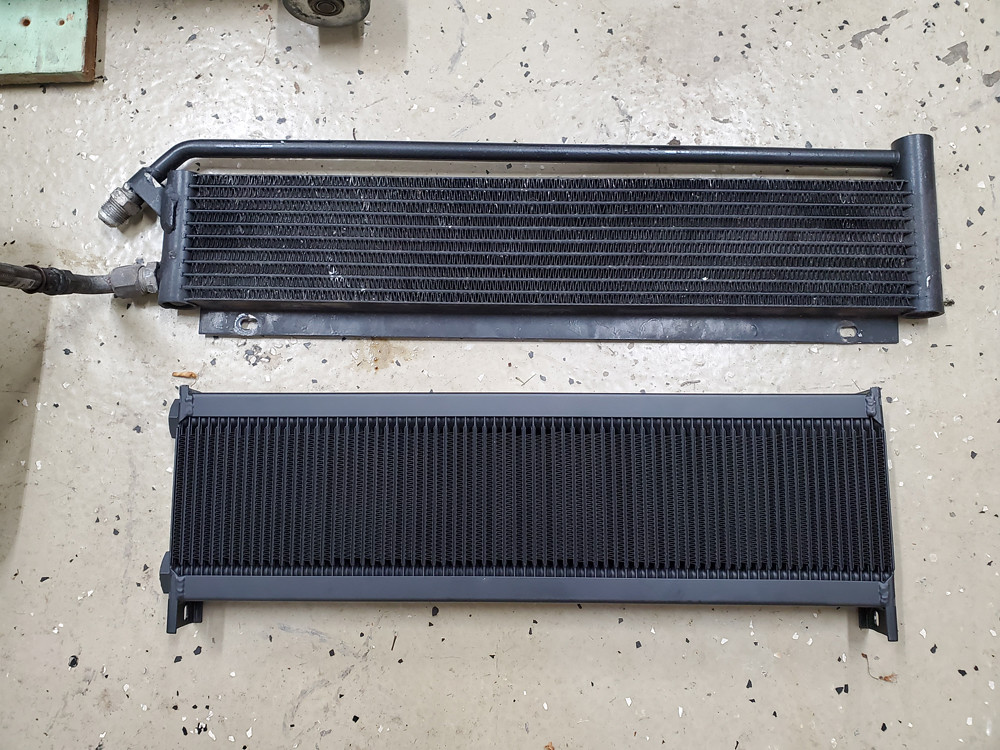
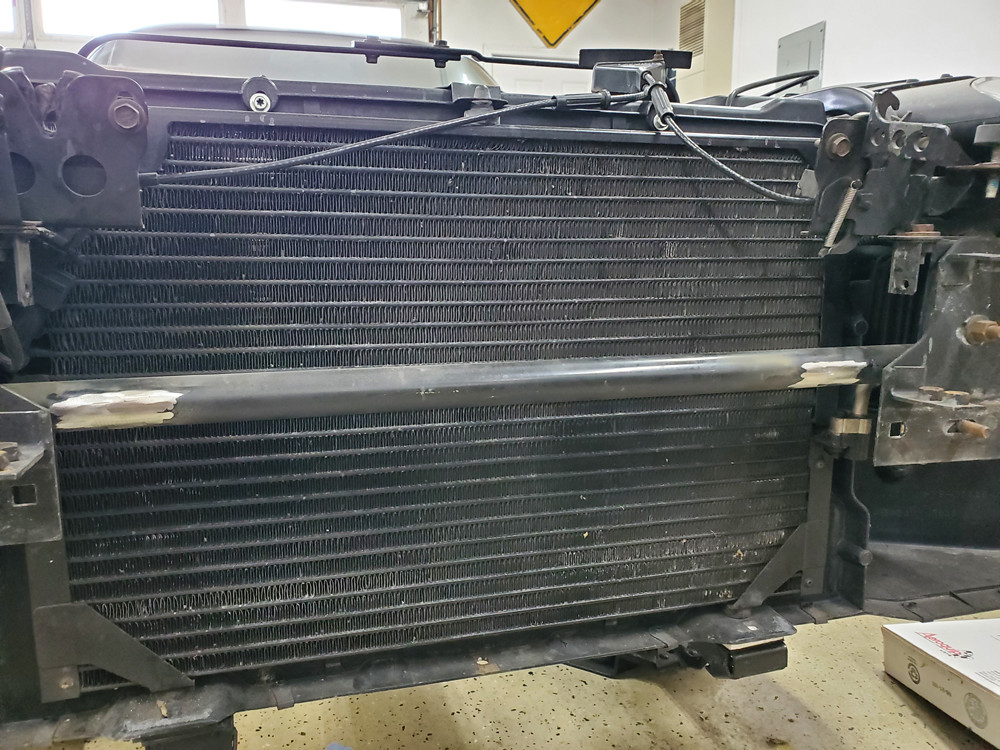
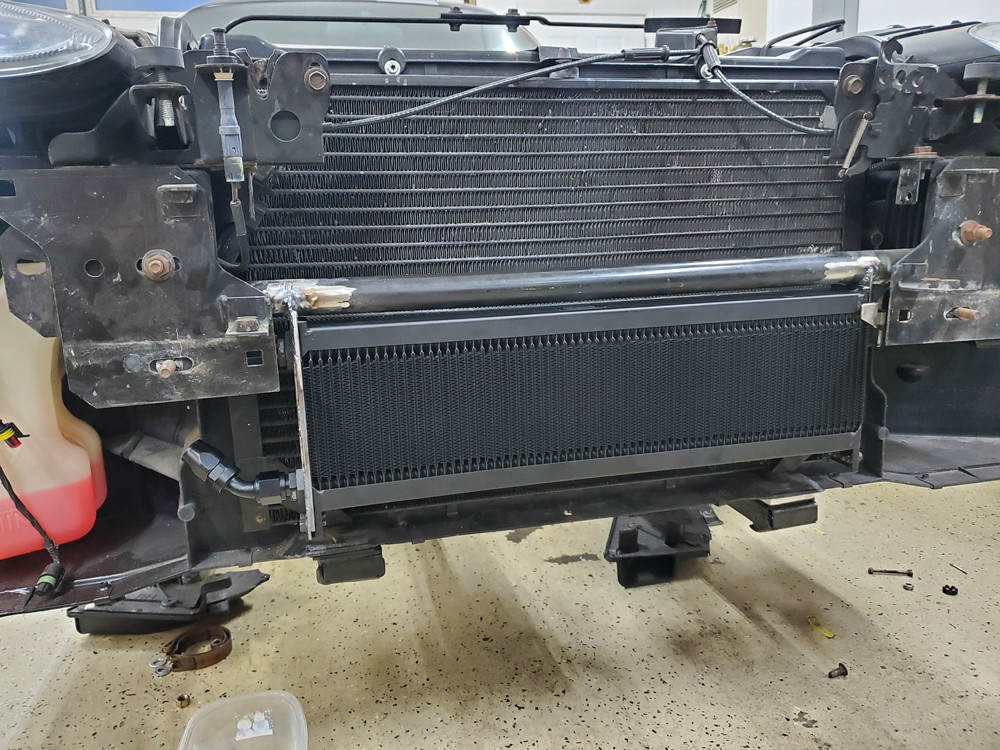
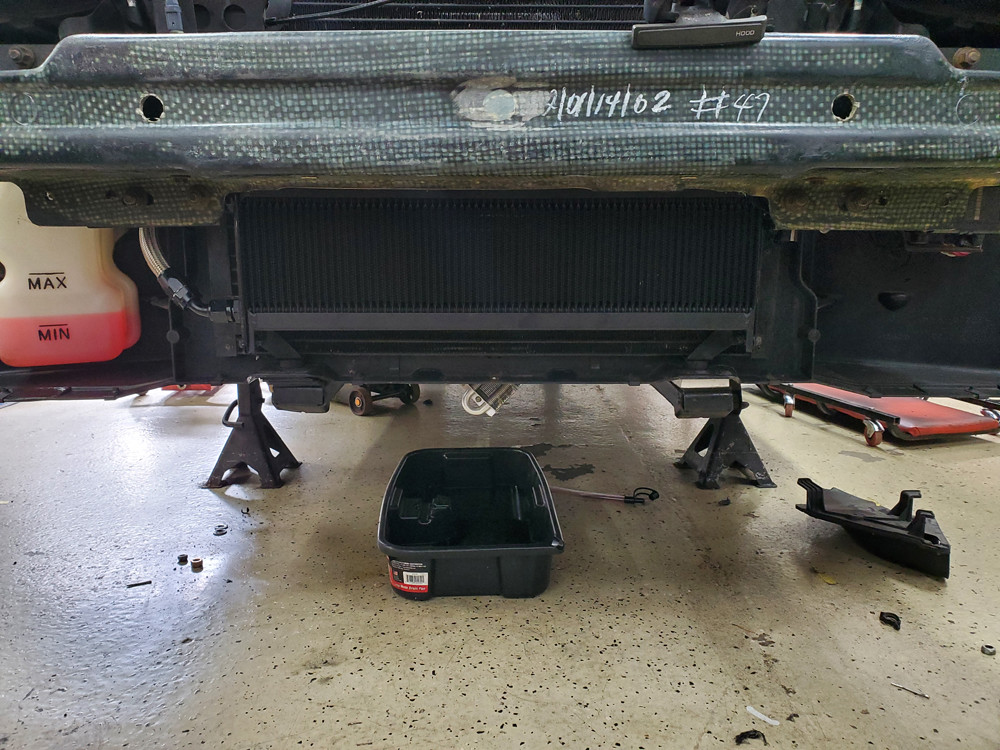
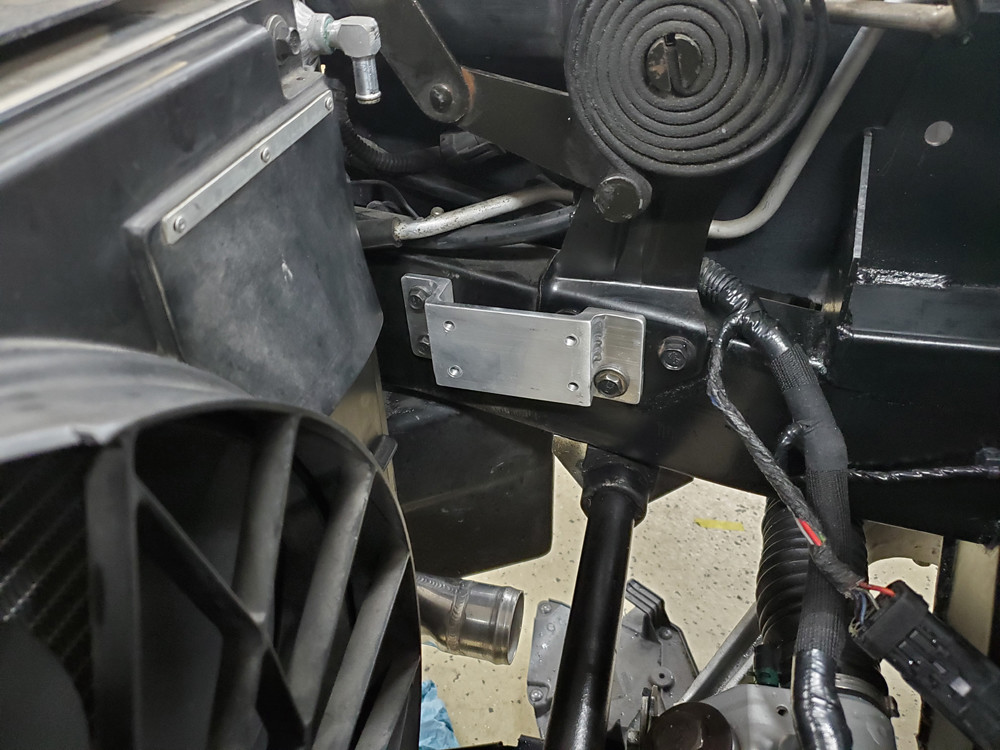
So I got the engine back in its' home and started getting everything reconnected. One item getting connected that changed from stock was my oil cooler. I decided to get a new cooler to avoid any possible metal contaminants hiding in the old one and to see if I could drop my track oil temps even more. I went with the Setrab ProLine 72 row cooler and made custom -10 lines with aeroquip fittings and hose. It is a little less wide, but much thicker and a little taller than the stock unit. I wanted to tuck the cooler up so only the cooling portion was in the air flow and the upper end tank wasn't just an air dam. I cut off the stock mounts and welded some custom brackets on.
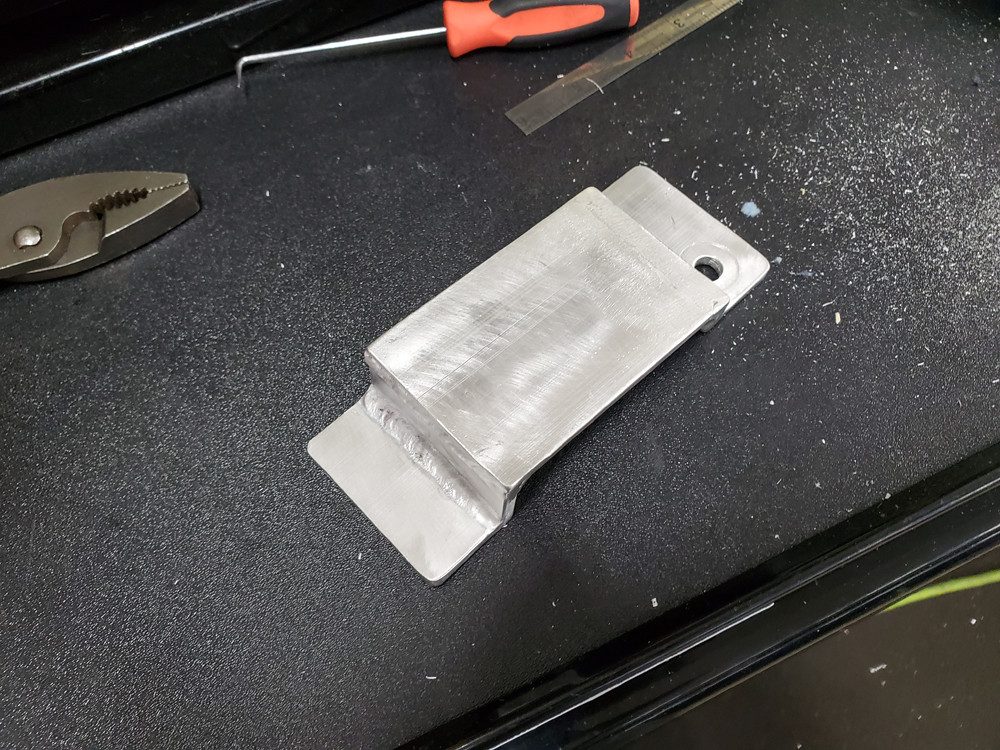
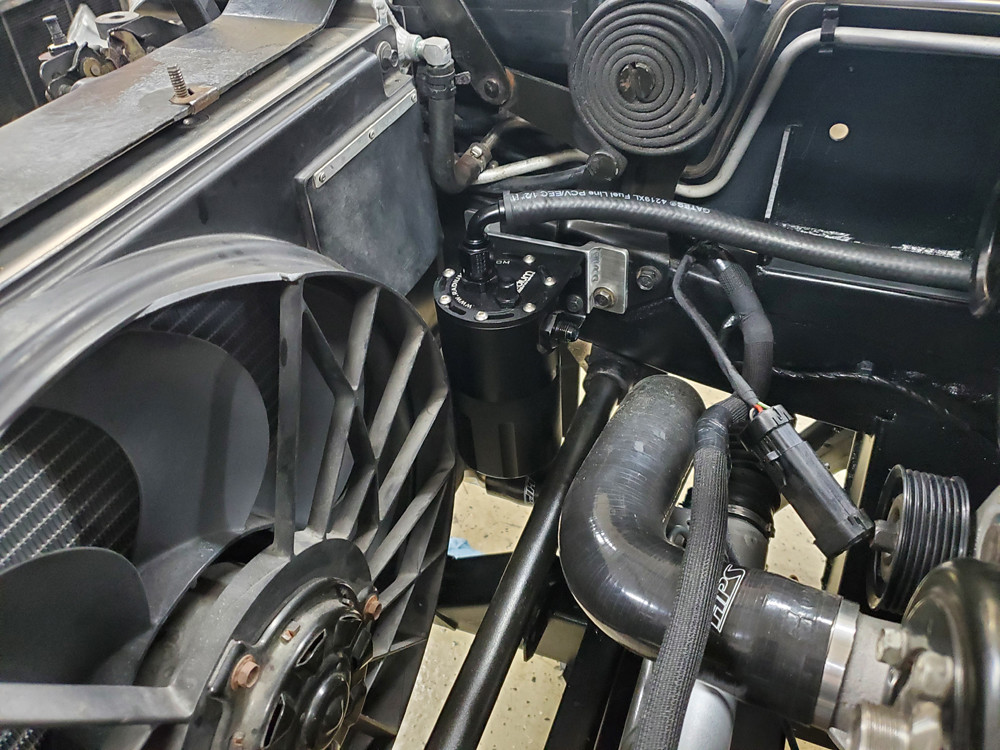
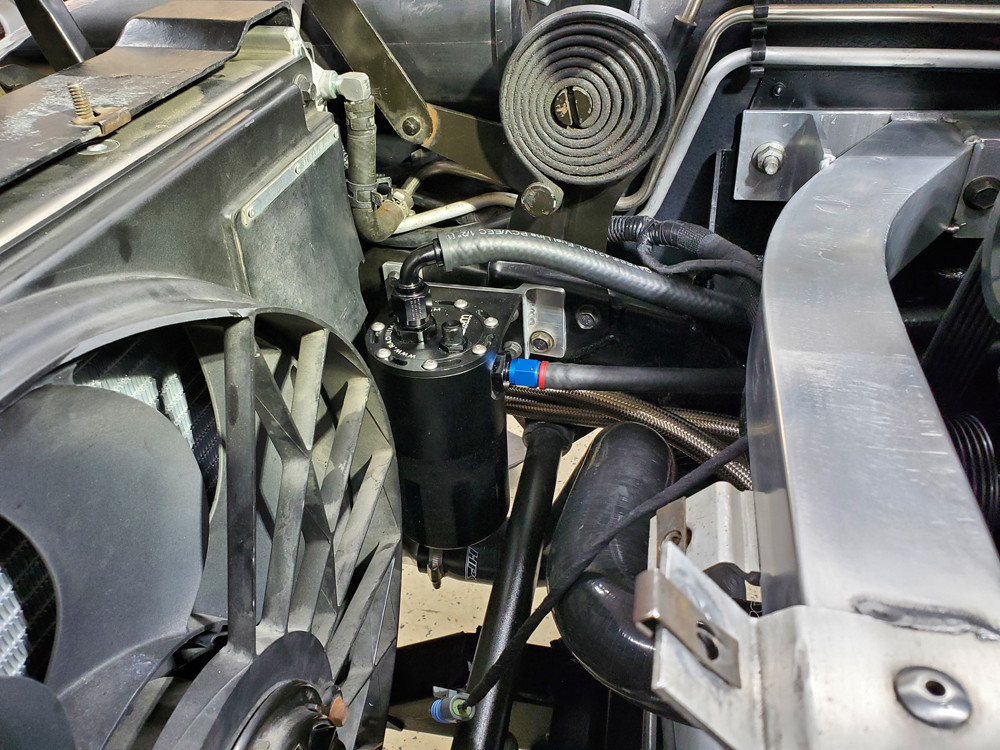
Speaking of oil, I changed up my oil catch can setup again. I was filling my small can from the block breather on track days pretty easily so I upgraded to the larger Radium Engineering Competition catch can. I just have the short version which will hopefully be plenty, but can upgrade to the long later if needed. I built an aluminum bracket that bolts to the frame and tucks the can just behind the fan shroud. It is positioned in the perfect spot so it doesn't interfere with the shroud air flaps. I ended up accidentally filling it a couple times during engine break in while seating the rings. Lots of blow by and crankcase pressure. After getting the rings fully seated it has been pretty much dry since, but I haven't flogged the car at the track yet. We will see at what rate it fills. I ended up just eliminating the valve cover catch can since it literally never caught a drop after many track days. They are just reconnected to the airbox directly like factory.
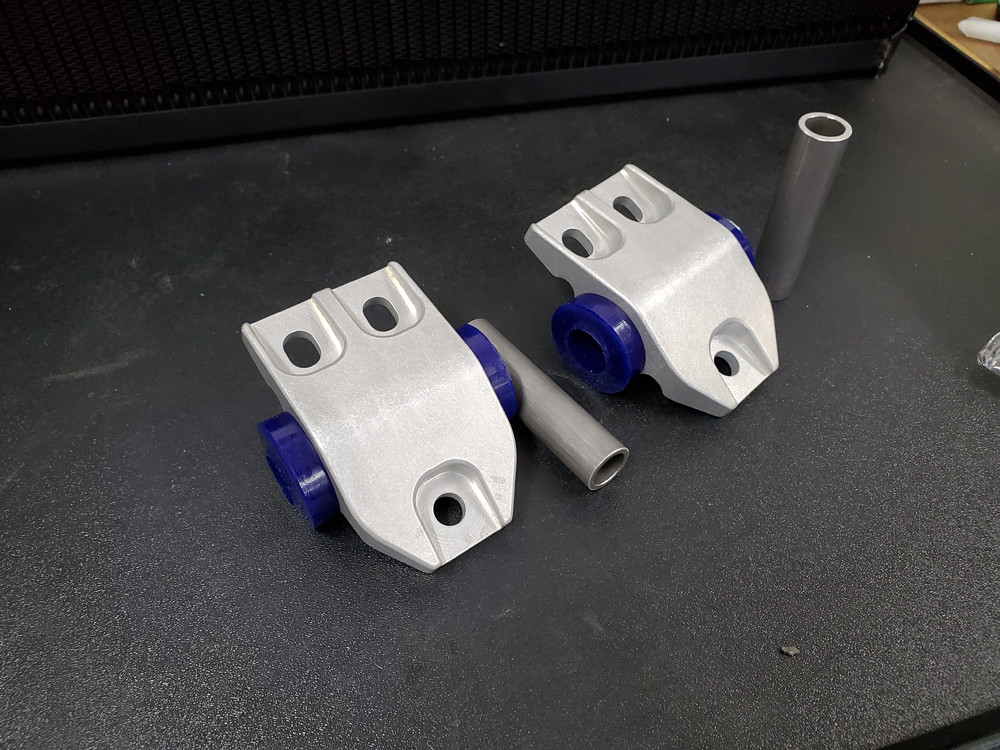
And finally some non engine related things I addressed. For a long time there were no real replacement options for the rear lower shock mounts. Well finally all at once several different manufacturers stepped up. I bought these lower mounts probably 6 months ago from a guy advertising on one of the Viper FB groups. My stock ones were toast, which considering this car was never really tracked until I bought it, shows just what the effects of stress and time does to rubber. These Poly mounts should last quite some time and the aluminum brackets look really nice.

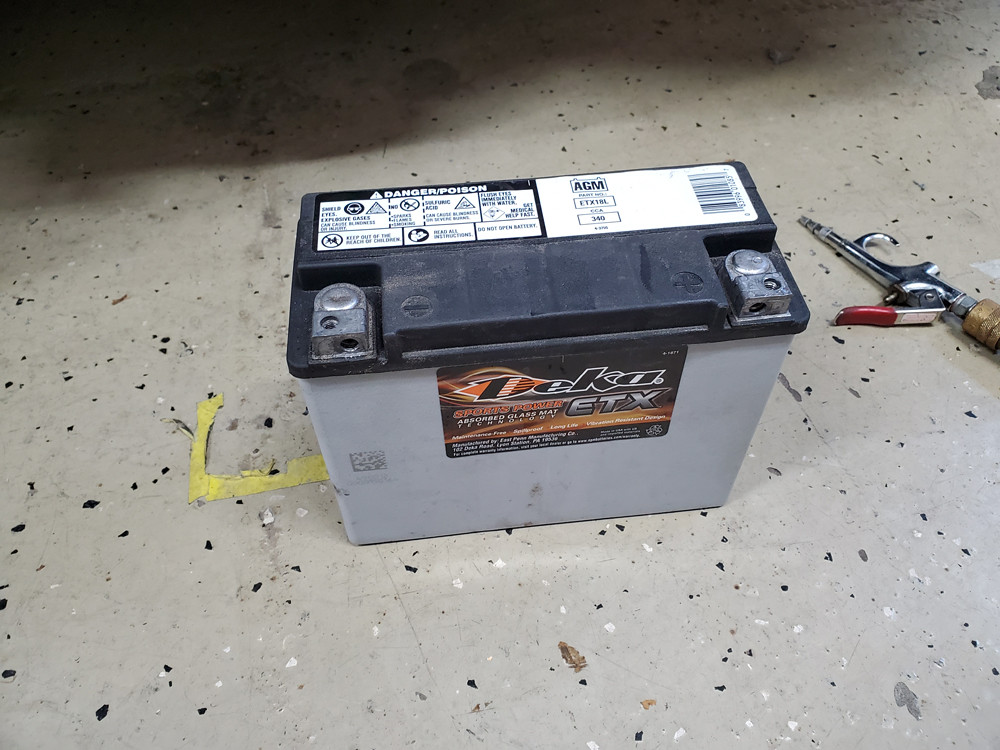
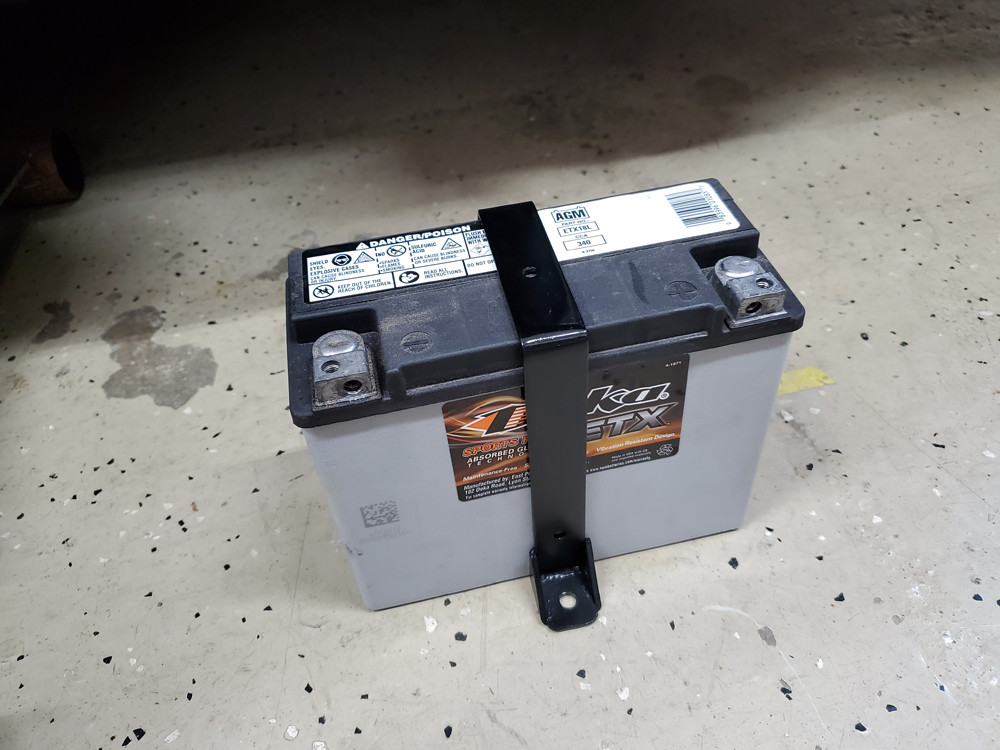
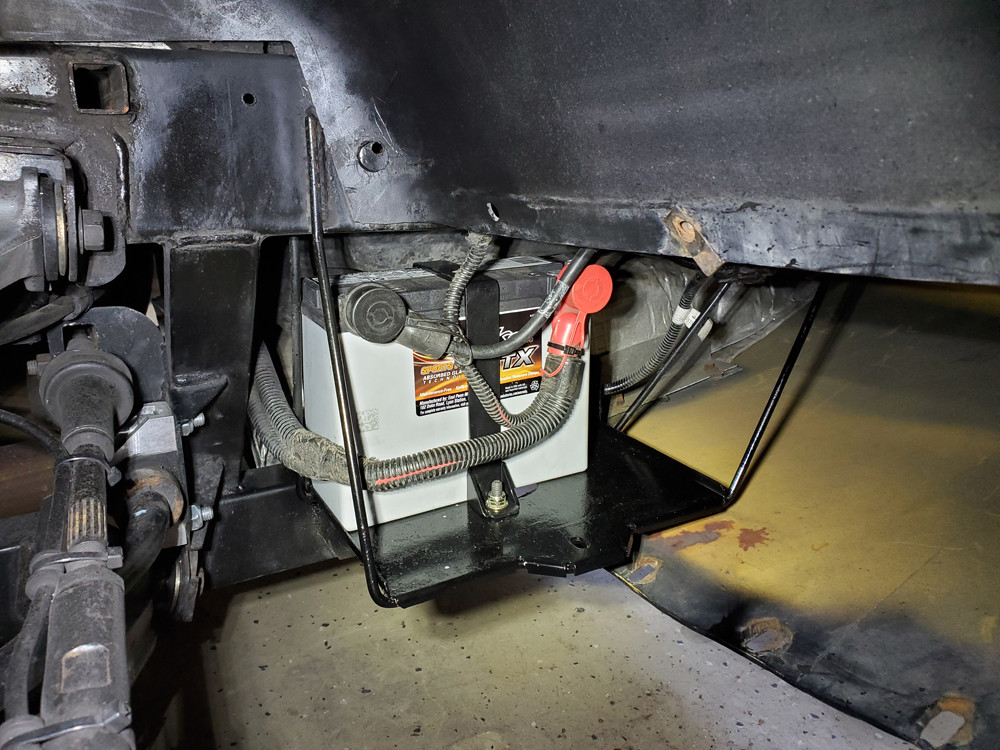
For the true weight savings addicted but also for the people who don't want to spend $500 on a battery I present the Deka ETX18L. I have been all over the fence about going with a lightweight battery. The quick weight savings is nice, but they can be brutally expensive or don't crank worth a crap. After a ton of research I settled on this one and took the chance and it has been awesome. It is an AGM and completely sealed, so perfect for the track. Total weight of the battery including the bracket I made is 17.9lbs and the battery it replaced was 39.5lbs. A quick almost 22 lbs off the left rear corner, a place where I always run heavy on the scales. The battery retails for right at $100 new so it was hard to say no. It has had no issue cranking the car cold, hot, after short run times, and sitting for many days. It has M6 threaded terminals and is right side positive, so you just have to change the bolts in the stock cable ends to M6 and there is plenty of length in the stock cables to do the crossover.
That is all for now. I have a few more pictures and probably a video of startup I can post eventually. Hopefully I have provided some entertainment and insight as the crazy guy with a welder.Last edited by Mr. Acoustics; 08-27-2020 at 06:08 AM.
-
08-27-2020 #75Enthusiast
- Join Date
- Feb 2020
- Location
- Indianapolis
- Posts
- 166
And now I have the unsettling urge to check my rear lower shock mounts hahah.


 Reply With Quote
Bookmarks