
It's not for an investment. I love the car and I drive it to much for that, but it's more so a pride thing knowing my car is damaged. I'll fix the front end eventually, hell if it's just the rebar that's busted I'll replace it and try to fix up my gaps.Originally Posted by daveg

Results 26 to 50 of 171
-
05-01-2018 #26Enthusiast


- Join Date
- Dec 2017
- Location
- The US.
- Posts
- 181
-
05-01-2018 #27Enthusiast
- Join Date
- Oct 2016
- Location
- Trois-Rivieres (QC)
- Posts
- 229
I understand your disappointment, but if I was you I would simply fix it. Everything is fixable, except a ruined Carfax! After the job there could be absolutely no sign of a collision. Originally Posted by JimJoeBob
-
05-01-2018 #28Enthusiast
- Join Date
- Dec 2017
- Location
- The US.
- Posts
- 181
I like the way you think murcielago. We'll see how far I dig to see what's busted.
-
05-01-2018 #29Enthusiast
- Join Date
- Apr 2016
- Location
- Sweden
- Posts
- 257
Welcome to the club. Originally Posted by JimJoeBob
Don't be mad, don't be sad. Just face the facts.
And now when you've been allowed to breathe a little, Just get yourself some fiberglass, polyester, a good 3m mask and get to work. You will be proud when you're done!
But also don't assume that the hood is correct like I did! Do it once, do it right.
Don't do it twice. Like me.
-
05-01-2018 #30Enthusiast
- Join Date
- Dec 2017
- Location
- The US.
- Posts
- 181
That's what I'm trying to do is tell myself, oh well I still have a Viper and I know my hood needs to come down. If I can push the centerline of the fascia down I could lower my hood and get everything damn close. Originally Posted by ViperTim
-
05-01-2018 #31Enthusiast
- Join Date
- Apr 2016
- Location
- Sweden
- Posts
- 257
Hey I just bought a BMW because for the first I time wanted to be reasonable and have a reasonable car. Originally Posted by JimJoeBob
Today I've been tearing down the transmission because the torque converter is toast.
Meanwhile I've just rebuilt the entire front end of our other reasonable car just to hear from the tech inspection it won't pass due to emissions.
Meanwhile my supercharged Tbird needs love.
Meanwhile my Viper needs all new fluids.
Meanwhile my girlfriend's wants to have a baby.
Meanwhile I want to get an Austin A40 to restore.
Cars and I are no good match.
Somehow I still keep them around....
-
05-01-2018 #32Enthusiast
- Join Date
- Oct 2013
- Posts
- 462
Sounds like you are doing just fine, what with multiple girlfriends and all. Originally Posted by ViperTim

-
05-01-2018 #33Enthusiast
- Join Date
- Oct 2013
- Location
- New Braunfels, TX
- Posts
- 1,836
There are (4) 15mm carriage bolt nuts that need to be loosened (two on each rebar adapter plate) to adjust its horizontal and vertical positioning. Two of them are accessed from behind the closeout panel - below the NACA duct and in front of the radiator - and two from the front grille opening. Unless the rebar is broken clean in two, I don't know what would hold you back from trying it. Then, you could lower your hood quite a bit. Originally Posted by JimJoeBob
-
05-01-2018 #34Enthusiast
- Join Date
- Dec 2017
- Location
- The US.
- Posts
- 181
Thanks, the rebar has a ugly crack but it's not in two bits fortunately. If that works it'll get me close and I'll be happy with close. Originally Posted by GTS Dean
-
05-02-2018 #35Enthusiast
- Join Date
- Oct 2013
- Location
- South of London, Surrey
- Posts
- 7,577
I'm in the process of aligning everything up too, For the record Front Radiator support shrouds are still available new. I just got one

Now weather the spacing is the same on the new one compared to the old one I will find out this weekend!
-
05-02-2018 #36Enthusiast
- Join Date
- Apr 2016
- Location
- Sweden
- Posts
- 257
Thank God It's only 1 girlfriend. With all shit going on I could never afford more than 1 Originally Posted by Red Snake
-
05-03-2018 #37Enthusiast
- Join Date
- Oct 2013
- Location
- New Braunfels, TX
- Posts
- 1,836
Here are the various shims used for the fascia, core support and headlights.
From L-R: Rebar adapter to front frame horns, lower frame rail to underside of core support, outside upper frame rail to core support (inline with radiator) and headlight pod shims.
-
05-06-2018 #38Enthusiast
- Join Date
- Oct 2013
- Location
- South of London, Surrey
- Posts
- 7,577
Well, started on the alignment today, by the end of the day Im totally depressed. I cant even get it close!
First thing I did was to check hood alignment, where hood meets the top of the door. Now the trouble is I have adjusted my doors in the past without much success, so checked measurements of the rear of each door to the rear wings, sure enough the measurements either side were different.
Now I have never adjusted my hood so I am going to use that as the starting point.
1, Closed hood and adjusted rebar so that the measurement was equal both sides.
2, core support fastenings were slightly loose at this point.
3, Tried plastic fascia positioning
Now the core support is a new one, I was hoping that the shims used on the old core support would be the same for the new support, but sadly that seems not to be the case!
Mounted headlights and sadly the lights are too close to the top of the hood. Also I can't slide them forward enough to close the lower gap to the plastic fascia
Also found that front headlight stud had torn away from the headlight housing
Took headlight apart and repaired the housing.
Trouble is I don't have any previous measurements to guide me,
Left the garage tonight totally depressed.
-
05-06-2018 #39Enthusiast
- Join Date
- Nov 2017
- Location
- New Canaan, CT
- Posts
- 235
Hey Jim/Joe/Bob/Whatever-First-Name !!!
While this discovery might annoy you at first, once you fix it you will "really" bond with the car because it is now yours. Enjoy the ride.
-
05-07-2018 #40Enthusiast
- Join Date
- Apr 2016
- Location
- Sweden
- Posts
- 257
Hey, nobody said it was easy nor quick. Originally Posted by Fatboy 18
Keep working. Took me about a week, to do it wrong.
Frustration is only the beginning, soon it will be the feel of hopeless.
Keep at it! Do it an hour or two at a time, then just walk out and continue the day after.
-
05-07-2018 #41Enthusiast
- Join Date
- Oct 2013
- Location
- South of London, Surrey
- Posts
- 7,577
I would actually like to know the correct factory procedure, they must have had Some guidelines to work on? Lets face it they built thousands of these things, it couldn't have taken them days each car? I was actually pleased with my fit prior to Aquaplaning
-
05-07-2018 #42Enthusiast
- Join Date
- Oct 2013
- Location
- New Braunfels, TX
- Posts
- 1,836
I have never seen any factory guides for this process. It all comes down to logical contemplation and patience.
Moving the doors and centering them in their holes can be a bit of work. You have to "walk" them around by pivoting about the 4 hinge bolts and adjusting the latch striker plate. The ones that bolt to the side of the footbox control fore-aft (fender gap), and parallelism to the side sill. The ones on the front of the door twist it to perfectly match the profile of the quarter and roof panels. They can also be used to push the front of the door in or out to more closely match the hood corners. When you get it right, the doors magically pop open about an inch with no drag just from the spring in the door seals - just like when brand new!
If you have to move the hood at the front hinge mounts, you'd best get another pair of hands. I've tried rubber mallets, dead blow hammers and wooden blocks to move them around on my own, but to no avail. Frankly, any significant door, hood, fascia or headlight alignment is much more productive with 2 people.Last edited by GTS Dean; 05-07-2018 at 08:44 AM.
-
05-07-2018 #43Enthusiast
- Join Date
- Oct 2013
- Location
- South of London, Surrey
- Posts
- 7,577
I need to move to Texas.
I need to raise the front fascia to cover the lower part of the light, but if I rase the rebar then this makes the fascia too high to match the front of the hood.
So it looks like I need to tilt the headlamps down which would mean shimming the rear of the headlights.
The other major issue is the plastic fascia itself. it moves around too much with the christmas tree fasteners, I going to go the Rivnut route to hold it firmly in place.Last edited by Fatboy 18; 05-07-2018 at 10:35 AM.
-
05-07-2018 #44Enthusiast
- Join Date
- Oct 2013
- Location
- New Braunfels, TX
- Posts
- 1,836
I prefer the re-usable 1/4" nylon rivets with the lock pin in the center. That's also what I use to retain the front fender wells to the frame.
-
05-07-2018 #45Enthusiast
- Join Date
- Oct 2013
- Location
- South of London, Surrey
- Posts
- 7,577
Where I'm at DAY3!
I am working from the front of the hood.
I am of the opinion that the rad shroud needs to come forward, but it cant move forward because there are 2 vertical slots and shins that the shroud locates onto. You can tilt the shroud but that's not cutting it.
I was fed up by the end of the day so mounted the facia again and used the christmas tree fasteners to firmly hold the fascia in place and firmly tightened the fender fascia screws to get a true measure to where i'm at.
Result......Not good.
Earlier in the day I also removed some of the original core support spacers to slightly lower it. I removed two shims from the drivers side and 1 shim from the passenger side.
In the pictures the headlights currently have Zero shims in place but it as if I need to make the slots in the core support bigger to allow the light boxes to move in all directions rather than just forwards and backwards? They surely didn't play around with a dremel at the factory!
Prior to my Aqua Plane incident
DOC-20180503-WA0011.jpg
Now zooming in on that side shot I note that the fascia is tilting slightly down if looking at the front and rear hood gap behind the headlight.
So at end of day 3 this is where im at
Side shot hood to fascia RHS
20180507_194443.jpg
Side shot hood to fascia LHS
20180507_194535.jpg
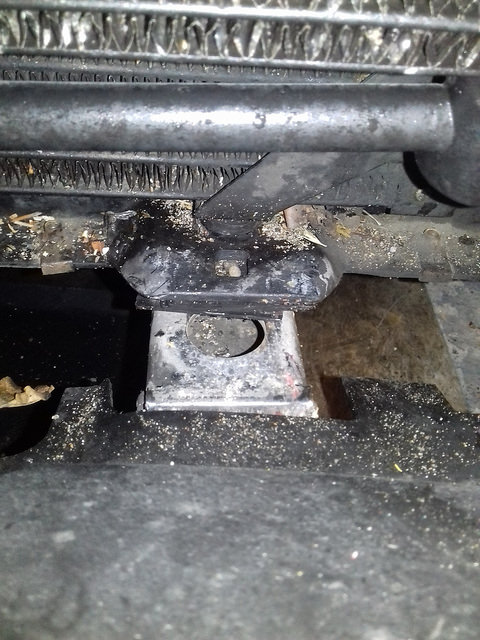
On the lower outside of the headlight its touching the front fascia (that's as far forward as the light will travel in the core support slots}
20180507_194956.jpg
LHS Similar thing, Outside lower part of light touching front fascia but still light needs to travel forward or be angled
Light is sitting high too
20180507_194525.jpg
-
05-07-2018 #46Enthusiast
- Join Date
- Oct 2013
- Location
- South of London, Surrey
- Posts
- 7,577
Hood to fascia
20180507_194501.jpg
Gap seems to be a bit big?
-
05-07-2018 #47Enthusiast
- Join Date
- Dec 2013
- Location
- Mass
- Posts
- 1,079
Question Mark..
Did you label all the shims and where they were when you were removing them? I understand you have some new parts up front..
Also, do you have pics of a car that has never been apart so you know how thing look when they rolled out of the factory?Last edited by daveg; 05-07-2018 at 06:55 PM.
-
05-07-2018 #48Enthusiast
- Join Date
- Oct 2013
- Location
- New Braunfels, TX
- Posts
- 1,836
You can, and probably should, open up the slotted holes on the core support to the upper frame horns for more adjustability. You may need to add fender washers under the bolts. It appears the right side may need to move back a little more. You need to loosen the little flimsy angle bolts on the right wheel well frame and finesse the outer corner a little closer to the hood. Then, work the tubular bracket with the two nuts at the very outer corner above the side marker lamp.
-
05-08-2018 #49Enthusiast
- Join Date
- Oct 2013
- Location
- South of London, Surrey
- Posts
- 7,577
Here's another shot of what it was like before
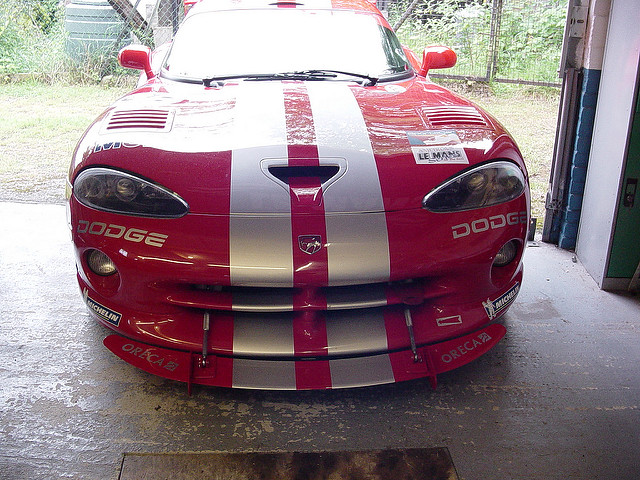
I labeled up everything as it came off the car.
Here is the reason I had to have a new front core support. The front end of my car aquaplaned as I exited a roundabout and drifted wide to the right no more than a couple of feet but that was enough for the front splitter to catch a kerb on the central divide, it snapped the rose joint on the splitter and then folded under the car, I was doing just under 30mph when this happened, (early morning and pouring with rain).
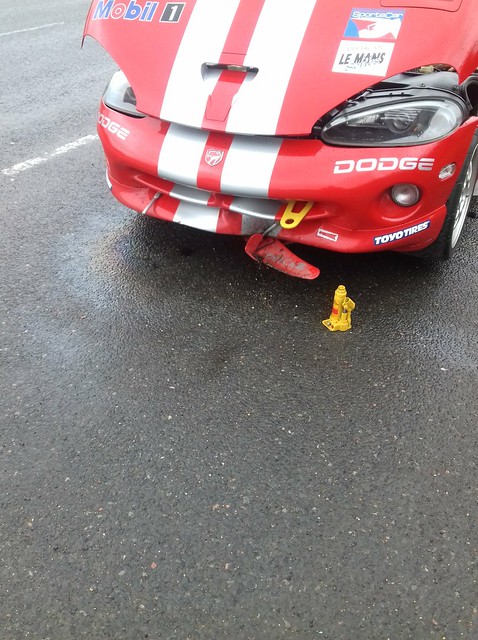
To say i'm upset is an understatement, but no one else was involved, I was only about a mile from the event having driven some 50 miles.
The front splitter arms tore through everything under the car moving the front core support backwards
Oil cooler FUBAR
Radiator FUBAR
AC Condenser radiator Suspect? Signs of leakage.
Core support smashed lower RHS.
My Pride Smashed too
Splitter
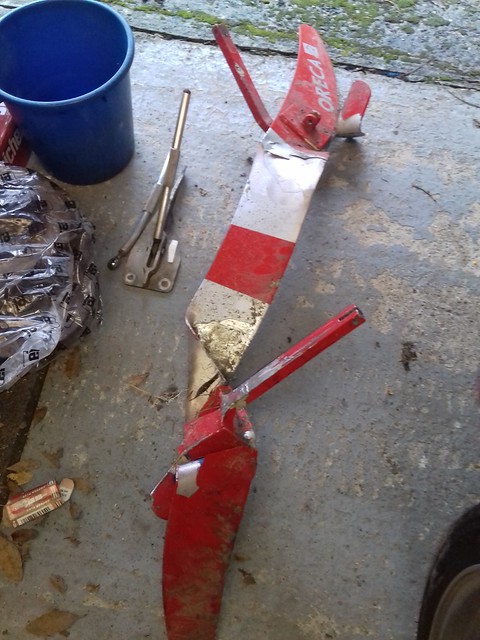
Core support
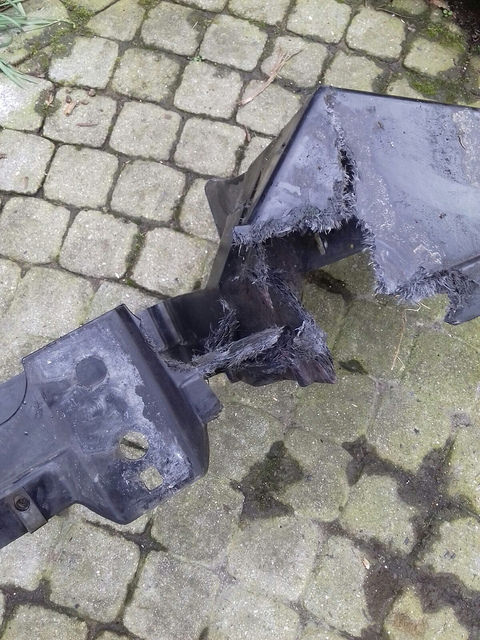

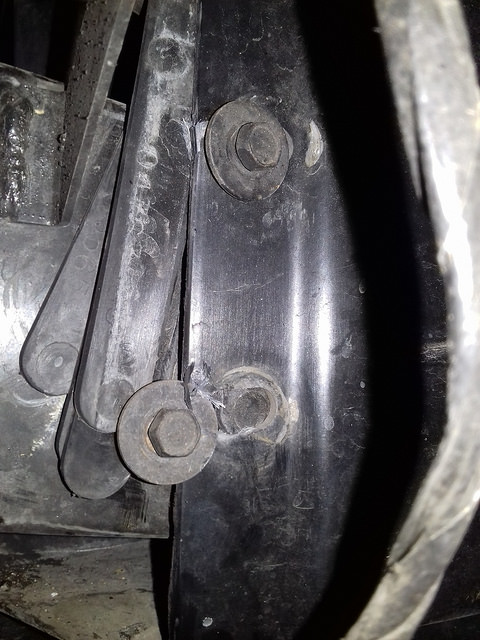
Bent core support brackets
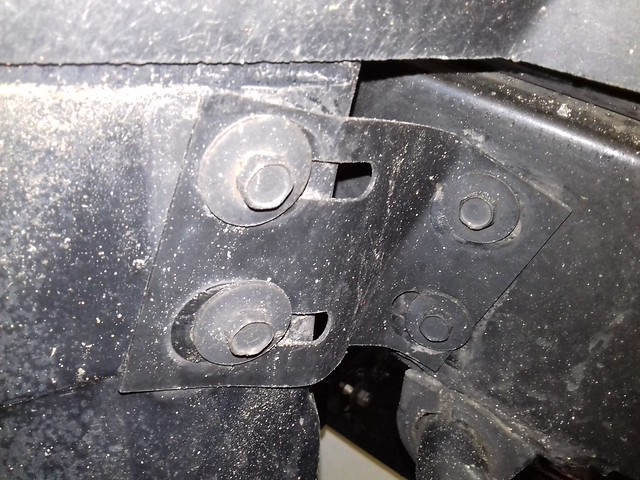
Looking at this photo note the rebar Upper chassis metal face plates have been bent back.
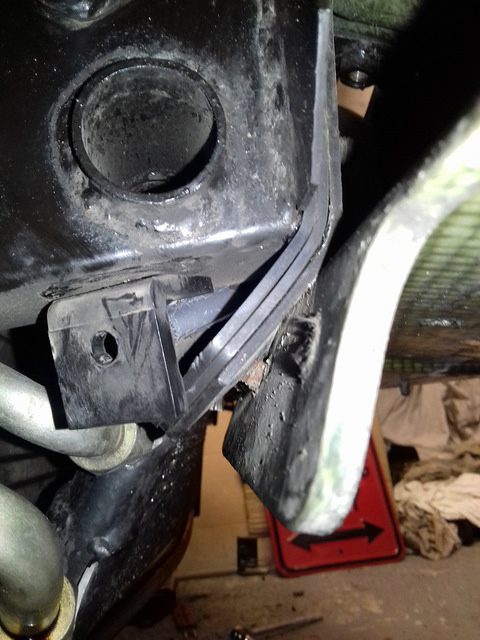
Side shot of core support slots LHS (You can see its torn the slots).
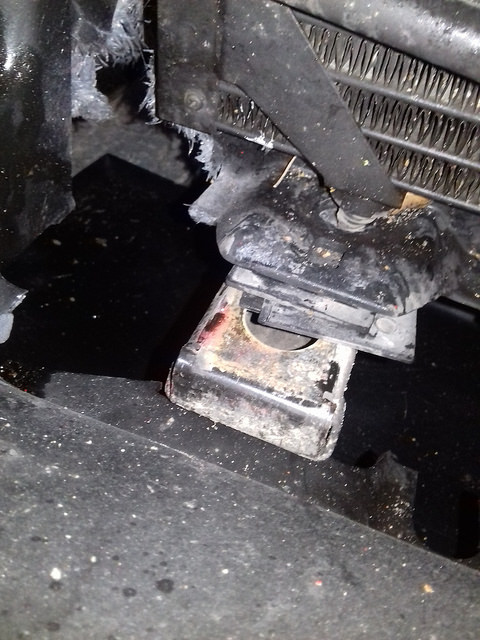
Lower core support pushed back Left and right side
Loads more pics here
https://www.flickr.com/photos/905823...57689432208630
-
05-08-2018 #50Enthusiast
- Join Date
- Oct 2013
- Location
- South of London, Surrey
- Posts
- 7,577
Yes to all above. Originally Posted by daveg

 Reply With Quote
Bookmarks