
Differential Case Drain Plug
Installation Instructions
Tools:
- Drill
- 1/4” drill bit
- 7/16” drill bit
- 1/4-18 NPT pipe thread tap
- 1/4-18 NPT thread plug gauge (not required)
- Black marker/pen/pencil
- Hammer
- Center punch
- Awl or similar tool
- Ratchet
- 3/8” hex bit (for the fill plug)
- 1/4” hex bit (for the drain plug)
- Drain pan
- FloTool Trans Fluid & Gear Oil On/Off Spout ($3.83, Wal-mart, part# 009821318106)
- Pipe cleaners
Parts:
- 1/4” Flush-Mount High-Pressure Steel Threaded Hex-Socket Plug, PTFE Coated, 1/4" Hex Key Size (can be found at McMaster-Carr - part# 4534K12)
- PTFE tape
- Mopar Synthetic Gear and Axle Lubricant SAE 75 W-140 (MS-8985, Mopar #04874469), 2 x 32 ozs (need 45 ozs)
- Mopar Limited Slip Additive (MS-10111, Mopar #4318060AB), 1 x 4 ozs
Remove the Differential Case Gear Oil
The gear oil will drain easier if it’s warm. Take the viper for a short/long drive.
Put the viper up on a lift or raise it on jack stands.
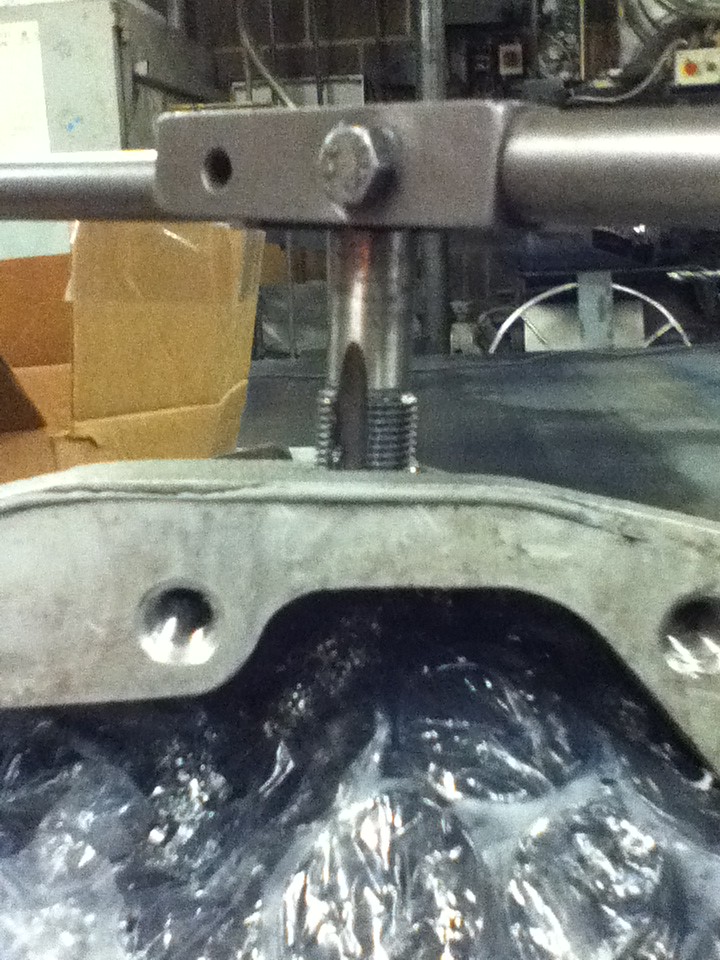
Mark the drill spot on the bottom of the differential case 1 1/2” from the rear seal and 1 7/8” from the step running front to back along the bottom of the case.
Use the hammer and center punch to start the hole.
Remove the differential case fill plug from the upper passenger side of the differential case using the ratchet and 3/8” hex bit.
Clean any residue from the fill plug and the fill plug hole.
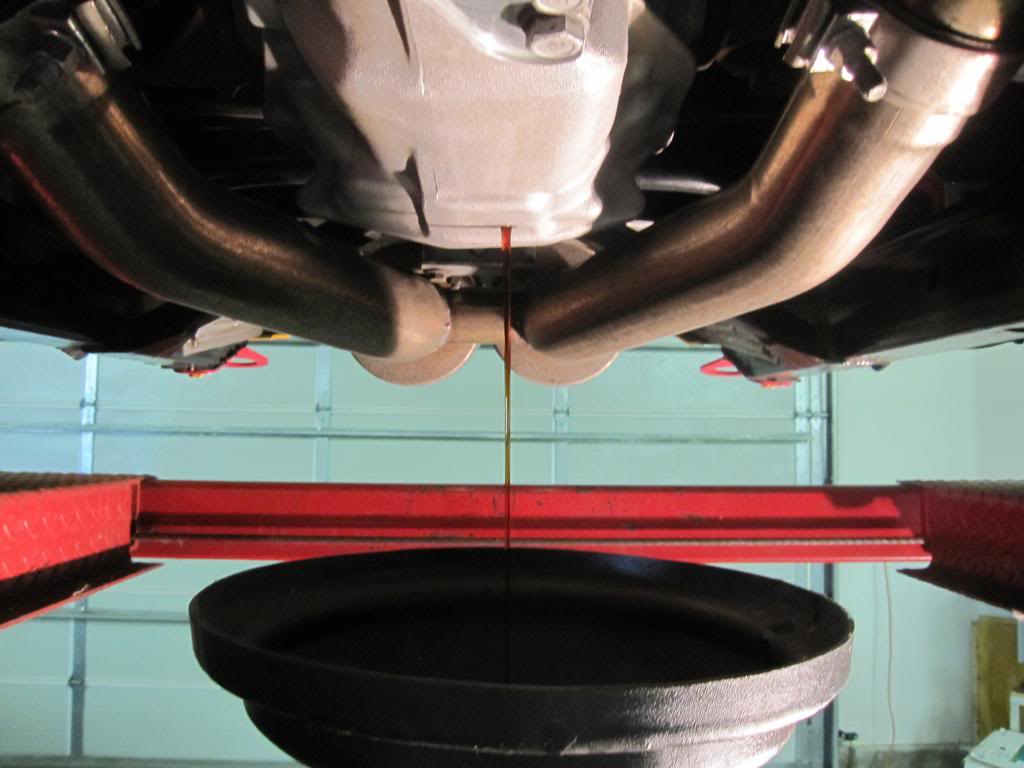
Place the drain pan under the differential case.
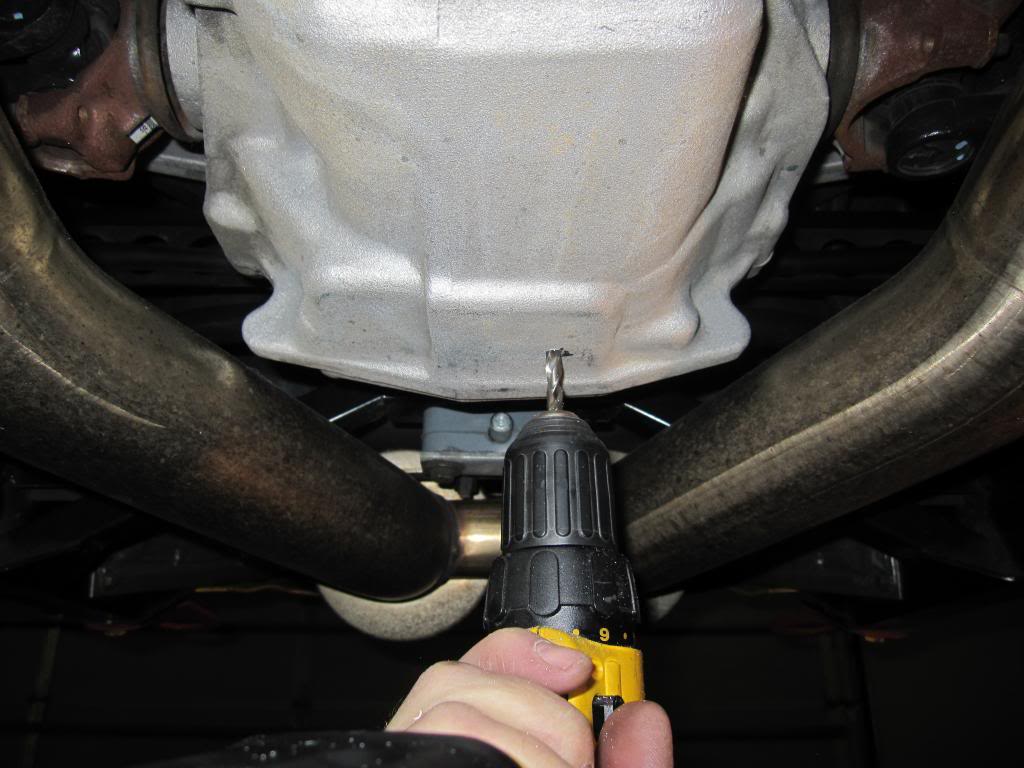
Drill a 1/4” hole at the marked spot. Be careful not to break through the differential case with too much force so as not to damage the internal gears. Try to get the drill and bit as perpendicular as possible.
Gear oil will begin to flow once you’ve broken through the case.
Quickly remove the drill/drill bit and allow the gear oil drain into the drain pan.
Clean the gear oil from the drill and bit.
Clean the Interior of the Differential Case
Once the gear oil stops dripping, clean as many aluminum chips out of the differential case as possible using the pipe cleaners.
Make a 3/4” L bend in the end of the pipe cleaner and insert that end through the drain hole into the differential case. You may want to double up the pipe cleaners to get a larger diameter.
Rotate the pipe cleaner trying to get the aluminum chips to catch on the end.
Remove the pipe cleaner and inspect for chips. Repeat with clean pipe cleaners until you stop finding chips.
Drill and Tap the Drain Hole

Increase the hole size by using the 7/16” bit.
Repeat the process of using pipe cleaners to remove any new aluminum chips.

Use the 1/4-18 NPT pipe thread tap to thread the hole.
Make only half turns to a turn at a time and back out the tap to remove the aluminum chips.
Clean the tap each time you reverse it out of the drain hole.
The drain plug should be installed flush to the bottom of the differential case, so don’t tap the threads too deep.
Use the thread plug gauge or the drain plug to determine how deep to tap.
Flush the Interior of the Differential Case
There are multiple things that can be done to make sure there are no more aluminum chips in the differential case.
I hooked up 1/4” clear tubing to a shop vac and ran it through the fill hole down to the newly drilled drain hole and moved it around to pick up any residual aluminum chips and gear oil.
Pour 16 ozs of the fresh gear oil into the case using the gear oil spout (remove the plug in the spout so that the fill end can be inserted into the fill hole) via the fill hole. Let it drain into a shop towel in the drain pan.
As the gear oil flows into the case, stop up the hole with your thumb (2 or 3 times) to let the gear oil slightly puddle in the bottom of the case and then let it continue to drain.
I decided that I was good to go once I didn’t find any aluminum chips in the towel.
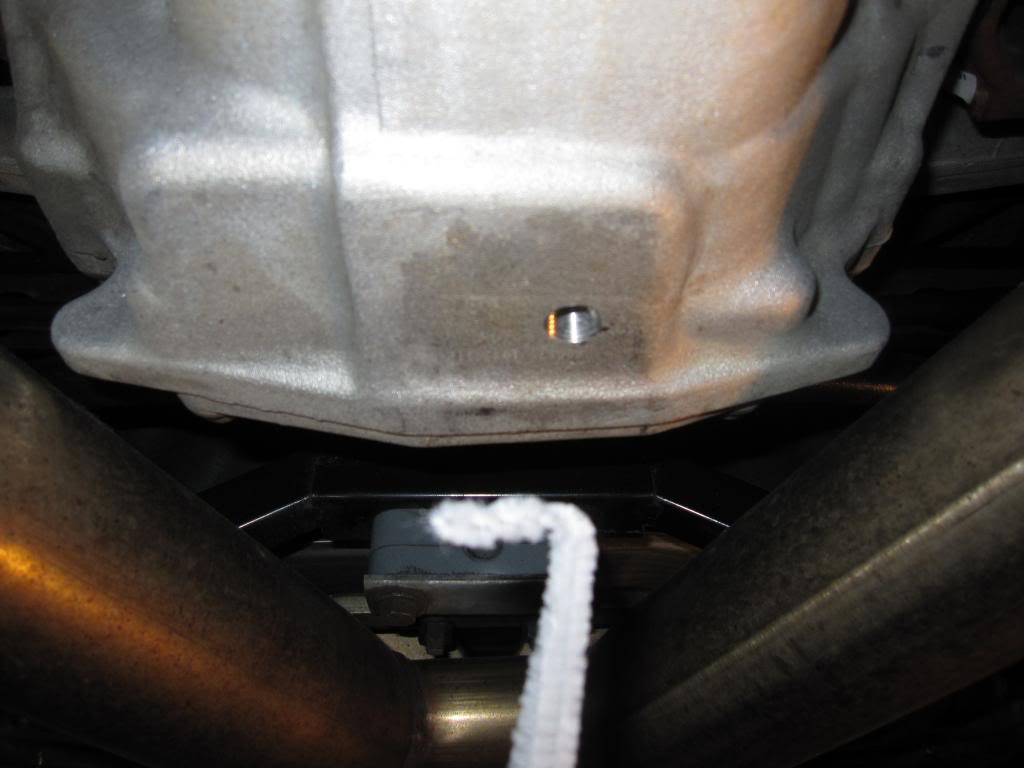
Install the Differential Case Plug
Wrap two layers of PTFE tape around the plug.
Use the 1/4” hex bit to screw the plug into the new threaded hole.
Tighten to approximately 160 in-lbs. The plug should be flush with the case.
Fill the Differential Case with New Fluid
Pour the Mopar Limited Slip Additive (4 ozs) into the Mopar Synthetic Gear and Axle Lubricant bottle that was depleted by 16 ozs during the flushing stage.
Use the gear oil spout to pour the mixture into the differential case using the fill hole on the upper passenger side.
Make sure the adjustable spout is closed and maneuver the bottle and spout into this position. Use an awl or similar tool to puncture a hole in the upper backend of the bottle while it’s in position so that the gear oil/additive will flow smoothly.
Open the adjustable spout and allow all the gear oil/additive to pass into the differential case. Massage the bottle to get as much of the gear oil/additive into the case.
Close the adjustable spout and remove the bottle/spout.
Attach the spout to the second bottle of gear oil and repeat the process used for the first bottle.
The case will be full when either the second bottle is emptied or gear oil starts flowing out of the fill hole.
Screw in the differential case fill plug using the ratchet and 3/8” hex bit. Tighten to approximately 30 ft-lbs.
Results 1 to 16 of 16
-
01-02-2014 #1Enthusiast


- Join Date
- Oct 2013
- Location
- Viper Drive, AZ
- Posts
- 793
GEN II Differential Case Drain Plug
Last edited by LifeIsGood; 01-02-2014 at 02:23 PM.
-
01-02-2014 #2Enthusiast
- Join Date
- Oct 2013
- Location
- Bremerton, Washington
- Posts
- 435
Thanks for an informative how to do it post. You did an excellent job with the illustrations and photos with a bunch of really nice tips and methods to keep metal out of the case. I may get ambitious and do that this winter.
-
01-02-2014 #3Enthusiast
- Join Date
- Oct 2013
- Location
- North Carolina
- Posts
- 1,235
Great write up -- Chilton's should have such good photos! Very clean and professional job.
-
03-03-2014 #4Enthusiast
- Join Date
- Oct 2013
- Location
- SW FL
- Posts
- 90
I highly recommend doing this. The previous owner did this for me and it made changing the fluid a quick job.
-
03-03-2014 #5Enthusiast
- Join Date
- Oct 2013
- Location
- Orlando
- Posts
- 2,541
I did this awhile ago. MUCH easier to change fluid
-
03-03-2014 #6Enthusiast

- Join Date
- Oct 2013
- Location
- CT
- Posts
- 2,733
Nice write up. I did this 6 years and it's a huge time saver when changing the diff fluid.
-
03-03-2014 #7Enthusiast
- Join Date
- Jan 2014
- Location
- Southwest FL
- Posts
- 665
You always do some great write ups! Thanks!
-
03-03-2014 #8Enthusiast
- Join Date
- Oct 2013
- Location
- South of London, Surrey
- Posts
- 7,577
Great write up (as usual) Ken.
I did mine a slightly different way as I had the diff out, Thought some people might want to see the hole from the inside

Here is the hole position on the underside of the diff.
With the diff cover removed you can see this is the lowest point of the diff

Another shot, you can see the new drain hole at the top of the picture

Hole tapped.

Drain plug fitted with fibre washer.
I use Amsoil Severe Gear oil in my diff
-
03-03-2014 #9Enthusiast
- Join Date
- Oct 2013
- Location
- Viper Drive, AZ
- Posts
- 793
Thanks for adding your pictures.
-
03-13-2018 #10Enthusiast
- Join Date
- Oct 2016
- Location
- Trois-Rivieres (QC)
- Posts
- 229
I wonder if the diff on a Gen I is the same.
-
03-13-2018 #11Enthusiast
- Join Date
- Nov 2013
- Location
- Rocky Mountains
- Posts
- 1,888
Gen I and II should pretty much be identical. This is on my list of “to dos” as well.
-
03-13-2018 #12Enthusiast
- Join Date
- Dec 2013
- Location
- Mass
- Posts
- 1,079
Very comprehensive write-up.
Takes the guess work out of doing it.
-
03-14-2018 #13Enthusiast
- Join Date
- Oct 2013
- Posts
- 209
Early Gen-1 had the drain plugs from factory. I think they stopped around 94. Originally Posted by MuRCieLaGo

Last edited by SHELBYVIPER; 03-14-2018 at 02:37 AM.
-
01-05-2020 #14Enthusiast
- Join Date
- Oct 2013
- Location
- Rockford
- Posts
- 488
What a great write up you have given us. Just did it and was very easy. I used a vacuum cleaner to clear chips between 1/2 turns of tapping. The next change will be so easy!
Last edited by sparkrn; 01-05-2020 at 03:27 PM.
-
01-06-2020 #15Enthusiast
- Join Date
- Apr 2014
- Posts
- 380
Agree.....excellent write-up. I just did this while my diff was out for a ring-gear swap and rebuild. Thank you LIG !
-
01-06-2020 #16Enthusiast
- Join Date
- Oct 2013
- Location
- Viper Drive, AZ
- Posts
- 793
I'm happy to help. I remember doing this in Mark Johnson's (IPSCO) shop. He has a lot of nice tools.


 Reply With Quote
Bookmarks