
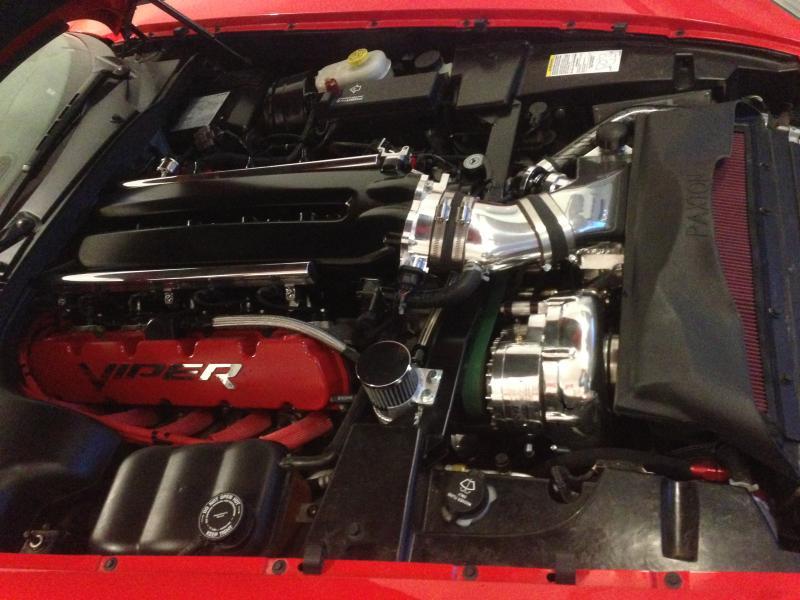
Just this time last winter i was installing a paxton on my stock motor, Paxton build link-
http://driveviper.com/forums/threads...axton-G3-Build
Which performed very well all summer with my mods trouble free, The car dynoed 692rwhp and was a blast to drive all summer, In the 1/4 mile my best et was a 11.2 at 128mph, living high up in canada and not a pro track by any means , makes alot less power than sea level, to give you an idea stock vipers run 12.6-13 seconds , Teds gen2 roe 650whp runs 11.7, vettes stock and zr1's run 12.9-13.5, stock gallardo runs 12.9, ferrrari 599 gtb runs 12.3, So my stock block with stock paxton 3.75" pulley that produced 8psi i think the car did very good at a 11.2 with a 1.85 60ft that easily could have been improved. To me it just doesn't make any sense to build the block for a paxton when i can build the block for TT's since i probably would be doing it down the road. So now that a few friends of mine have talked me into twin turbos and to change with the times, get rid of the dated so called supercharger as they say. Time to start another winter project, In this build I'm not looking for a 2-3 year build or project! Not interested in ridiculous man hrs and to be a one off build, My goal here is to enjoy the car drive it put miles on it and kick a lot of ass on the street. Im going for 1,000RWHP on the street and thats it (pump gas), The engine will be built for 1400+ but will be running it detuned vs running it at close to max, rather it over built than under built. Kevin at exotic engines sold me on his modified caps with engine GIRDLE is the key word here, with custom grind cam, head work, rods & pistons, ati damper,etc. The TT kit i talked with Will at rsi for few months over the summer and bought a 67/66 precision TT kit in fall, I was looking for a kit that i could do in my garage like the paxton and not turn my clean garage into a fab shop welding, cutting, grinding, and a stupid amount of man hrs. I was very happy with there fuel system last winter so was easy to get this kit for my TT build, I will run the 67/66 precisions this summer if they give me any oil issues i will replace them with the comps oilless turbos. Now that the paxton kits sold time for the winter wrenching to start in my garage again!
Paxton coming off
Jack stands and creeper coming out again my back loves them, gonna fix this issue soon,
ENGINE:
Forged Pistons & Rods
Dailey Engineering Oil Wet Sump
Modified Main Caps
Exotic Engines Engine Girdle
Exotic Engines Custom Grind Cam
Calvo Motorsports Head Work
Roe TB
ATI Damper
170 T-Stat
Exotic Engines Breather System With Oil Catch Can
New Spark Plug Wires With Plug Boots
Screamin Demon Coils
TWIN TURBO SYSTEM:
67/66 Precision Turbos
Comp Oilless BB Turbos (On The Shelf)
Tial Q-BOV'S
Precision Wastegates - 46mm
RSI Stage 3 Air-To-Air Intercooler
RSI All Hard Pipe Kit Stage 3:
Cold Side Pipes Powder Coated Black
Hott Side Pipes Ceramic Coated Black
FUEL SYSTEM:
RSI Triple Hanger
-8 Feed
-6 Return
Aeromotive Fuel Regulator
2- Walbro 450's
100lb Injectors
RSI Fuel Rails
DRIVETRAIN:
Trans TR6060
NTH MOTO Triple Carbon Clutch (1500+ Ftlbs Torq Rating)(UPDATE: Stock pedal feel, No chatter, Most would think its a factory clutch )
Spec 3+ Clutch (Fired POS)
Steel Flywheel (Out)
Fidenza Flywheel (Fired POS)
Polyurethane Engine and Transmission Mounts From Woodhouse
Gen 4 Differential
Knuckle Support Braces
Hurst Line Lock
EXHAUST:
3" With Magnaflow Muffler
ENGINE MANAGEMENT SYSTEM:
JOHN REED JRR Viper Motec M150 Custom Firmware Package
TIRES/WHEELS:
Street Vellano 19/20 on Nitto Invos
Track Stock Front Wheels On Nitto NT01
Track Rears CCW 18" Wheels On 345/35/18 Mickey Thompsons
Forgestar F14 18" Wheels With Mickeys For Street Full-time
30" Radial Slick For Drag Strip Days
Results 1 to 25 of 90
Thread: PaulP's G3 Twin Turbo Build
-
12-24-2015 #1Enthusiast


- Join Date
- Feb 2014
- Posts
- 404
PaulP's G3 Twin Turbo Build
Last edited by PaulP; 06-05-2020 at 02:17 PM.
-
12-24-2015 #2Enthusiast
- Join Date
- Feb 2014
- Posts
- 404
Paxton off,

Engine prepped ready to come out, trans out, had to bear hug it on my creeper and roll out with it, i need a hoist!

Engine out,

Last edited by PaulP; 01-07-2016 at 03:05 PM.
-
12-24-2015 #3Enthusiast
- Join Date
- Feb 2014
- Posts
- 404
A lot of wrenching to get to this point,

Engine strapped to a pallet ready to go 1800 miles away to Exotic Engines performance

Here is a pic from Kevin

Last edited by PaulP; 06-05-2020 at 02:19 PM.
-
12-24-2015 #4Enthusiast
- Join Date
- Apr 2015
- Location
- Port Charlotte, Fl.
- Posts
- 292
Very cool!! I'll be following your build. Your car looks just like mine....never seen another one with the wheels done like mine. Been debating just building mine instead of trading up to a GenV.
-
12-26-2015 #5Enthusiast
- Join Date
- Feb 2014
- Posts
- 404
repiV, The gen V would put me well over a 100k buying one and modding it be close to 150k plus, The gen 3 i think is the best platform to start and finish with for me. I did this summer consider trading and test drove a gen v but going back to my paxton boosted gen 3 i didn't want to go down in power. So i say Repiv mod yours
 ! Here is a pic of the car this summer on its drag setup trying to pull the front end up cutting a 1.6 60ft.

Here is me and a good friend Joel Fortin (helped me pull the motor) in his dads blue gen 4 playing around.

Last edited by PaulP; 01-07-2016 at 03:12 PM.
-
12-27-2015 #6Enthusiast
- Join Date
- Oct 2015
- Location
- Austin,TX
- Posts
- 127
Sounds like a super fun build. You will deff love the new found power!!!!
-
12-27-2015 #7Enthusiast
- Join Date
- Oct 2015
- Posts
- 404
You will love it Paul!!
-
12-27-2015 #8Enthusiast
- Join Date
- Oct 2014
- Location
- Alberta , Canada
- Posts
- 78
What are you doing with your paxton ? if your selling, please let me know.
-
12-28-2015 #9Enthusiast
- Join Date
- Feb 2014
- Posts
- 404
Thanks Mike can't wait for 1,000whp, Going to hurt a lot of feelings on the street! Originally Posted by mike@calvomotorsports

Thanks Antonio nice to follow your guys Gen V twin turbo build nice work! Originally Posted by Antonio@CalvoMotorsports
Boosted I sold my paxton kit but i know where there is one pm me, Originally Posted by BOOSTED
-
01-01-2016 #10Enthusiast
- Join Date
- Feb 2014
- Posts
- 404
Since i have some down time over the holidays and waiting on parts, Perfect time to install a hoist to save my back and from crawling around on the floor. I went with the dannmar commander 7000X. The hoist was a simpler installation than i thought, The only difficult part was needing a few guys to move the ramps around or raising them. I have an reverse L shape garage, with double car in front of the house and a single car garage door into the backyard. When building the house i planned on putting the hoist here with a lift master #8500 side mount garage door motors for no overhead obstructions. Can control the garage doors from your phone and be notified when they open or close from there app trick setup. Here are a couple pics.


Last edited by PaulP; 01-07-2016 at 03:14 PM.
-
01-03-2016 #11Enthusiast
- Join Date
- Feb 2014
- Posts
- 404
I installed a aluminum fidenza flywheel in the summer close too the end of the season, i had the stock luk clutch in the car with the paxton and stock steel flywheel both preformed perfect, no slipping, great drivability around town, hit hard at the drag strip. I had the fidenza aluminum flywheel on the shelf and a spec 3+ clutch, so i thought why not throw them in and try it out. I keep hearing guys saying the aluminum is lighter, spools the rpms up quicker for gains, less rotating mass etc. I installed the spec and fidenza broke the clutch in 400 miles around town driving, First thing i noticed was how terrible the drivability around town was, the car wants to stall and had to be revved up quite a bit just to get going. Banging the gears i noticed very minor rpm spooling up quicker with the less inertia. I did notice that every time i was shifting that the rpms would fall off quicker. So i thought its all in my head has to be a win win, took the car to the drag strip to test it out to compare the weekends time slip before to the new setup, Results 60ft went down, the ET never changed, MPH was the same. The reason the 60ft went down is very hard to launch and be consistent with the aluminum. The energy that the steel flywheel holds vs an aluminum is well worth it imo. The aluminum flywheels are great for the four cylinder, six cylinder guys that need the help. For us v10 guys and all the low end torq we make there useless IMO, If your worried about weight get a lightened steel flywheel. Aluminum flywheel wheel fired waste of 700 bucks plus had to buy a new disc for the spec clutch, stock steel will be mated up to it and balanced and going back in. Here is a pic showing the aluminum fidenza disc replacement screws, grabbing and holding material from the spec disc bunching up and gouging the spec disc.

Last edited by PaulP; 01-07-2016 at 03:15 PM.
-
01-08-2016 #12Enthusiast
- Join Date
- Feb 2014
- Posts
- 404
Precision Turbo 67/66's T3 V-Band .82 A/R For Quick Spooling

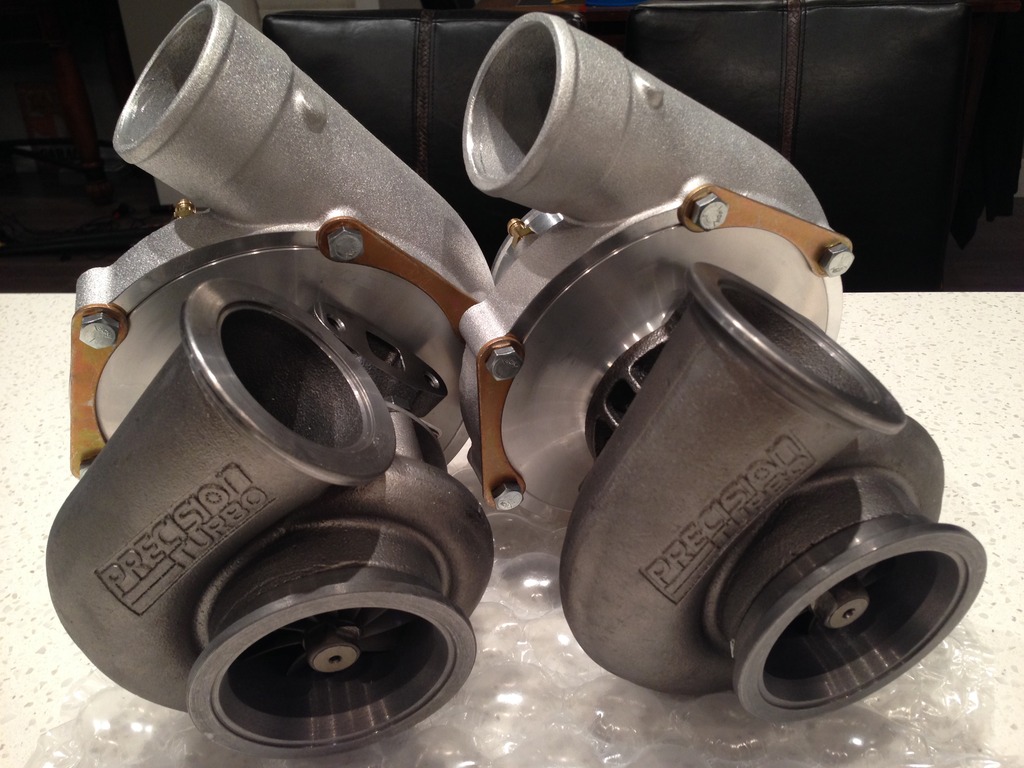
Tial Q-BOV'S

Precision Wastegates - 46mm

-
01-08-2016 #13Enthusiast
- Join Date
- Apr 2015
- Location
- Port Charlotte, Fl.
- Posts
- 292
WOW!! Looks like some good stuff!! The garage and the lift look really nice too. I need to build more garage space and add a lift some day. I really like reading build threads and seeing what everybody is doing to their cars. I'm anxious to see your final results.
-
01-08-2016 #14Enthusiast
- Join Date
- Mar 2014
- Posts
- 400
Very Cool!! Keep posting progress as you go. Car should be a BEAST when all is said and done
-
01-09-2016 #15Enthusiast
- Join Date
- Feb 2014
- Posts
- 404
Thanks repiV, Cant wait for it to hit the streets this spring! Originally Posted by repiV
Thanks Ripper, She made almost 700whp last year should be 1000whp this spring. Originally Posted by Ripper
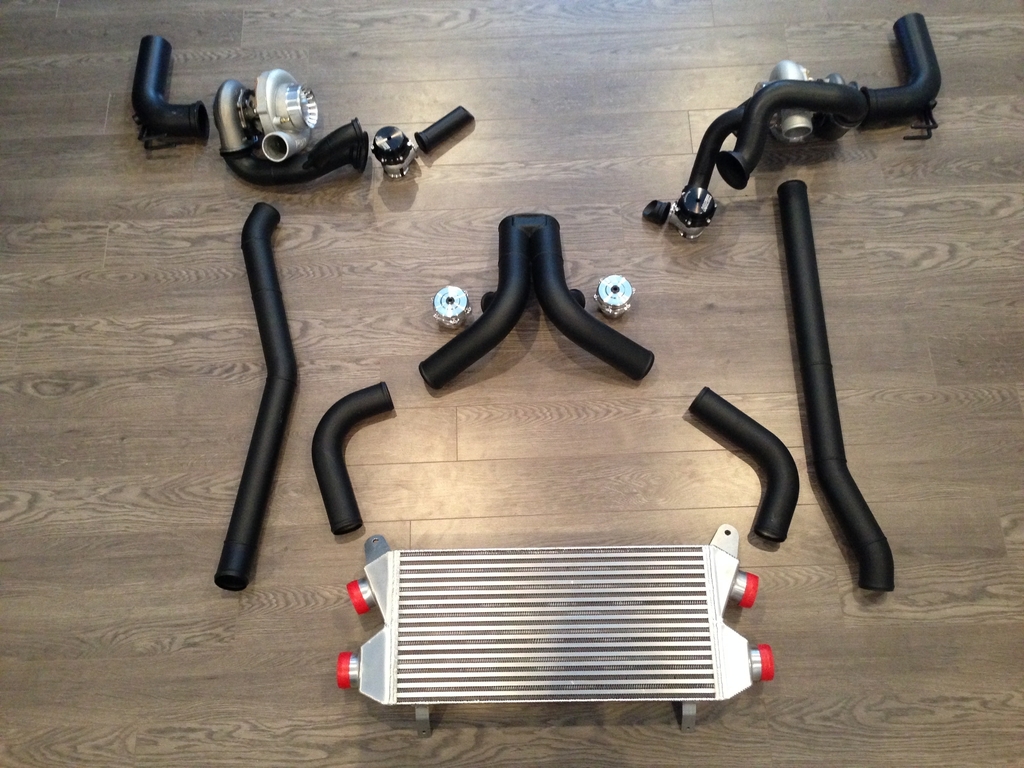
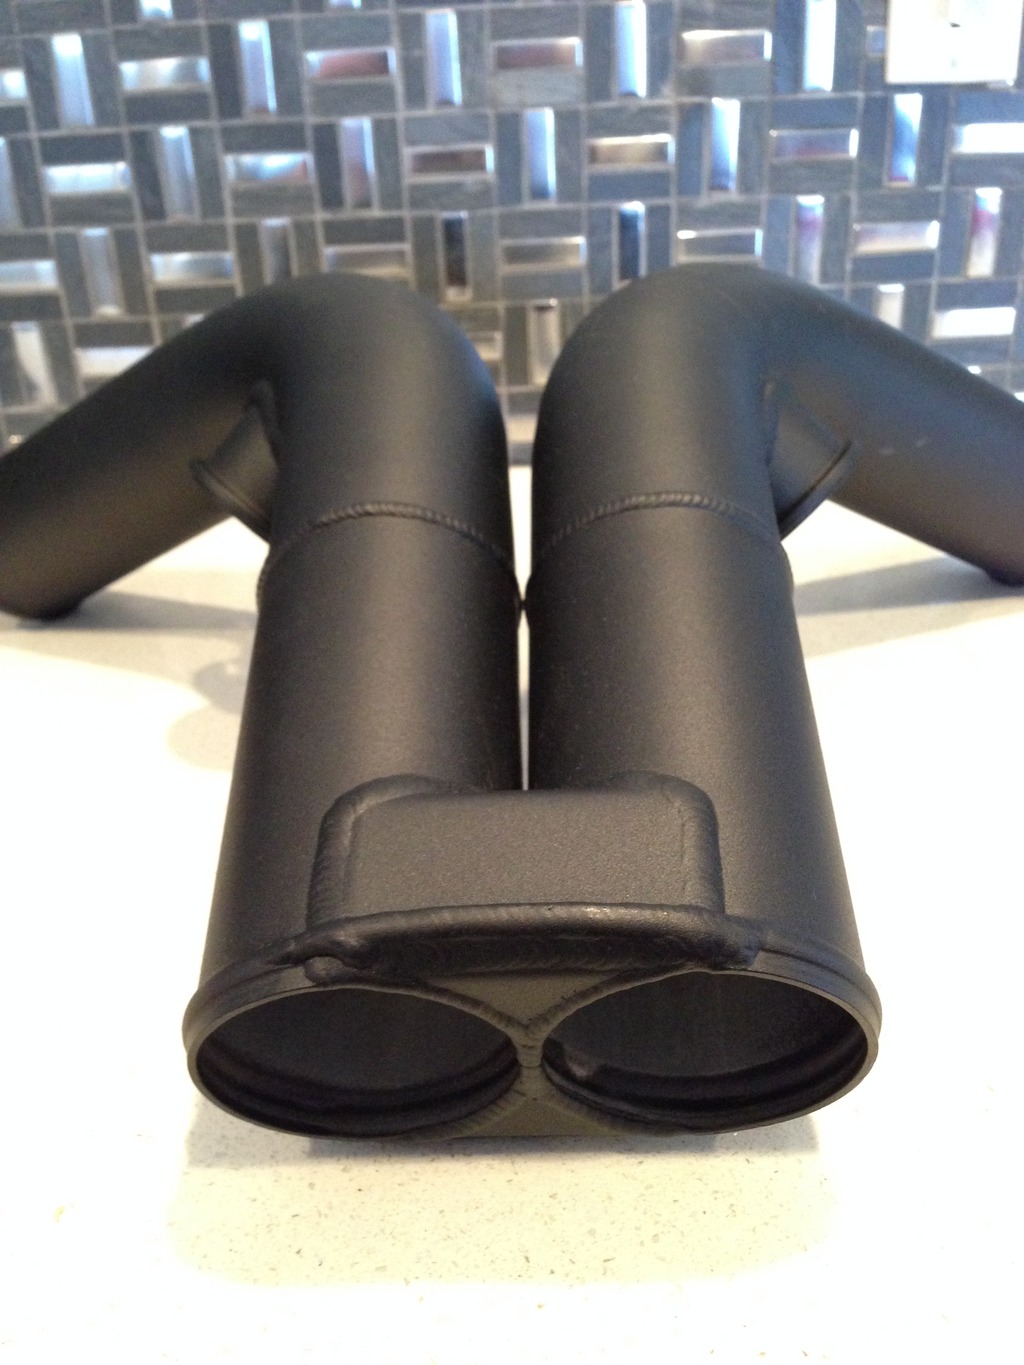
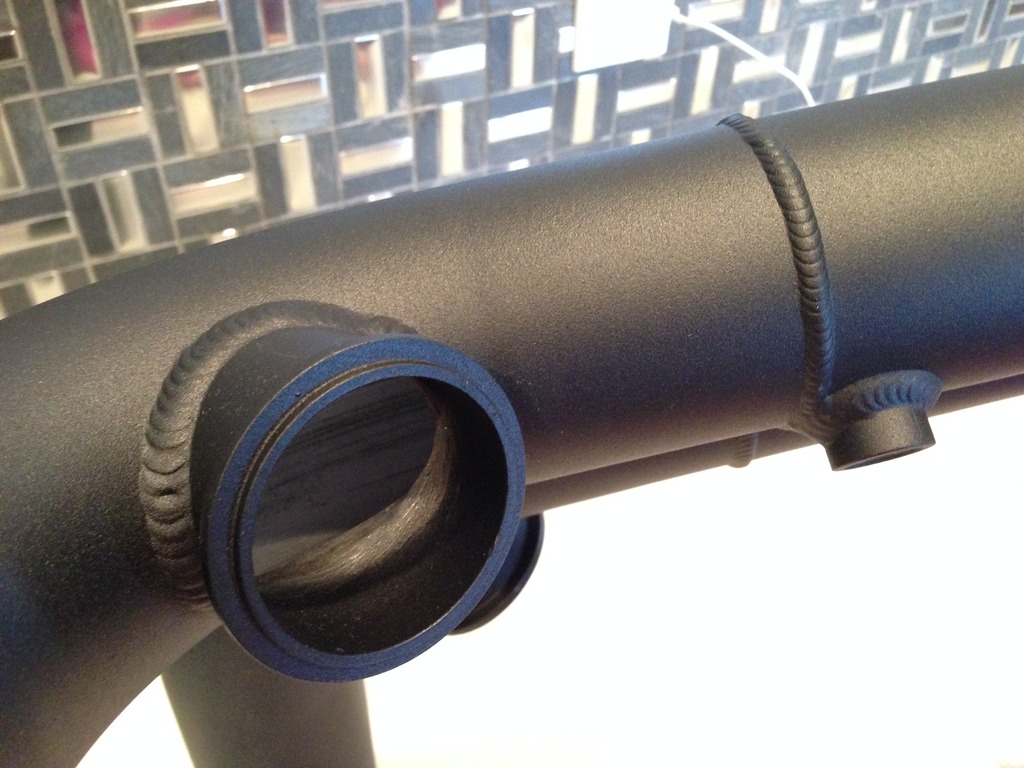
Been busy with work not much wrenching going on, pulled the radiator and reservoir tank, Had them flushed and tested since the block is getting a full cleaning making sure everything is clean. Here are a few pics of the TT kit. The fit and finish is perfect really happy with it. All the welds and ceramic coating on the hot side and powder coating on the cold side looks great. They even ground down and smoothed the welds and edges inside the intake pipe so everything flows smooth. Here is a rough mock up,
-
01-09-2016 #16Enthusiast
- Join Date
- Feb 2014
- Posts
- 404


-
01-09-2016 #17Enthusiast
- Join Date
- Oct 2013
- Location
- Ontario,MCVO,PA,OH
- Posts
- 2,671
Nice work and post ! You make a good point on modding a Gen 3 vs Gen 5 . Look forward to seeing your end result !
-
01-11-2016 #18Enthusiast
- Join Date
- Sep 2015
- Posts
- 523
Nice build, great to see a fellow viper owner doing his own work
-
01-21-2016 #19Enthusiast
- Join Date
- Dec 2015
- Posts
- 42
Sub'd for the greatness to ensue.
-
01-24-2016 #20Enthusiast
- Join Date
- Feb 2014
- Posts
- 404
Thanks J TNT! Originally Posted by J TNT
Thank you ACR! I have definitely been keeping busy with this car lots of progress since i have owned it in 24 months exactly this month. Originally Posted by ACR
Thanks Kaine. Originally Posted by Kainedogg
Did some work over the weekend, Making room for the turbos. Cut the exhaust shields off, ground the welds down and painted up the exposed areas. Drilled some holes in frame for the oil lines to pass threw as well. Couple pics,


-
03-06-2016 #21Enthusiast
- Join Date
- Feb 2014
- Posts
- 404
Using the factory headers since there bolt on with the kit and mild steel, Took off the factory heat shields and found that both where cracked in the same spots,

Welded up the cracks,

Then sanded them down and coated them with VHT header paint, The header paint should keep them from rusting under the header wrap,

Wrapped headers in DEI titanium wrap, Will put on the factory heat shields as well when install time comes, should help control the heat really well with both the shields and wrap.

Last edited by PaulP; 03-07-2016 at 01:53 AM.
-
03-19-2016 #22Enthusiast
- Join Date
- Feb 2014
- Posts
- 404
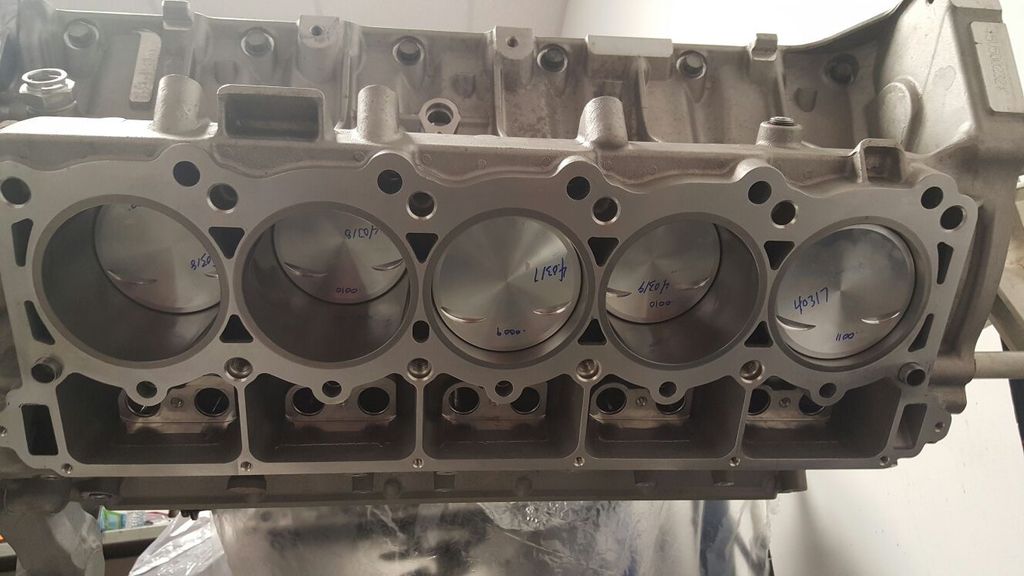
Kevin sent me some pics of the engine getting disassembled, cleaned, then waiting to get squared and decked.
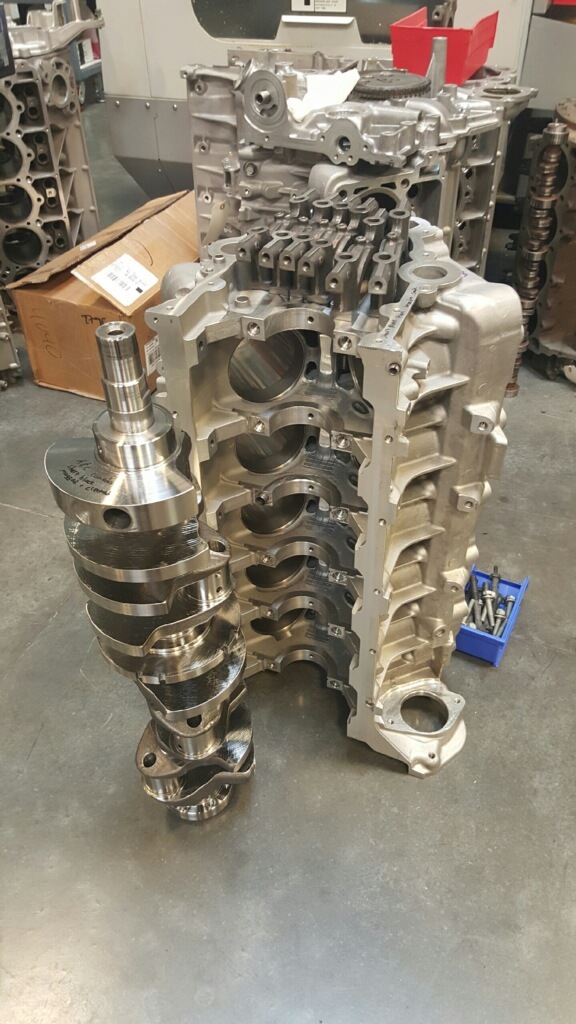
Now engines been machined, fitted with the engine girdle, many oiling mods been completed, line boring stage.

Last edited by PaulP; 06-05-2020 at 02:20 PM.
-
04-03-2016 #23Enthusiast
- Join Date
- Feb 2014
- Posts
- 404
Hurst line lock installed

Switch on the right is the arm switch, Then the middle switch is the momentary button all hidden, when done the burnout close the centre console lid.

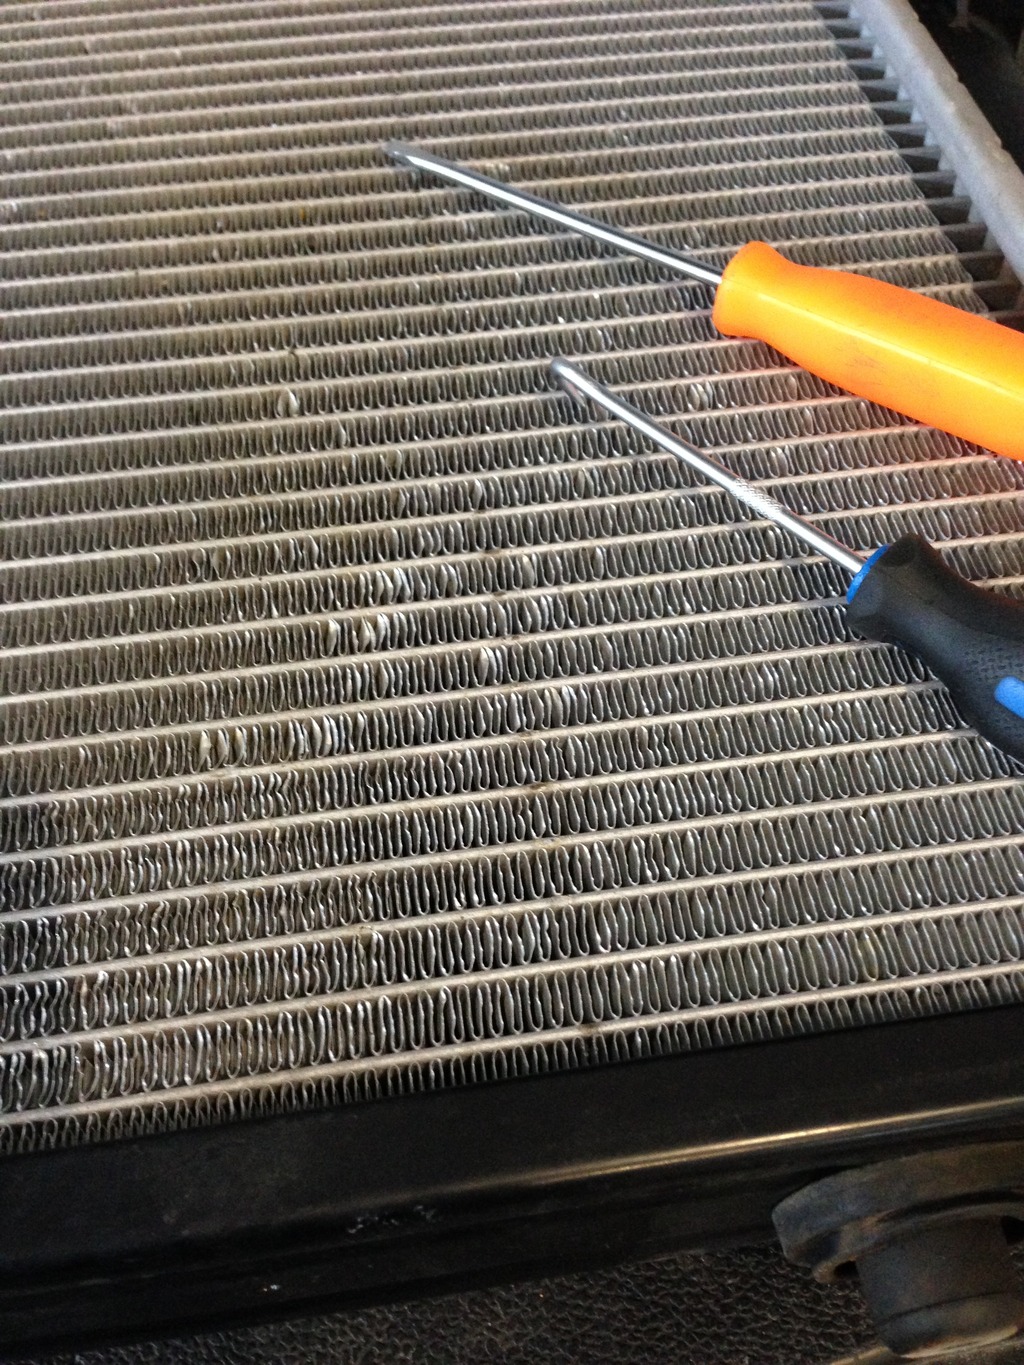
Pulled the rad and reservoir tank, had them both flushed,

Straightened a few fins at the same time and reinstalled it.
Last edited by PaulP; 04-14-2016 at 02:52 AM.
-
04-14-2016 #24Enthusiast
- Join Date
- Feb 2014
- Posts
- 404
Kevin sent me a few pics today of the heads, We at first where going to leave them alone this year, But decided too clean them and refreshen everything up, New valve guides, seals, springs , titainum crower retainers.


Last edited by PaulP; 06-05-2020 at 02:21 PM.
-
04-23-2016 #25Enthusiast
- Join Date
- Feb 2014
- Posts
- 404
Got some more pics from Kevin, Engine is built and ready to ship waiting for custom cam to be finished.
Great pic of the engine girdle!


Last edited by PaulP; 06-05-2020 at 02:21 PM.


 Reply With Quote
Bookmarks